43
16 17
(*)
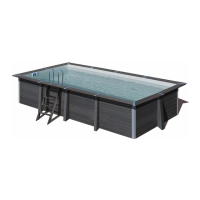
PLACEMENT OF THE SLEEVE ( LINER ) -
If your pool includes the LED light, check the assembly manual before installing the liner.
- Remove the sleeve from the box with great care. Stretch and extend it in the shade so that it recovers its shape. Perform this step at least two hours before its placement. The ideal temperature
for mounting the sleeve is 25 - 30°C.
-Do not use sharp objects they could prick the sleeve. The warranty does not cover punctures due to poor handling. Take o your shoes.
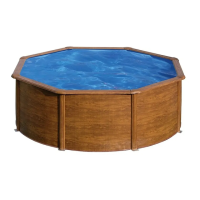
- Extend the cover, pulling it to the corners of the swimming pool. It is very important to take this step seriously, since the nal aesthetic of your pool will depend on proper placement of the
sleeve.
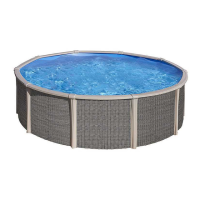
-Insert the sleeve in the attachment slot. If at some point during completion of this operation an excess of sheath is observed on the wall, spread the excess out evenly around the perimeter
of the pool. This will prevent wrinkles.
-Once in place, ll the pool with 2 - 3 cm of water and extend the sleeve wrinkles well. If folds remain in the bottom is not a reason to replace the sleeve with another, as it is not a manufacturing
defect. Take your time.
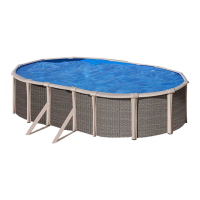
- Very Important: ( * ) Locate the serial number on the upper part of the wall of the sleeve, near the weld that joins the side.
Write it down in the instruction sheet box for potential claims.
MONTAŻ WKŁADU BASENOWEGO (LINERA) -
Jeśli Twój basen wyposażony jest w oświetlenie LED, sprawdź instrukcję montażu przed zainstalowaniem linera.
- Wyjmij wkład basenowy z opakowania z zachowaniem szczególnej ostrożności. Rozwiń go całkowicie w cieniu, aby odzyskał swój kształt. Wykonaj tę czynność co najmniej dwie godziny przed
jego montażem w basenie. Idealna temperatura do montażu wkładu basenowego to 25 - 30 °C.
-Nie używaj ostrych narzędzi, które mogą przebić wkład. Gwarancja nie obejmuje szkód spowodowanych przebiciem w wyniku niewłaściwej obsługi. Zdejmij buty.
- Rozłóż liner, rozciągając go do rogów basenu. Bardzo ważne jest poważne potraktowanie tego kroku, gdyż od prawidłowego ułożenia wkładu będzie zależał ostateczny wygląd basenu.
-Włóż wkład w szczelinę mocującą. Jeśli podczas wykonywania tej czynności na ścianie pojawi się nadmiar linera, należy równomiernie go rozłożyć na obwodzie basenu. Zapobiegnie marsz-
czeniu się wkładu.
-Po założeniu, napełnij basen wodą na 2-3 cm i dobrze rozciągnij pomarszczony liner. Jeśli fałdy znajdują się na dnie, nie jest to powodem do wymiany wkładu na inny, ponieważ nie jest to
wada fabryczna. Nie spiesz się.
- Bardzo ważne: ( * ) Znajdź numer seryjny znajdujący się w górnej części ściany wkładu, w miejscu połączenia boków.
Zapisz go na pudełku z instrukcją obsługi na wypadek ewentualnych reklamacji.
PLACEMENT OF THE SLEEVE ( LINER ) -
If your pool includes the LED light, check the assembly manual before installing the liner.
- Remove the sleeve from the box with great care. Stretch and extend it in the shade so that it recovers its shape. Perform this step at least two hours before its placement. The ideal temperature
for mounting the sleeve is 25 - 30°C.
-Do not use sharp objects they could prick the sleeve. The warranty does not cover punctures due to poor handling. Take o your shoes.
- Extend the cover, pulling it to the corners of the swimming pool. It is very important to take this step seriously, since the nal aesthetic of your pool will depend on proper placement of the
sleeve.
-Insert the sleeve in the attachment slot. If at some point during completion of this operation an excess of sheath is observed on the wall, spread the excess out evenly around the perimeter
of the pool. This will prevent wrinkles.
-Once in place, ll the pool with 2 - 3 cm of water and extend the sleeve wrinkles well. If folds remain in the bottom is not a reason to replace the sleeve with another, as it is not a manufacturing
defect. Take your time.
- Very Important: ( * ) Locate the serial number on the upper part of the wall of the sleeve, near the weld that joins the side.
Write it down in the instruction sheet box for potential claims.
AȘEZAREA MÂNECII (LINER) -
Dacă piscina dvs. include lumină LED, vericai manualul de asamblare înainte de a instala căptușeala.
- Scoatei manșonul din cutie cu mare grijă. Întindei-l și extindei-l la umbră, astfel încât să-și recapete forma. Efectuai acest pas cu cel puin două ore înainte de plasarea acestuia. Tempera-
tura ideală pentru montarea manșonului este de 25 - 30 ° C.
-Nu folosii obiecte ascuite, deoarece ar putea înepa mâneca. Garania nu acoperă punciile din cauza manipulării slabe. Descală-te.
- Extindei capacul, trăgându-l în colurile piscinei. Este foarte important să luai acest pas în serios, deoarece estetica nală a piscinei dvs. va depinde de amplasarea corectă a mânecii.
-Introducei manșonul în fanta de xare. Dacă la un moment dat în timpul nalizării acestei operaii se observă un exces de teacă pe perete, răspândii excesul uniform în jurul perimetrului
bazinului. Acest lucru va preveni ridurile.
-O dată pe loc, umplei piscina cu 2 - 3 cm de apă și extindei bine ridurile mânecii. Dacă pliurile rămân în partea de jos nu este un motiv pentru a înlocui manșonul cu altul, deoarece nu este
un defect de fabricaie. Nu vă grăbii.
- Foarte important: (*) Localizai numărul de serie pe partea superioară a peretelui manșonului, în apropierea sudurii care se unește lateral.
Scriei-l în caseta cu foaia de instruciuni pentru eventualele daune.
SLEEVE (LINER) PLACERING - Om din pool innehåller LED-lampan, kontrollera monteringsanvisningen innan du installerar linern.
- Ta bort hylsan ur lådan med stor försiktighet. Sträck ut och sträck ut den i skuggan så att den återfår sin form. Utför detta steg minst två timmar innan det placeras. Den perfekta temperaturen
för montering av hylsan är 20 - 25 ° C.
-Använd inte vassa föremål, de kan sticka hylsan. Garantin täcker inte punkteringar på grund av dålig hantering. Ta av dina skor.
- Dra ut locket och dra det till poolens hörn. Det är mycket viktigt att ta detta steg på allvar, eftersom den slutliga estetiken i din pool beror på korrekt placering av hylsan.
-För in hylsan i fästet. Om det vid något tillfälle under genomförandet av denna operation observeras ett överskott av mantel på väggen, ska du sprida överskottet jämnt runt poolens omkrets.
Detta förhindrar rynkor.
Fyll poolen med 2-3 cm vatten när du väl är på plats och förläng rynkorna väl. Om vikningar förblir i botten är det inte en anledning att byta ut hylsan mot en annan, eftersom det inte är
tillverkningsfel. Ta din tid.
- Väldigt viktigt: (*) Leta upp serienumret på den övre delen av hylsans vägg, nära svetsen som förenar sidan. Skriv ner det i instruktionsbladet för potentiella anspråk.
PL
EN
CS
SK
RO
SV
 Loading...