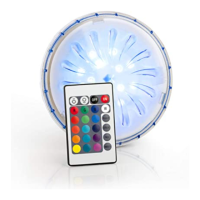
MAGNETIC UNDERWATER LED LIGHTED POOL LIGHT FOR ABOVE GROUND POOLS
PROYECTOR LED PARA PISCINAS ELEVADAS PIEZAS MAGNÉTICAS SUBMARINAS
PROJECTEUR LED DE COULEUR POUR PISCINE HORS SOL
FARB-LED-PROJEKTOR FÜR AUFSTELLBARE SCHWIMMBECKEN
FARETTO LED MULTICOLOR PER PISCINA FUORI TERRA CON MAGNETI
GEKLEURD LED-PROJECTOREN VOOR EEN VERHOOGD ZWEMBAD
FOCO LED PARA PISCINAS ELEVADAS PEÇAS MAGNÉTICAS SUBMARINAS
Pool light is specially designed for above ground (vinyl and steel walled) pools. It uses an internal magnet to ax the light to the inside of the pool wall.
Easy to install and remove.
Este conjunto de proyectores LED está especialmente diseñado para piscinas elevadas (vinilo o pared de acero). Utiliza un imán interno para jar la luz en
el interior de la pared de la piscina. Sin instalación, fácil de colocar y quitar.
Cet ensemble de projecteurs DEL est spécialement conçu pour des piscines hors-sol (à parois en vinyle ou en acier). Grâce à un aimant interne, le
projecteur est xé à l'intérieur de la paroi de la piscine. Facile à installer et à enlever.
Pool light wurde speziell für (vinyl- und stahlwandige) Außenpools entworfen.
Einfach zu installieren und zu entnehmen.
Questo gruppo di proiettori LED è appositamente studiato per piscine fuori terra (in vinile o con pareti in acciaio). Utilizza un magnete interno per ssare la
luce all'interno della parete della piscina. Non necessità di particolari procedure di installazione, facile da posizionare e da rimuovere.
Pool Light is speciaal ontworpen voor vrijstaande zwembaden (met vinyl of metalen wanden). Er wordt gebruik gemaakt van een interne magneet om
de lamp aan de binnenkant van de zwembadwand vast te zetten. Eenvoudig te installeren en verwijderen.
Este conjunto de focos LED foi especialmente concebido para piscinas elevadas (de vinilo ou parede de aço). O conjunto utiliza um imã interno para xar
a luz no interior da parede da piscina. Não requer instalação, fácil de aplicar e de retirar.
1. ABRIR
Agarre rmemente la cubierta transparente superior, presione y gire en el sentido contrario
de las agujas del reloj para abrirla.
1. OPEN
Grip rmly and use pressure and turn the top clear cover counter clockwise to open.
1. OUVERTURE
Tenez la lampe fermement et appliquez une pression sur le capot supérieur, tournez-le dans le
sens inverse des aiguilles d'une montre pour l'ouvrir.
1. ÖFFNEN
Nehmen Sie es fest in die Hand und drehen Sie drückend den oberen, transparenten Deckel
gegen den Uhrzeigersinn, zum Önen.
1. APRIRE
Impugnare saldamente e premere, ruotando verso sinistra, la copertura superiore trasparente.
1. OPENEN
Stevig beetpakken en de transparante bovendeksel krachtig tegen de klok in draaien om te openen.
1. ABRIR
Sujeitar com rmeza e pressionar para girar a cobertura transparente superior para a esquerda.
2 .Levante la tapa de las pilas de la pestaña para abrirla fácilmente. Inserte 3 pilas
AA (no incluidas). No mezcle pilas viejas y nuevas, no mezcle pilas alcalinas,
estándar o recargables.
2. Take the tap of battery cover to open easily. Insert 3 AA batteries (not included)
Do not mix old and new batteries, do not mix alkaline, standard or rechargeable
batteries
2. Soulevez le couvercle des piles à partir de l'onglet pour l'ouvrir facilement.
Insérez 3 piles AA (non fournies). Ne mélangez pas des piles neuves et usées, des
piles alcalines, standard ou rechargeables.
2. Heben Sie den Batteriedeckel ab, um es einfach zu önen. Führen Sie 3 AA
Batterien (nicht beinhaltet) ein. Mischen Sie keine neuen und alten Batterien.
Mischen Sie auch keine Alkali, standard- und auadbare Batterien.
2 .Sollevare il coperchio delle pile dal bordo per aprire facilmente l'alloggio.
Inserire 3 pile AA (non incluse)
Non mischiare pile vecchie e nuove, pile alcaline, standard o ricaricabili.
2. Haal de deksel los om makkelijk bij de batterijen te kunnen om nieuwe te plaatsen
Plaats 3 AA batterijen (niet bijgeleverd). Gebruik geen oude en nieuwe batterijen
door elkaar, evenmin alkaline-, standaard of oplaadbare batterijen door elkaar heen
gebruiken
2 .Premir a pestana de abertura do compartimento das pilhas. Inserir 3 pilhas
AA (não incluídas). Nunca misturar pilhas novas e usadas, nem pilhas alcalinas,
standard ou recarregáveis.
Quick setup instructions
Instrucciones de instalación
Instructions d'installation rapide
Anleitungen für den Quick Setup
Istruzioni per l'installazione
Montagehandleiding
Instruções de instalação
Ref. PLED1C