EasyManua.ls Logo

Great day Ride-N-Rest RR605B User Manual

Great day Ride-N-Rest RR605B
3 pages
To Next Page IconTo Next Page
Page #1 background imageLoading...
Page #1 background image
PAGE 1 OF 3
RIDE-N-REST
MODEL: RR605B
READ ALL INSTRUCTIONS BEFORE USING THE RIDE-N-REST
NOTE: Failure to read instructions before use could result in injury or death.
Instructions for Installation and Use:
FIG. 1
FIG. 1
FIG. 2
PAGE 2 OF 3
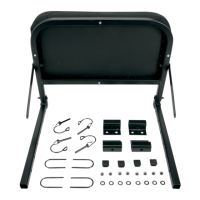
CONTENTS:SEE FIG. 1
4 SLIDING MOUNTING BRACKETS
4 RIV-NUT PLATES
4 2” QUICK CLIP PINS
6 1” MULTI PLUGS
8 1-4” X 2 3/4” BOLTS
8 1/4” X 1 3/4” BOLTS
8 FLAT WASHERS
1 - RIDE-N-REST FRAME ASSEMBLY WITH
CUSHION
STEP 1
SLIDE THE 4 MOUNTING BLOCKS
ONTO HORIZONTAL BARS OF
RIDE-N-REST FRAME. SEE FIG. 2
Question and Answer IconNeed help?

Do you have a question about the Great day Ride-N-Rest RR605B and is the answer not in the manual?

Great day Ride-N-Rest RR605B Specifications

General IconGeneral
BrandGreat day
ModelRide-N-Rest RR605B
CategoryOffroad Vehicle
LanguageEnglish

Summary

Instructions for Installation and Use

Step 1: Mount Blocks to Frame

Slide the 4 mounting blocks onto the horizontal bars of the Ride-N-Rest frame.

Step 2: Attach Blocks with Clip Pins

Attach 4 sliding mounting blocks in desired positions using the 4 quick clip pins.

Step 3: Insert Multi Plugs

Drive the 6 x 1-inch multi plugs into the open ends of the Ride-N-Rest frame's horizontal bars.

Step 4: Position Frame on ATV Rack

Position the frame on the ATV rear rack, ensuring mounting blocks are correctly placed for securing.

Step 5: Secure Blocks to ATV Rack

Attach blocks to ATV rack using riv-nut plates, washers, and bolts. Finger tighten until snug.

Step 6: Final Tightening

Ensure the Ride-N-Rest is centered on the ATV rack and tighten all bolts securely with a 7/16" wrench.

Step 7: Secure Cushion

Secure the cushion by removing front pins, pivoting, pinning support bars, and replacing pins.

Step 8: Lay Backrest Flat

Lay the backrest flat by removing pins from support bars and replacing them into mounting blocks.