EasyManua.ls Logo

Great Little Trading Afternoon tea set User Manual

Great Little Trading Afternoon tea set
4 pages
To Next Page IconTo Next Page
Page #1 background imageLoading...
Page #1 background image
1
Afternoon tea set
01/05/2018
V1
easy - medium - hard
Assembly Difculty
one-person job
L4365
A few important pointers before you start:
Please read the instructions right through before you start, and check
that all the components have been included in the pack; we nd
separating all the hardware into piles makes it easier to be sure that
everything is present and correct.
Make sure you have the right tools. Allen keys are provided if required,
but screw drivers and other tools are not. You’ll nd details of the tools
you need at the beginning of the instructions.
Do not throw away any packing materials until assembly is complete,
just in case you accidentally discard smaller parts or hardware.
Thank you for shopping with GLTC, we hope you enjoy
having this product in your home.
We know assembling furniture, toys or accessories is not everyone’s
favourite way to spend their time, so we’ve tried to make assembling
this item as quick and painless as possible.
Question and Answer IconNeed help?

Do you have a question about the Great Little Trading Afternoon tea set and is the answer not in the manual?

Great Little Trading Afternoon tea set Specifications

General IconGeneral
BrandGreat Little Trading
ModelAfternoon tea set
CategoryToy
LanguageEnglish

Summary

Safety Information

General Safety Warnings

Essential safety precautions for assembly and use, including warnings for children and tool usage.

Customer Service and Product Care

Contact information for missing parts and guidelines for cleaning and maintaining the product.

Assembly Instructions

Component Check List

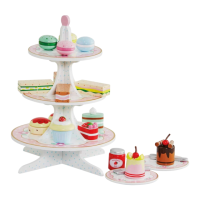
Verify all parts and hardware are present before beginning assembly.

Step 1: Slotting Parts A and B

Connect the main side panels (A and B) together.

Step 2: Securing the Large Plate

Attach the large plate (C) to panels A and B using screws.

Step 3: Securing the Medium Plate

Attach the medium plate (D) to panels A and B using screws.

Step 4: Securing the Small Plate

Attach the small plate (E) to panels A and B using screws.

Step 5: Assembly Complete

Confirmation that the cake stand assembly is finished.

Related product manuals