EasyManua.ls Logo

Great Little Trading Gumdrop Kitchen User Manual

Great Little Trading Gumdrop Kitchen
15 pages
To Next Page IconTo Next Page
Page #1 background imageLoading...
Page #1 background image
1
Gumdrop Kitchen / Sea Salt Kitchen
10/02/2017
V2
easy - medium - hard
Assembly Difculty
two-person job
L4008 / L4009
A few important pointers before you start:
Please read the instructions right through before you start, and check
that all the components have been included in the pack; we nd
separating all the hardware into piles makes it easier to be sure that
everything is present and correct.
Make sure you have the right tools. Allen keys are provided if required,
but screw drivers and other tools are not. You’ll nd details of the tools
you need at the beginning of the instructions.
It’s a good idea to build the unit in the room where you are going to be
using it, to avoid the need to move it after it’s been assembled.
Do not throw away any packing materials until assembly is complete,
just in case you accidentally discard smaller parts or hardware.
Thank you for shopping with GLTC, we hope you enjoy
having this product in your home.
We know assembling furniture, toys or accessories is not everyone’s
favourite way to spend their time, so we’ve tried to make assembling
this item as quick and painless as possible.
Hopefully our efforts will have been worthwhile and you’ll sail
through the whole process. But if it all feels a bit too much
like hard work, then we do have an assembly company we
can recommend: the Flatpack Construction Company offers a
nationwide service and can be contacted on 0843 289 4951 or
www.atpackconstruction.co.uk.
Question and Answer IconNeed help?

Do you have a question about the Great Little Trading Gumdrop Kitchen and is the answer not in the manual?

Great Little Trading Gumdrop Kitchen Specifications

General IconGeneral
BrandGreat Little Trading
ModelGumdrop Kitchen
CategoryToy
LanguageEnglish

Summary

Getting Started with Your Kitchen Set

Important Pointers Before Assembly

Read instructions, check components, gather tools, and prepare assembly area before starting.

Safety, Service & Care Information

General Safety Warnings

Covers adult assembly, choking hazards, proper usage, and product stability.

Customer Service Contact

Contact details for missing/damaged parts and availability of spare hardware packs.

Product Care Guidelines

Instructions for cleaning and maintaining the product, avoiding harsh chemicals.

Component Check List

Drawer and Soap Drawer Assembly

Drawer Assembly Steps 1-2

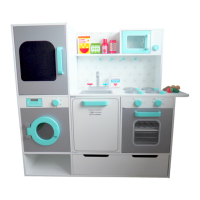
Assemble the main drawer structure using panels A, B, C, D, and E.

Soap Drawer Assembly Steps 3-4

Assemble the soap drawer components including panels F, G, H, I, J, and K.

Door Assemblies

Soap Drawer, Microwave & Oven Doors

Attach handles and catches to drawer front (L), microwave door (M), and oven door (P).

Dishwasher Door Assembly

Attach handle (R) and door catch (#2) to the dishwasher door (O).

Fridge and Other Door Assemblies

Fridge Door Assembly

Attach handle (R) and door catch (#2) to the fridge door (Q).

Shelf Runner Installation

Secure shelf runners (Y) to panels T and U using screws and door catches.

Panel and Tap Assembly

Door Catch and Peg Installation

Attach door catches (#1) to panels V and S, and pegs (AS) to panel W.

Tap and Worktop Assembly

Assemble spout (Z2) and taps (ZI), then attach to worktop (AA).

Cabinet and Microwave Integration

Shelf and Backboard Attachment

Attach shelf panel (AC) to side panel (AB) and secure to backboard (W).

Microwave Panel and Door Fitting

Fit microwave control panel (AE) and door (M) onto the shelf (AC).

Microwave and Cabinet Assembly

Microwave Top Panel and Side Panels

Attach microwave top panel (V) and side panels (X, AG) using barrel nuts and bolts.

Dividing Panel and Base Panel Fitting

Secure dividing panel (T) to panel AG and panels X, U to base panel AF.

Cabinet Side and Backboard Assembly

Right Hand Panel and Dividing Panel

Secure right hand panel (S) and dividing panel (AG) to base panel (AF).

Backboard Installation

Lift assembly upright and slide backboards (AN) and (AK) into place.

Oven and Microwave Fitting

Oven Tray and Lower Door Hinge

Slot oven tray (AI) and attach lower oven door hinge on panel P to panel AG.

Upper Oven Door and Panel AH

Position panel AH onto dowel holes, securing it to panel T.

Dishwasher and Cabinet Assembly

Dishwasher Door and Panel J

Position panel J and AL, attach lower dishwasher door hinge on panel O to panel AG.

Worktop Attachment

Lower worktop panel (AA) onto the assembly, securing it to panels U and S.

Washing Machine and Fridge Assembly

Washing Machine Panel and Backboard

Place panel AP and insert dowels, secure left side and slide backboard (AQ).

Fridge Shelf and Door Fitting

Slot fridge shelf (AO) and locate fridge door hinge on panel Q to panel AP.

Final Cabinet Construction

Fridge Panel and Top Assembly

Position panel AR, secure fridge door hinge, then attach top assembly to base.

Panel AB and Worktop Attachment

Secure panel AB to worktop (AA), then attach panel AC to panel U.

Final Assembly Steps

Dishwasher Tray and Sink Installation

Slide dishwasher tray (AM) into runners and insert sink (AT) into worktop.

Anti-Tip Strap Installation

Attach anti-tip strap (AU) to the back of the unit and secure to the wall.

Related product manuals