This document describes the GREENCUT GLM680X lawnmower, a gasoline-powered 4-stroke OHV engine machine designed for domestic use only. It is intended for cutting grass and should not be used for other purposes such as clearing, mowing fields, cutting bushes, or as a shredder. Misuse can lead to dangerous situations and voids the manufacturer's liability.
Important Technical Specifications
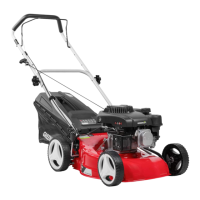
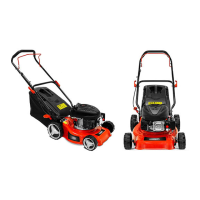
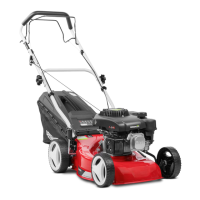
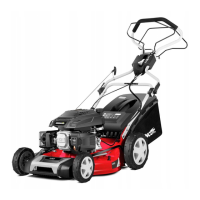
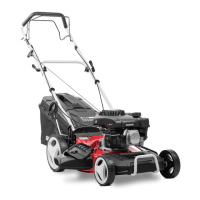
The GLM680X features a 139cc 4-stroke OHV gasoline engine, delivering 5cv (horsepower) at 2800rpm. It uses a manual easy-start system. The fuel tank capacity is 0.8L, and it requires unleaded 95 octane gasoline. The oil capacity is 0.4L, and it is compatible with 10W30, 10W40, 15W30, or 15W40 oil types, depending on ambient temperature. The lawnmower has manual traction and a central handlebar height adjustment. It is equipped with a single blade and offers 7 cutting height adjustments, ranging from 25mm to 75mm. The cutting width is 410mm (17 inches). It includes a 45L grass collection basket and has a steel chassis. The guaranteed sound power level is 96 dB(A), and the machine weighs 21.5Kg.
Usage Features
Assembly:
The lawnmower is supplied without fuel and oil, though residual oil from factory testing may be present.
- Handlebar Assembly: Carefully unfold the handlebars, ensuring control cables are not pinched. Remove the two locking knobs from the lower handlebar, align its side holes with those on the mower's rear cover, and secure with bolts and knobs. Unfold the upper handlebar, remove its locking knobs, align its holes with the lower handlebar's holes, and insert the locking knob bolts through both handlebars.
- Collection Basket Assembly: Attach the plastic clips of the collection basket to the mower's metal frame, ensuring they are fully secured.
Before Use:
- Air Filter: The air filter prevents dirt and particles from entering the engine. Regular maintenance is required; always check it before starting.
- Engine Oil: It is crucial to add the correct type of engine oil before use, as the product is not supplied with it. Running the engine without oil will void the warranty and can cause severe damage. Always check the oil level, ensuring it is at or just below the maximum indicator, before starting.
- Fuel: The engine must be cold before refuelling. Use unleaded, ethanol-free gasoline (higher RON for best performance). Do not use old or contaminated fuel.
- Place the machine on a flat, level surface.
- Clean around the tank opening.
- Remove the fuel filler cap (turn left).
- Use a funnel to carefully fill the tank, avoiding overfilling.
- Replace the cap (turn right) until securely closed. Clean any spilled fuel.
- Always refuel outdoors, do not smoke, and keep flames away.
- Spark Plug: Ensure the spark plug is securely connected to its wire.
Starting and Stopping the Engine:
- Priming (if equipped): Fill the fuel tank, locate the fuel primer, press it several times until fuel is felt, then start the engine. Overfilling the carburetor can cause fuel spillage and prevent the engine from starting.
- Locking/Unlocking Lever (Safety Lever): This lever must be activated for the engine to start. Releasing it automatically stops the engine, ensuring the operator is behind the machine during operation.
- Starting: Press the fuel priming button several times. Pull the locking/unlocking lever towards and against the upper handlebar. Pull the starter rope as needed. The mower will start as soon as the starter rope is pulled; it will not operate if the safety lever is not held against the upper handle.
- Stopping: Release the locking/unlocking lever.
Adjustments:
- Cutting Height: The mower deck has multiple height settings (25-75mm). For long grass, cut in several passes, gradually lowering the height. To adjust, pull the height adjustment lever outwards to disengage it, then move it forward to raise or backward to lower, and lock it into the desired height.
- Environmental Considerations:
- Altitude: At altitudes above 1500m, carburetor adjustments may be needed due to less oxygen, leading to a richer fuel mixture. For permanent high-altitude operation, consult an authorized technical centre. Occasional use at altitude may result in a slight performance decrease without adjustments.
- Temperature: Engine oil type may need to be changed in extremely cold or hot environments to match ambient temperatures, as oil thickens or thins with temperature, affecting lubrication. Refer to the provided oil chart for the correct type.
Mowing Tips:
- Use appropriate footwear (boots, long trousers); avoid open footwear.
- Clear the work area of objects (stones, etc.) before mowing.
- If the machine hits an object, stop it immediately, allow it to cool, and inspect for damage.
- If the machine vibrates excessively, have it inspected by an authorized technical centre.
- Avoid cutting wet or very tall grass; cut tall grass in several passes.
- Do not use the equipment for shredding leaves or wood.
- Avoid working on overly steep slopes; mow across the slope, not up and down.
- Be careful when reversing or changing direction.
- Stop the engine if tilting or moving the machine over non-grass surfaces.
- Do not cut more than one-third of the grass height to maintain lawn health.
- Mow at a moderate pace in slightly overlapping, straight rows for best results.
- For areas with trees or flowerbeds, mow 1-2 rows around them.
- Empty the grass catcher frequently.
- Cutting leaves completely can damage the grass.
- Excessive low-level cutting can harm roots.
- During summer, keep grass moderately high to prevent soil from drying out.
- Alternate cutting directions for a better appearance.
Maintenance Features
Periodic Maintenance:
A maintenance schedule is provided, with tasks categorized by frequency (every use, monthly/20h, 3 months/50h, 6 months/100h, yearly/300h). Some tasks may require professional assistance.
- Engine Oil: Check every use, replace monthly/20h and yearly/300h.
- Oil Leaks: Check/repair as necessary every use.
- Air Cleaner: Check every use, clean and replace as necessary every 3 months/50h.
- Spark Plug: Check every 3 months/50h, replace every 6 months/100h.
- Valve Clearance: Adjust as necessary yearly/300h.
- Combustion Chamber: De-choke as necessary yearly/300h.
- Idle Speed: Check and adjust as necessary every 6 months/100h.
- Fasteners: Check/tighten as necessary every use.
- Fuel Tank: Flush and clean yearly/300h.
- Fuel Line: Replace as necessary every 3 months/50h.
- Fuel Filter: Clean and replace as necessary every 3 months/50h.
- Fuel Strainer: Check every use.
Checking and Changing Engine Oil:
- Always check oil level on a flat surface. Do not use contaminated oil.
- The first oil change should be after 20 hours of operation, then every 20 hours.
- It is recommended to change oil when the engine is warm but not hot.
- To check: Place the machine on a flat surface. Clean around the oil filler cap/dipstick. Remove the cap/dipstick, wipe it clean, reinsert (without screwing), then remove and inspect the oil level. Add or drain oil to the correct level. Re-install the cap firmly.
- To change: Place the machine on a flat surface with a container for drained oil. Clean around the oil filler opening. Remove the oil filler cap/dipstick. Tilt the machine to drain all oil. Return to level, carefully add new oil to the maximum level, and re-install the cap firmly.
Checking, Cleaning, or Replacing the Air Filter:
- Operating without a functional air filter can damage the engine and void the warranty. A dirty filter restricts airflow, which can be mistaken for fuel system issues. Replace damaged filters.
- To clean: For foam filters, wash in warm water with mild detergent, rinse, and air dry. For paper filters, use compressed air from the engine side or tap/brush to remove particles. For foam filters, add a few drops of clean engine oil and squeeze to distribute. Clean the air filter cover and intake.
- To remove: Carefully open the cover by pressing the upper clips and remove the filter element.
- To install: Insert the filter element correctly, ensuring it seats and seals properly. Re-install the cover, ensuring it fits firmly.
Spark Plug Maintenance:
- Replace damaged spark plugs (cracked insulator, broken/eroded electrodes). Use correct "heat range" spark plugs.
- Cleaning and Gap Check: Remove carbon deposits from electrodes with a wire brush. Clean threads and the top electrical terminal. Use feeler gauges to measure the gap; adjust by gently tapping or pulling the electrode.
- Removal: Pull the electrical lead from the spark plug terminal. Clean around the spark plug. Use the spark plug tool to remove it (turn left).
- Re-installation: Place the spark plug in its hole, screw in "finger tight" (turn right). Use the tool to tighten approximately one-quarter turn (do not over-tighten). Place the electrical lead over the terminal and push down firmly.
Replacing the Blades:
- For safety, ensure the machine is off and the spark plug is disconnected. Drain oil from the tank before removing the blade.
- Remove the bolt holding the blade. Install the new blade as shown in the diagram. Tighten the screw to 40Nm. Replace the bolt when replacing the blade.
Cleaning Guidelines:
- Do not use solvents, chemicals, or abrasives.
- Wear gloves or use appropriate tools.
- Clean the machine after every use for best performance.
- When inspecting the underside, jack up the machine to avoid tilting and fuel/oil spills.
- Use a damp cloth, water, and mild detergent.
- Use a brush for hard-to-reach parts.
- Ensure all air vents and heat dissipation surfaces are clean.
- Remove grass clippings and dirt from the underside of the deck and blades.
- Lightly oil cutting blades after each use to prevent corrosion.
- Ensure all chutes and flaps are clean and unobstructed.
- Ensure spring-loaded parts (e.g., rear guard) return to their normal position.
- Clean and check the grass catcher for damage; allow it to dry completely before storage.
- Ensure all control cables, levers, and switches are clean and operate smoothly.
Troubleshooting
The manual provides a table of common problems, causes, and solutions, including:
- Difficulty Starting the Engine: Lack of fuel, engine "OFF" switch, carbon build-up on spark plug, flooded engine, insufficient/excessive engine oil.
- Engine Starts but Does Not Idle: Blocked air filter, idle speed requires adjustment.
- Excessive Vibration: Blunt/damaged blades, loose brackets/screws, worn/bent engine output shaft.
- Difficulty Restarting After Use or Engine Stops Suddenly: Lack of fuel/oil, jammed cutting blades, overheating, carbon build-up on spark plug, blocked/choked carburetor.
- Reduced Engine Power/Speed During Use: Blocked air filter, carbon build-up in engine/exhaust, carbon build-up on spark plug, blocked/choked carburetor.
- Cannot Attach Grass Catcher: Handle installed incorrectly.
- Poor Grass Cutting: Dull/damaged blades, cutting too much in one pass, unsuitable cutting height.
For unresolved issues, contact the Official Technical Service.
Transportation and Storage
- Allow the equipment to cool completely before transport or storage.
- Avoid storing the machine in direct sunlight or in a locked vehicle for extended periods, as high temperatures can cause fuel evaporation and explosion.
- Secure the product in its normal operating position with the fuel cap closed to prevent fuel loss during transport.
- Store in a clean, safe, dry place between 0ºC and 45ºC.
- The equipment is not weatherproof; avoid direct sunlight, high temperatures, or damp locations.
- Never store near flammable materials, gases, or liquids.
- Keep the machine clean to reduce fire risk.
- For long-term storage, store without fuel (stabilized if stored for longer periods).
- Keep out of reach of children.
Long-Term Storage Procedures:
- Drain the fuel system, keeping the tank as empty as possible. Unscrew the carburetor drain plug (turn left), collect drained fuel in an airtight container, then re-screw the plug (turn right) and tighten.
- Remove the spark plug, add 30ml of clean engine oil to the cylinder, slowly pull the starter rope to distribute the oil, and replace the spark plug.
- Cover the equipment to protect it from dust and dirt.
Recycling and Disposing
Worn products are recyclable and should not be disposed of in household waste. Plastic and metal components can be separated for recycling. Take the appliance to an approved recycling centre. Gasoline, used oils, and oil-stained items should be disposed of according to local regulations at a recycling centre, not in regular trash, sewage, or natural environments. Packaging materials are also recyclable.
Guarantee
GREENCUT products are guaranteed for 2 years (in Europe) from the purchase date, subject to the product's intended use. The original receipt with purchase date and description of the defective tool is required for warranty claims. The warranty does not cover normal wear and tear (blades, fasteners, turbines, light sources, belts, impellers, air filters, spark plugs) or damage from improper use or non-compliance with operating and maintenance instructions. Repairs or modifications made by the consumer or third parties using non-original GREENCUT spare parts will void the warranty. Justified warranty claims will result in free repair or replacement of the defective tool at GREENCUT's discretion. Other claims beyond this warranty are not valid.