EasyManua.ls Logo

Grindmaster P300E User Manual

Grindmaster P300E
36 pages
To Next Page IconTo Next Page
Page #1 background imageLoading...
Page #1 background image
Shuttle Brewer & Airpot/Shuttle Brewers
Operation and Instruction Manual
For Models P300E, P400E, RAP300E,
RAP400E, RAPS300E, RAPS400E
Installation:
See rough-in drawings in this manual for dimensions and locations of
electric and water input.
Set-Up/Position
1) Remove the brewer from the packing material and attach its legs.
2) Position the brewer on a strong, stable table or counter. Check the
level front to back and side to side. Adjust the legs to the correct level.
IMPORTANT:
THE PERSON INSTALLING THIS APPLIANCE IS RESPONSIBLE
FOR ENSURING THAT ELECTRIC AND WATER CONNECTIONS
MEET THE REQUIREMENTS OF THE NATIONAL ELECTRIC
CODE, NATIONAL PLUMBING CODE, AND ANY LOCAL
ORDINANCES.
The electric and water hook-up locations are behind the front panel.
Remove the four screws fastening this panel for access to these
connections.
Table of Contents
Installation and Start-up ....................................... 1-2
Operation .......................................................... 3
Adjustments ........................................................ 4-7
Care and Cleaning ............................................... 8-9
Service ............................................................... 9-10
Troubleshooting
Filling Problems .................................... 11
Heating Problems ................................. 12
Brewing Problems ................................ 13
Parts Illustrations
Models P300E & P400E ....................... 14
Model RAP400E ..................................... 15
Model RAPS400E ................................... 16
VSB-400................................................ 17
Shuttle CS-LL .......................................... 18
Rough-In Drawings
Model P-300.......................................................... 19
Model P-400 ......................................... 20
Model RAP-300 ......................................... 21
Model RAP-400 ........................................ 22
Model RAPS-300 ....................................... 23
Model RAPS-400 ..................................... 24
VSB-300 .................................................. 25
VSB-400 ................................................ 26
Wiring Diagrams
P300E/P400E with 1 Batch Timer ......... 27
P300E/P400E with 2 Batch Timer........ 28
RAP300E/RAP400E................................29
RAPS300E/RAPS400E........................30
Drawing #091-548 .................................31
Drawing #091-182 ....................................32
Warranty ................................................................... 36
Water Hook-up
1) The water line may enter through holes on the rear or the bottom of the brewer. Use the right hand opening for water.
2) Use 3/8" copper or flexible water line to prevent strain. Do not use low temperature plastic tubing. The connection
to the fill valve is 3/8" flare.
3) Water line pressure must be from 30 to 70 psi.
4) Hot (up to 160°F) or cold water may be used. Hot water offers faster recovery between brews.
5) Install a shut-off valve near the brewer.
6) Installing a filtering system can improve the taste of brewed coffee and extend the life of the brewer. If your water
has high calcium (lime), chlorine, or iron content, this is especially important. The filter should be the lime inhibiting
type if cold water is used. Contact our parts department to select the filter for your conditions.
© Grindmaster Corporation, 1998
PRINTED IN U.S.A.
0306 FORM # AM-309-06
Part # 090-077
Prior authorization must be obtained from Grindmaster Corporation for all warranty claims.
Grindmaster Corporation
4003 Collins Lane
Louisville, KY 40245 USA
(502) 425-4776
(800) 695-4500 (USA & Canada only)
(800) 568-5715 (Technical Service Only)
FAX (502) 425-4664
www.grindmaster.com
WARNING
ELECTRIC SHOCK HAZARD!
Installation of this appliance should be performed by
qualified service personnel only. Improper installation could
result in electrocution.
Question and Answer IconNeed help?

Do you have a question about the Grindmaster P300E and is the answer not in the manual?

Grindmaster P300E Specifications

General IconGeneral
BrandGrindmaster
ModelP300E
CategoryCoffee Maker
LanguageEnglish

Summary

Installation

Set-Up/Position

Instructions for positioning the brewer on a stable surface and ensuring it is level.

Water Hook-up

Details on connecting the water supply line, pressure requirements, and filter recommendations.

Installation (cont.)

Electric Hook-up

Guidance on electrical ratings, circuit requirements, cord types, and grounding.

Start-up

Procedure for filling the brewer with water and initiating the heating cycle.

Operation

Adjustments

Brew Volume, Brew Timer

Guide to adjusting the brewer's timer for desired batch volume and brew time.

Adjusting the Timer

Steps to adjust the single batch timer for accurate brew volume.

Adjustments (cont.)

Two Batch Timer Adjustments

Instructions for setting two-batch timers using knob or counter potentiometer adjustments.

Bypass Adjustment

How to adjust the bypass valve to control coffee strength and dilution.

Thermostat Adjustments

Standard Mechanical Thermostat

Procedures for adjusting the main thermostat to control water temperature.

Thermostat Adjustments (cont.)

Optional Solid State Thermostat

Instructions for adjusting the optional solid state thermostat for precise temperature control.

Optional Brew Thermostat Adjustment

How to adjust the optional low temp/no brew thermostat.

Care and Cleaning

After Each Brew

Basic cleaning steps to perform immediately after each brewing cycle.

Every Day

Daily cleaning routines for brew baskets, spray heads, shuttles, and airpots.

Service

Drain Water Tank

Procedure for safely draining the hot water tank for maintenance.

Service (cont.)

Component Removal

Instructions for removing the brew valve and heater element for servicing.

Troubleshooting

Filling Problems

Diagnosing and resolving issues related to the brewer's water filling system.

Troubleshooting (cont.)

Heating Problems

Troubleshooting steps for issues with the brewer's heating system and temperature.

Troubleshooting (cont.)

Brewing Problems

Identifying and fixing problems related to the coffee brewing process.

Parts Illustrations

Model P300E & P400E Parts

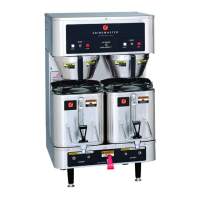
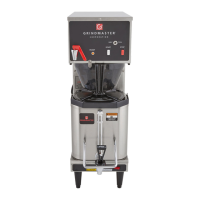
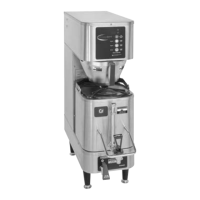
Diagram showing components and part numbers for P300E and P400E models.

Rough-In Drawings

Model P-300 Rough-In

Dimensional drawing for installation planning for the P-300 model.

Wiring Diagrams

P300E/P400E, 1 Batch Timer Wiring

Electrical schematic for P300E/P400E models with a single batch timer.

Warranty Information

General Warranty Information

Overview of the manufacturer's warranty policy, coverage, and limitations.

Warranty Exceptions

List of conditions and actions that void the warranty or are not covered.

Obtaining Warranty Services

Instructions on how to contact the service department and initiate a warranty claim.

Related product manuals