1
English
Application
Pressure Balancing Valves are designed for use with
hot water supplied from pressurized storage heaters
and offer the highest temperature accuracy when used
in this way.
Pressure Balancing Valves cannot be used in
conjunction with low-pressure storage heaters
(displacement water heaters).
Specifications
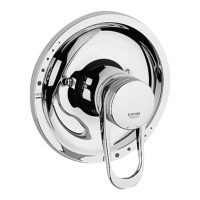
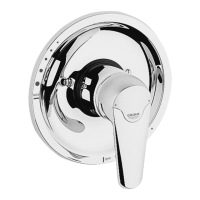
• Concealed single handle pressure balancing tub
and shower valve
• Integral service stops (35 210 / 35 214)
• Integral check valves prevents cross flow
• Pressure balanced diaphragm cartridge automati-
cally adjusts to inlet pressure fluctuations.
Cartridge restricts hot water supply should the cold
water pressure fail - to prevent scalding.
• Flow pressure
- min. 20 psi
- recommended 20 - 72.5 psi
- greater than 72.5 psi, fit pressure reducing valve
• Max. operating pressure 145 psi
• Max. test pressure 500 psi
• Flow rate:
- Outlet 13.5 L/min or 3.5 gpm/20 psi
20 L/min or 5.2 gpm/45 psi
30.5 L/min or 8 gpm/100 psi
- Shower 13 L/min or 3.4 gpm/20 psi
19 L/min or 5 gpm/45 psi
29 L/min or 7.6 gpm/100 psi
• Temperature
- max. (hot water inlet) 176 °F
- maximum temperature is reached when the
handle is rotated 270° in a counterclockwise
direction.
The handle rotation stop may be used to limit the
maximum temperature.
• Back to back installation possible by reversing the
pressure balancing cartridge
• Water connection hot - LH
cold - RH
Installation
Final installation
1. Remove the two screws (A1) from the fitting
template (A), then remove the template,
see fold-out page I, fig. [1].
2. Make sure the water supply is turned on at the
service stop valves (B). Stop valves must be in
fully open position.
3. Turn the valve stem (C) clockwise to OFF
position, see fig. [2].
4. The adjustable hot water limit stop (D) is factory
set at neutral position to give maximum outlet
temperature.
Please refer to chapter "Maximum hot water
limit setting" on page 2 for limiting maximum
outlet temperature.
5. Install lever adapter (E) onto the valve stem (C),
by placing the lever stop pin (E1) on top of the
"Arrow" (↑), then tighten with screw (G).
6. Push cap (H) with drain hole facing down onto
the plastic guide (J) by gently pressing the
slotted section (J1) on the plastic guide.
7. Slide the escutcheon (K), over the cap (H) and
tighten with screws (K1), see fig. [3].
Do not use excessive force to tighten the screws.
8. Remove the cover cap (L) from the lever
handle (M), see fig. [4].
9. Position the handle with lever facing down over
the lever adapter (E) and tighten with screw (N).
10. Replace the cover cap (L).
The pressure balancing valve is now ready
for use.
Caution!
Do not lift the lever on the handle to operate this
valve. This pressure balancing valve opens from
cold to hot by turning the lever counterclockwise,
see fig. [5].
If the pressure balancing valve is installed too
deep, the fitting depth can be increased by 1" with an
extension set, Part No. 47 344, see fold-out page II.
952721.book : I95272us.fm Seite 1 Dienstag, März 16, 1999 1:39 PM