Partie générale / General Section CUC 2030 F / 2031 F
GRUNDIG Service1 - 22
6.2 OSD Position
Call up the dialog line "OSD" with button "6" via "DIALOG CENTER"
–> "SERVICE" –> Service Code "8500".
With the 3 4 buttons it is possible to shift the on screen display in the
horizontal or vertical direction and to store this position "with mem.".
6.3 Hotel Mode
6.3.1 Activating the Hotel Mode
Call up the dialog line "Hotel" with button "6" via "DIALOG CENTER"
–> "SERVICE" –> Service Code "8500".
With activated "Hotel Mode":
- it is no longer possible to call up the "DIALOG CENTER" menu with
button "6".
- the last volume setting is stored as the maximum level possible.
6.3.2 Deactivating the Hotel Mode
Depress and hold button "6" on the remote control handset while
switching the TV set on with the mains switch. Under the "SERVICE"
menu switch the Hotel Mode off.
6.4 Deactivating the Protection Circuit
Depress and hold button "6" on the remote control handset while
switching the TV set on with the mains switch. As long as the Service
Menu is displayed the protection circuit of the TV set is not evaluated
on video processor IC34015-(50).
7. Setting the Analog Values
Maximum Optimum
Brightness 63 32
Colour contrast 63 40
Black/white contrast 63 48
Volume 63 30
Headphone volume 63 50
Tint 63 32
Bass 25 15
Treble 25 18
Sharpness 5 2
The analog values are stored automatically:
after about 8 seconds,
on switching to Standby mode,
on switching over from TV to AV mode,
on changing the individual AV settings.
Having stored the minimum volume level the volume indicator bar is
displayed for about 10 seconds when switching the TV receiver on.
With "AUX" –> "OK" it is possible to re-set the optimum values for
picture and sound.
The optimum values are read out from EEPROM IC82005.
8. Audio / Video Connectors
Re-recording possibilities:
AV 1 –> AV 2 (Scart1 –> Scart2 with 2 AV sockets)
AV 2 –> AV 1 (Scart2 –> Scart1 with 2 AV sockets)
AV 3 –> AV 1, AV2 (Camera –> Scart1,2 with 2 AV sockets)
AV 2 –> AV 1 (Camera –> Scart with 1 AV socket)
Re-recording is activated automatically by selecting button "0/AV" of
the source.
Securing a re-recording:
A re-recording is secured by selecting the source with button "0 /AV"
–> button "AUX" –> button "0/AV", indication "copy on". The pro-
gramme can be changed. The securing function can be cancelled by
repeating this sequence: "Copying off".
Notes:
- Should all video signal paths be in use on selection of AV because
Copy is active for example, this situation is identified and the TV
switches over to the next technically possible AV position.
- On selection of the country Italy in the menu, an AV-RGB signal with
blanking signal (Pin 16) has priority.
- The blue screen background does not appear in all AV settings.
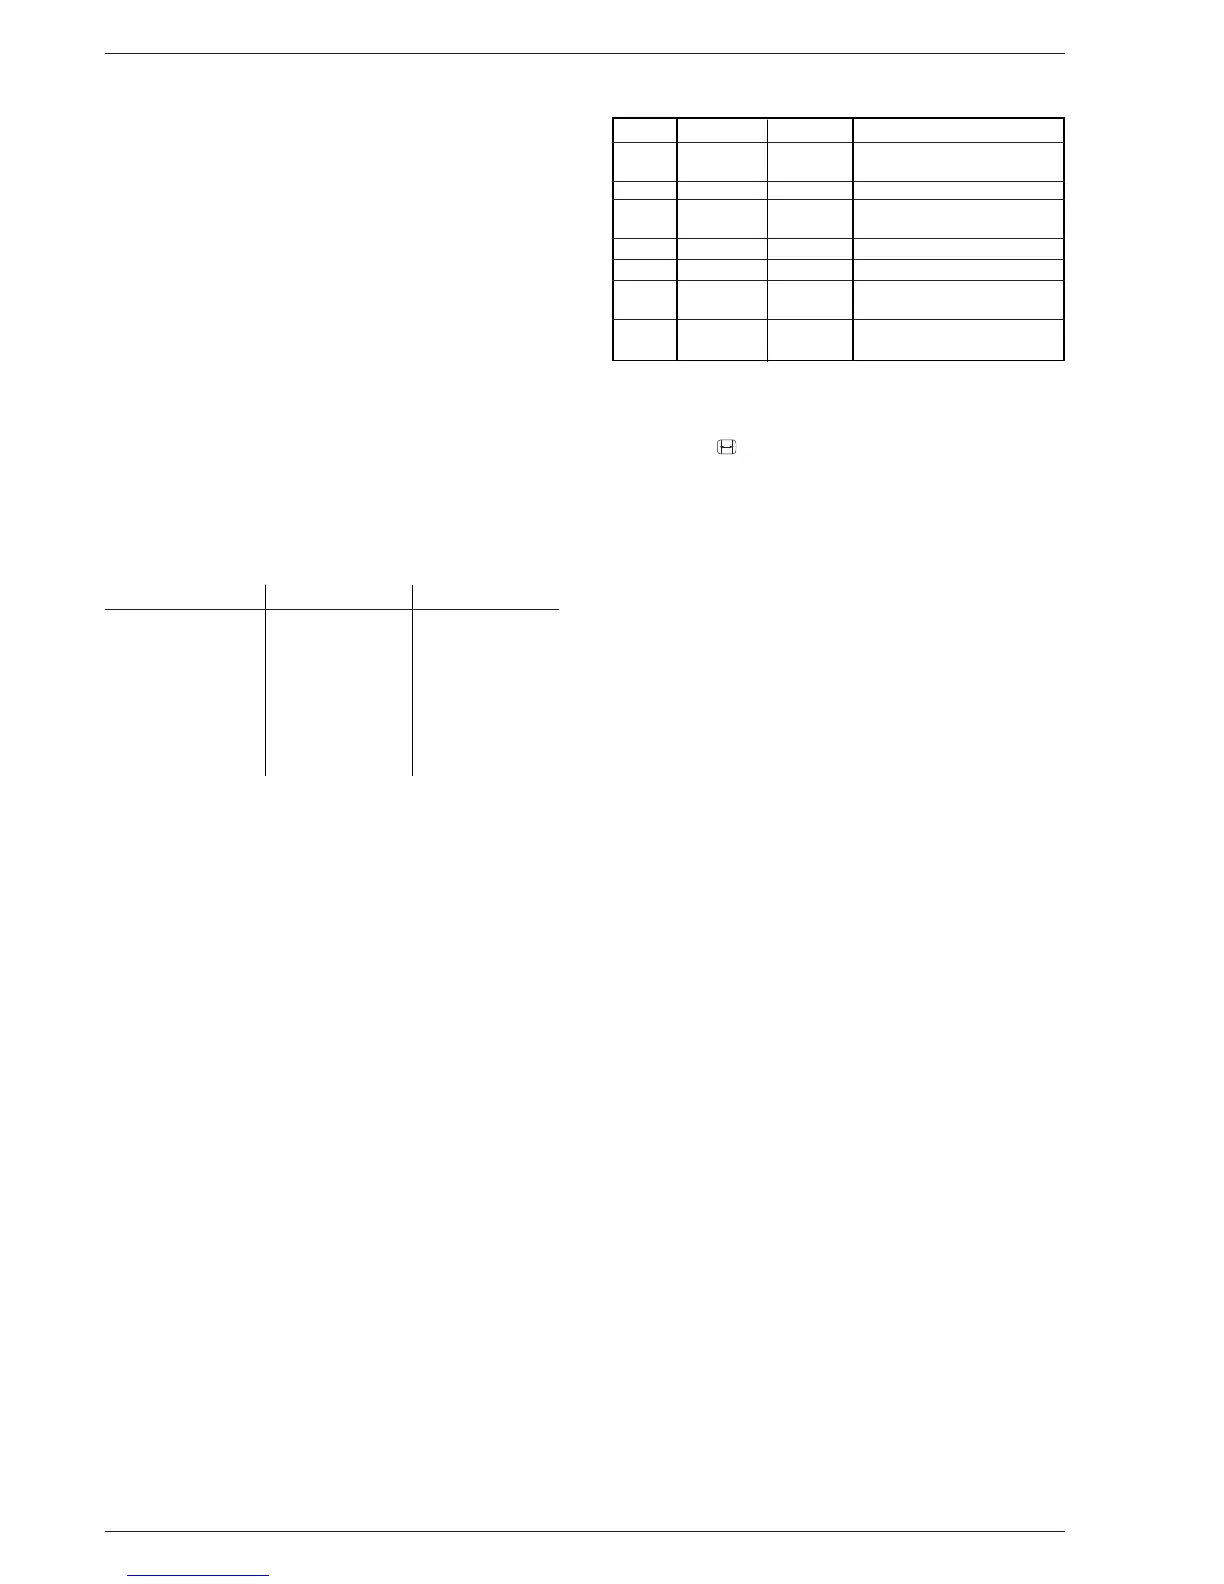
AV socket configuration
Socket Input Output Switching Signal
AV1 RGB - 6/12V (switching voltage)
+1V (fastblanking) evaluation
CCVS CCVS 6/12V
SBAS (Y/C) CCVS 6/12V
(converted)
AV2 RGB - 6/12V + 1V evaluation
CCVS FBAS 6/12V
SBAS (Y/C) CCVS 6/12V
(converted)
AV3 CCVS - 5V generated from sync
Camera
9. Changing the Picture Format
In AV mode, the picture format can be switched over with remote
control button " " in dependence of the size of the picture tube.
The picture formate is changed between 4:3 and 16:9 in AV mode and
on the programme position with Peribit.
This status is indicated by the switching voltage applied to pin 8 of the
AV 1 and AV 2 socket.
- 4:3 format 12V
- 16:9 format 6V
Necessary for 16:9 camcorder playback to compensate for the vertical
extension because supply of the 16:9 switching voltage is not provided.
 Loading...