Do you have a question about the GUBI BEETLE and is the answer not in the manual?
Lists necessary tools like a slotted screwdriver and the required number of plastic glides.
Detailed steps to carefully detach the existing glides using a screwdriver, avoiding damage.
Instructions on how to position and securely attach the new glides to the chair's feet.
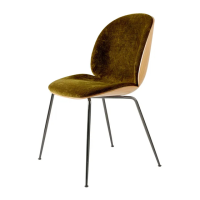
This document outlines the assembly instructions for changing glides on a BEETLE chair, providing a clear, step-by-step guide for users to perform this maintenance task. The primary function of these instructions is to enable users to replace worn or damaged glides, ensuring the chair continues to function smoothly and without causing damage to floor surfaces. The process is designed to be straightforward, requiring minimal tools and offering visual aids to enhance understanding.
The usage features of this guide are centered around its clarity and ease of comprehension. It begins by identifying the necessary tool: a slotted screwdriver or a similar implement. This immediate identification of required equipment helps users prepare for the task efficiently. Following this, the document specifies the product needed for the replacement: four plastic glides of the appropriate type. This detail ensures that users have the correct replacement parts before commencing the procedure, preventing potential delays or errors.
The instructions are broken down into distinct "Action" steps, each accompanied by a descriptive text and, in many cases, a corresponding image. This modular approach makes the process easy to follow and reduces cognitive load. The first action involves carefully placing the screwdriver between the existing glider and the chair's foot. A crucial maintenance feature highlighted here is the caution against scratching the chair and feet, emphasizing the importance of gentle handling to preserve the chair's aesthetic and structural integrity. This attention to detail in the instructions helps users avoid common pitfalls and maintain the quality of their furniture.
The subsequent action describes how to angle the screwdriver away from the feet/chair once it is in place. This specific instruction is vital for preventing damage to the chair's feet, reinforcing the maintenance aspect of the guide. The goal is to make the glider "pop right off," indicating a clean and efficient removal process. The accompanying images visually demonstrate these steps, providing a clear reference for users to compare their actions against. For instance, an image shows a hand holding a screwdriver, carefully prying off a glider, which serves as an excellent visual cue for the user. Another image displays the removed glides, confirming what the user should expect to see after successful removal.
Once the old glides are removed, the instructions transition to installing the new ones. The first step for installation is to place the new glider on the floor with the mounting side upwards. This seemingly simple instruction is critical for proper alignment and ensures the glider is ready to receive the chair's foot. The next action involves placing the chair's foot directly on top of the glider. This sets up the final step for securing the glider.
The final action for installation is to add pressure to the seat. This action is designed to make the glider "pop onto the base," indicating a secure and proper attachment. This method of installation is user-friendly, as it does not require specialized tools beyond the initial removal phase and relies on simple body weight to complete the task. The instructions conclude by stating that the glider is now attached, and an image of the "Beetle felt glider" is provided as an example of the finished product. This visual confirmation helps users verify that they have successfully completed the task.
Throughout the document, the emphasis on careful handling and precise actions underscores the maintenance features. The instructions are not just about replacing a part but about doing so in a way that protects the overall integrity and appearance of the BEETLE chair. The use of clear, concise language, combined with illustrative images, makes this assembly instruction an effective tool for chair maintenance. The guide ensures that even individuals with limited experience in furniture repair can successfully change the glides, thereby extending the life and usability of their chair while preventing damage to their flooring. The structure of the document, with its distinct "Action" sections and product identification, further enhances its utility as a practical maintenance manual.
| Designer | GamFratesi |
|---|---|
| Seat Height | 45 cm |
| Category | Chair |
| Manufacturer | GUBI |
| Material | Steel |
| Upholstery | Fabric or Leather |
| Type | Dining Chair |
| Materials | Plastic, Steel, Fabric or Leather |