5. Once the axle stands are properly located, VERY SLOWLY turn the release valve anti-
clockwise until the vehicle begins to lower onto the stands. Lower the vehicle slowly so as not
to shock load the jack stands.
6. BEFORE GOING UNDER THE VEHICLE ensure that all axle stands and chocks are correctly
in place and there is no chance of the vehicle becoming unstable.
TO LOWER THE VEHICLE:
Once repairs are completed raise the vehicle slightly, remove the axle stands and using the
handle as a wrench, VERY SLOWLY turn the release valve anti-clockwise until the vehicle begins
to lower.
CAUTION: Ensure all body parts are kept clear of the jack and vehicle during the raising and
lowering operation.
MAINTENANCE, CARE AND LUBRICATION
1. This jack contains no user serviceable parts. Any modication will render the jack unsafe.
2. All moving joints require lubricating often. Lubricate all linkages, pivot points and castor wheels
using a grease gun.
3. Regularly check the plunger, main piston and linkages for signs of corrosion. Clean any light
surface corrosion with a suitable maintenance spray. If the corrosion is deeper than surface
do not attempt to use.
4. When not in use keep the jack stored on all 4 wheels with the arm and plunger all the way
down to prevent corrosion.
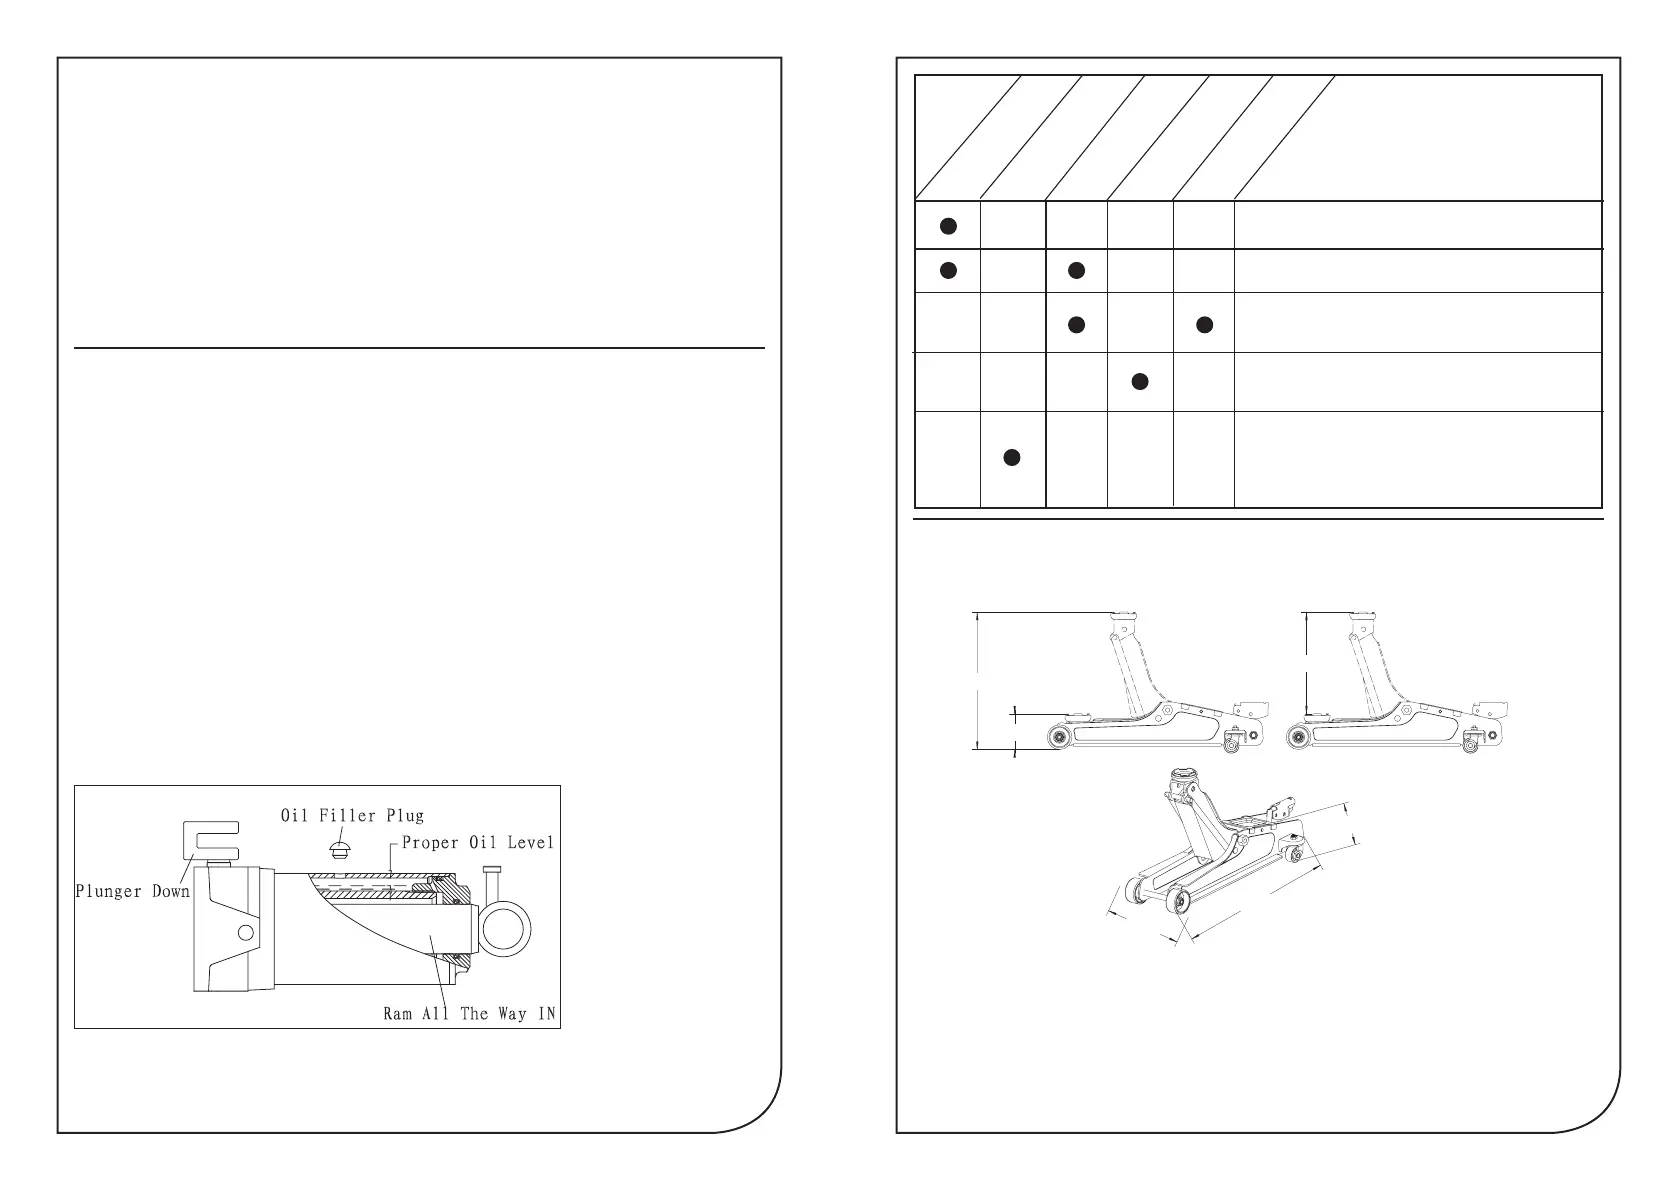
TO ADD OIL
IMPORTANT When adding or replacing oil, ONLY use a quality hydraulic oil adhering to ISO VG 32
or similar. DO NOT use brake uid, transmission uid, alcohol, glycerine, detergent motor oil,
or dirty oil etc. as improper uid will cause serious internal damage to jack making it unsafe to use.
1. Place the jack on level ground with the lifting arm and plunger fully lowered.
2. Remove the top cover plate and clean the surrounding area of the oil ller plug and remove
ensuring that no dirt etc falls into the unit (see Fig.1).
3. Oil should be lled to level indicated in the diagram. If low, add hydraulic oil as required.
Maintenance and inspection: The owner and/ or user must maintain and inspect the jack in
accordance with the manufacturer’s instructions.
SPECIFICATIONS
max.375mm
min.85mm
290mm
Low height................................................................................8.5cm
High height.............................................................................37.5cm
Saddle diameter..........................................................................6cm
Handle length............................................................................50cm
Base length...............................................................................56cm
Chassis width.........................................................................21.2cm
All dimensions are approximate.
J
ack w
i
ll
not hold lo
ad
o
r
h
andle ri
s
e
s
Jack will not lift load
P
ROBLEMS
Jack will not lift to its
full height
Jack will not lower
completely
Jack will not lift smoothly
or jack feels spongy
Trouble Shooting Check List
The release valve is not closed.
Turn the valve clockwise tightly.
Low on oil.
Refill the jack to the correct level of oil.
The hydraulic system is filled with air.Open the
release valve,pump handle rapidly (4) full strokes to
purge air, close release valve.
Return spring is broken or linkages binding.
Repace spring if broken.Grease pivot shaft,oil all
lift arm linkages.
Discharge ball is not sealing hydraulic system and oil
may be dirty.Manually flush hydraulic system by
raising and lowering lift arm by hand.Open the release
valve,as required to raise and lower the lift
arm.Manually raise and lower lift arm.
560mm
145mm
212mm
Fig.1
 Loading...