Do you have a question about the Halls Qube 610 and is the answer not in the manual?
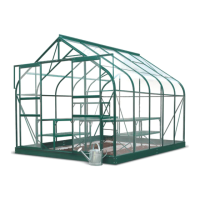
Assemble in dry, calm weather, use gloves, warn about glass, and ensure ladder stability.
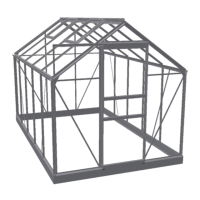
Prepare the base of the greenhouse, ensuring it is level and secure on the chosen location.
Ensure the greenhouse location is level and prepare the site for anchoring.
Dig holes for ground anchors and fill with quick-setting concrete for stability.
Trim anchors and attach base to a deck, wall, or concrete foundation.
Fill anchoring holes with quick-setting concrete as per Option 1.
Trim corner anchors and attach the base to a foundation as per Option 2.
Connect profiles using bolts and clips to begin forming the rear gable structure.
Join specific numbered parts to form the main rear gable framework.
Make essential connections for the rear gable, ensuring correct orientation and tightness.
Complete the rear gable assembly by making final connections and checks.
Ensure all components of the rear gable are securely fastened and checked.
Start building the front gable by connecting initial profiles and parts.
Join specific components to form the primary structure of the front gable.
Make critical connections for the front gable, ensuring precise measurements and secure fitting.
Continue assembling the front gable, connecting side and roof profiles.
Finalize the front gable assembly by ensuring all parts are correctly secured.
Assemble the left side wall section of the 4-foot structure, mirroring the right side.
Assemble the right side wall section of the 4-foot structure, mirroring the left side.
Connect the side wall components, ensuring proper alignment and secure fastening.
Assemble the left side wall section of the 6-foot structure, mirroring the right side.
Assemble the right side wall section of the 6-foot structure, mirroring the left side.
Connect the 6-foot side wall components, ensuring correct alignment and secure fastening.
Connect key components to form the middle link section of the greenhouse.
Attach and tighten the link brace, ensuring structural integrity and preventing bowing.
Complete the middle link by adding reinforcing parts and ensuring all connections are secure.
Remove doorway placeholder and attach the front gable to complete the main structure.
Requires two people; use suction cups and soapy water for easier fitting of glass panels.
Pay close attention to measurements when installing the roof vent glass and frame.
| Brand | Halls |
|---|---|
| Model | Qube 610 |
| Category | Greenhouse Kit |
| Language | English |