Do you have a question about the Halo 1600 and is the answer not in the manual?
Critical safety instructions and warnings to prevent injury, damage, or death.
Codes indicating errors and their potential causes and solutions.
Details on how to recharge the power station using various methods.
Instructions for charging the power station via AC cable.
How to enable and use the power station's output ports.
Steps to diagnose issues with turning on output ports.
Troubleshooting steps for when the device fails to charge.
The HALO Power Station 1600 is a versatile portable power solution designed for various scenarios, from RV travel to home backup during outages. It combines power, portability, and versatility to keep your devices charged and connected.
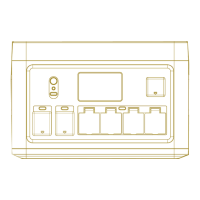
The power station features multiple input and output ports to accommodate a wide range of devices. For charging the unit itself, it supports AC input, DC/Solar input, and 12V car charging. The AC input port (11) allows for wall outlet charging, while the DC/Solar input port (7) can be used with solar panels or other DC sources. When both AC and DC/Solar inputs are used, the DC/Solar input takes priority.
For output, the device offers a variety of options. It includes DC output ports (1) (5521) and a 12V output port (2) for powering DC devices. USB-A output ports (3) and USB-C output ports (4) are available for charging mobile devices and other USB-powered gadgets. For AC appliances, the power station provides multiple AC output ports (6). Additionally, it features a wireless output (8) for compatible devices and an LED light (13) for illumination.
The LCD display (5) provides essential information about the power station's status. It shows the AC input icon (1) during AC charging and the DC input icon (2) when a solar panel or DC source is connected. The Uninterruptible Power Supply (UPS) icon (3) indicates that the UPS feature is active, providing backup power for sensitive equipment during outages. The input power (4) displays the total charging power, while the input time (5) estimates the remaining time to full charge. The AC charge mode (6) indicates whether slow charging is enabled. The cooling fan status (7) shows when the fan is active. High temperature warning (8) and low temperature warning (9) icons alert users to extreme internal temperatures. The AC output frequency (10) is also displayed. A wireless icon (11) indicates when wireless output is on. The discharge time (12) estimates the remaining time until the battery is fully discharged, and the output power (13) shows the total power being drawn by connected devices. The AC output icon (14), DC output icon (15), and USB output icon (16) indicate when these respective outputs are enabled. Finally, the battery level indicator (17) shows the current charge level of the battery.
The power station is equipped with an Overload Protection (OLP) Reset button (10) to address overload conditions. Air intake vents with cooling fans (9) ensure proper temperature regulation. A grounding port (12) is also included for safety.
To operate the power station, press and hold the Power ON/OFF button (15) for 2-3 seconds to turn the unit on or off. Once powered on, individual output ports can be enabled by pressing their corresponding buttons. The MODE button (16) allows users to switch between AC fast charging and slow charging (25%), with fast charging being the default. Slow charging is recommended when the AC outlet is shared with other equipment. The LED Light button (17) activates the LED light and cycles through different modes: Low, High, Strobe, S.O.S., and Off. Dedicated buttons are available to turn on/off the DC output (18), USB output (19), and AC output (20).
The device supports various charging methods. For AC charging, use the provided AC charging cable. The unit takes approximately 1.8-2.8 hours to fully charge from a wall outlet. Solar panel charging is also supported, with a full charge taking 1.8-4.4 hours depending on solar conditions. A 12V car charger can be used, which takes about 18 hours for a full charge. It's important not to charge the product with solar and car port simultaneously.
The power station features a power-saving sleep mode. If not plugged into a wall outlet and no output ports are enabled, it will enter sleep mode in 5-8 minutes. When fully charged, the LCD will display 100% battery level and 0W input power, then turn off automatically. If output ports are ON and power consumption drops below a certain level (USB<5W, DC<5W, AC<25W), the device will turn off all outputs and enter sleep mode after 8 hours.
The device can intelligently identify and set the frequency of voltage (50Hz or 60Hz) when charging.
Dynamic Voltage Adjustment (DVA) technology allows the power station to exceed its standard 1600-watt rating, enabling it to power tools and appliances with heating elements up to 2000-watts.
For optimal performance and longevity, the HALO Power Station 1600 requires regular maintenance. If not used regularly, it is recommended to charge and discharge the unit every 3 months under normal temperature to maintain its service life. During storage, if the unit will not be used for more than a month, charge it to 50% capacity and store it indoors at normal temperature, away from direct sunlight. The maximum storage time should not exceed 6 months.
To clean the equipment, ensure it is disconnected from all input and output devices. Use a clean, dry, non-soft cotton cloth to wipe the device. Remove any foreign objects, dirt, or obstructions from the vents on both sides. When cleaning foreign objects in the side vents, be careful not to allow debris or other blockages to enter the equipment. Avoid using corrosive cleaners or solvents. Do not use compressed air to clean the side cooling vents, as this can force foreign particles into the interior and cause a short circuit. For safety, do not use metal objects to clean the ports.
After taking the unit out of storage, visually inspect it to ensure its appearance and all accessories are in good condition. Check the intake and exhaust vents to ensure they are free of foreign objects.
| Series | Halo |
|---|---|
| Maximum Power | 1600W |
| Form Factor | ATX |
| Fan Size | 135mm |
| Input Voltage | 100-240V |
| Input Frequency | 50-60Hz |
| Warranty | 10 years |
| Modular | Fully Modular |
| Operating Temperature | 0°C to 50°C |
| Protections | OPP, OVP, UVP, SCP, OCP, OTP |
| Model | Halo 1600 |