2
G Operating instruction
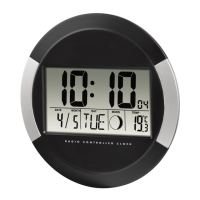
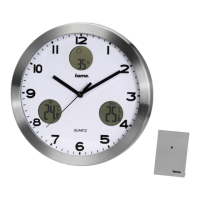
Controls and Displays
1. AM/PM (12-hour format)
2. Time
3. Day
4. Month
5. Day of the week
6. Moon phase
7. Room temperature
8. Time zone
9. Summer time
10. Battery symbol
11. Wireless symbol
12. Opening for wall mounting
13. Base
14. MODE button
=settings/conrms the setting
15. °F/°C button
=switches between °C and °F
16. UP button
=increases the current setting; activates/deactivates manual radio signal
reception; switches the display mode
17. DOWN button
=decreases the current setting; activates/deactivates manual radio signal
reception; selects the language
18. Battery compartment
Thank you for choosing aHama product.
Take your time and read the following instructions and information completely.
Please keep these instructions in asafe place for futurereference. If you sell the
device, please pass these operating instructions on to the new owner.
1. Explanation of Warning Symbols and Notes
Warning
This symbol is used to indicate safety instructions or to draw your attention to
specic hazards and risks.
Note
This symbol is used to indicate additional information or important notes.
2. Package Contents
• PP-245 DCF wireless wall clock
• 1AAbattery
• These operating instructions
3. Safety Instructions
• The product is intended for private, non-commercial use only.
• Do not operate the product outside the power limits given in the specications.
• Do not use the product in moist environments and avoid splashes.
• Do not use the product in the immediate vicinity of heaters or other heat sources
or in direct sunlight.
• Do not use the product in areas wherethe use of electronic devices is not permitted.
• Do not place the product near interference elds, metal frames, computers, TVs,
etc. Electronic devices and window frames can negatively affect the product’s
functionality.
• Do not drop the product and do not expose it to any major shocksl.
• Do not open the device or continue to operate it if it becomes damaged.
• Do not attempt to service or repair the product yourself.Leave any and all service
work to qualied experts.
• Keep the packaging material out of the reach of children due to the risk of
suffocation.
• Dispose of packaging material immediately according to locally applicable
regulations.
• Do not modify the product in any way.Doing so voids the warranty.
Warning –Batteries
• Immediately remove and dispose of dead batteries from the product.
• Only use batteries (or rechargeable batteries) that match the specied type.
• Do not mix old and new batteries or batteries of adifferent type or make.
• When inserting batteries, note the correct polarity (+ and -markings) and
insert the batteries accordingly.Failuretodosocould result in the batteries
leaking or exploding.
• Do not overcharge batteries.
• Keep batteries out of the reach of children.
• Do not short circuit the batteries/rechargeable batteries and keep them away
from uncoated metal objects.
4. Getting Started
4.1 Inserting the battery
Remove the battery that was already inserted into the clock, remove the protective
lm if necessary as well as the contact interrupter and the re-insert the battery with
the correct polarity.The clock is ready for operation.
4.2 Replacing the battery
Remove and dispose of any used batteries. Insert the new battery (AA). Ensurethat
the polarity of the battery corresponds to the symbols in the battery compartment
(18).
5. Installation
• Youcan mount the wall clock on awall using the opening on the back (12).
Warning –Mounting Note:
• Beforemounting the clock, ensurethat the chosen wall is suitable for the
weight to be mounted, and make surethat thereare no electrical wires,
water,gas or other lines at the installation site on the wall.
• Purchase special fastening materials from specialised dealers.
• Youcan also stand the wall clock on alevel surface using the base (13).
6. Operation
Note –Input
Hold down the UP button (16) or the DOWN button (17) to select the values
faster.
6.1. Automatic setting using the DCF signal
• Once the batteries areinserted, the clock automatically searches for aDCF signal.
During the search, the wireless icon (11) ashes.
Display Searching for the DCF signal
Display ashing
Active
Displayed continuously
Successful –signal is being
received
Not displayed Deactivated
• If the station still does not receive asignal, press and hold the UP button (16) and
the DOWN button (17) for approx. 3seconds to start the manual search for the
DCF signal. The wireless icon (11) will start to ash.