6
Note –Day of the week
Youcan choose from German (GER), English (ENG), French
(FRE), Italian (ITA), Spanish (SPA), Dutch (DUT) and Danish
(DAN) for the day of the week display.
6.3 Celsius/Fahrenheit
•Press the ‘
’button (16) when in any mode to choose
between °C (Celsius) and °F (Fahrenheit).
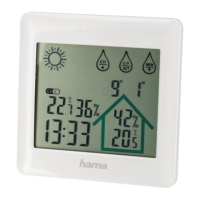
Maximum and minimum temperature and humidity
values
•The base station automatically stores the maximum and
minimum indoor/outdoor temperatureand humidity values.
•Repeatedly press the ‘ ’button (18) to switch between the
current temperatureand humidity,minimum temperature
and humidity (MIN) and maximum temperatureand humidity
(MAX).
•The maximum and minimum values aredisplayed for 10
seconds.
•Toresetthe stored maximum (MAX) and minimum (MIN)
values, press and hold the ‘ ’button (18) while the values
aredisplayed.
6.4. Backlight
Note –Backlight
•Ifyou press the
LIGHT
button (1), the display will light up
for approx. 10 seconds.
6.5. Low battery charge
As soon as the battery symbol
appears on the display of
the base station, the capacity of the batteries in the measuring
station is very low.Replace the batteries immediately.
Note –Replacing the batteries
•Note that the stations have to be resynchronised each
time you change the batteries in the measuring or base
station or in the wireless rain gauge.
•Todothis, remove the batteries from all stations and then
reinsert them, or change them as required.
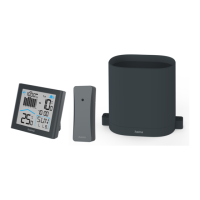
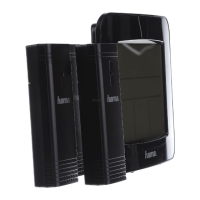
7. Wireless rain gauge
Note
The fallen precipitation is measured in millimetres (mm). 1
mm of precipitation corresponds to aprecipitation amount
of 1l/m². The average amount of precipitation per year in
Germany is approx. 800 mm ^= 800 l/m².
7.1. Rainfall display
•The rainfall is displayed in the form of ahistogram (11).
•The histogram shows the precipitation values for the last 6
hours (max. display range: 5mm–50mm).
•Press the RAIN button (19) in any mode to switch between
the following rainfall displays (12):
•1H=rainfall in the last hour
•24H =rainfall in the last 24 hours
•WEEK =rainfallinthe last week
•MONTH =rainfall in the last month
•TOTAL =total rainfall since rst-time use or the last reset
•Press and hold the RAIN button (19) in the respective
rainfall display to reset the stored precipitation amounts.
Each rainfall display (1H/24H/WEEK/MONTH/TOTAL) can be
individually reset.
Note –Rain alarm, 24-hour count
The rain alarm informs you as soon as the amount of
precipitation exceeds auser-denable value. If this value is
reached within 24 hours, the base station will emit abeep.
The data is deleted daily at 24:00 hours.
7.2 Setting the rain alarm
•Press the ‘ ’button (20) in any mode to display the
current rain alarm value for approx. 10 seconds (presetting:
12.7 mm).
•Tochange the preset alarm value, keep the ‘ ’button (20)
pressed; the preset alarm value ashes.
•Toselect the value, press the ‘ ’button (17) or the ‘
’button (18), and conrm your selection by pressing the ‘
’button (20).
•Ifyou do not make an entry for 10 seconds, the device
automatically exits the settings mode and the settings you
made aresaved.
7.3 Activating/deactivating the rain alarm
•Move the rain alarm ON/OFF slide switch (21) to the left to
the ON position. The rain alarm is activated and the rain
alarm symbol (13) appears on the display (2).
•Move the rain alarm ON/OFF slide switch (21) to the right to
the OFF position. The rain alarm is deactivated and the rain
alarm symbol (13) disappears from the display (2).
7.4 Stopping the rain alarm
•Ifthe rain alarm is activated and the set alarm value is
exceeded, the alarm is triggered and abeep will sound on
the base station for two minutes. The rain alarm symbol (13)
ashes. After that, the rain alarm stops automatically.
•Press the LIGHT button (1) or any other button of your choice
to stop the rain alarm manually.