EasyManua.ls Logo

HAMPTON BAY HDMIRAGECO PC - User Manual

HAMPTON BAY HDMIRAGECO PC
18 pages
Print Icon
To Next Page IconTo Next Page
Loading...
THANK YOU
We appreciate the trust and condence you have placed in Hampton Bay through the purchase of this patio heater. We strive to continually
create quality products designed to enhance your home. Visit us online to see our full line of products available for your home improvement
needs. Thank you for choosing Hampton Bay!
USE AND CARE GUIDE
48,000 COMMERCIAL GRADE HEAT FOCUSING PATIO HEATER
Questions, problems, missing parts? Before returning to the store,
call Hampton Bay Customer Service
8 a.m. - 7 p.m., EST, Monday - Friday, 9 a.m. - 6 p.m., EST, Saturday
1-855-HD-HAMPTON
HAMPTONBAY.COM
Item #1002693243
Model #HDMIRAGECO PC
Question and Answer IconNeed help?

Do you have a question about the HAMPTON BAY HDMIRAGECO PC and is the answer not in the manual?

Summary

Warranty

What Is Covered

We warrant that all aspects of this product will be free of defects in material and workmanship for 2 years.

What Is Not Covered

Defects or damage caused by misuse, alteration, product abuse, or unauthorized service are not covered.

Pre-Assembly

Planning Assembly

Check contents, gather tools, and prepare a clean, spacious area for assembly.

Tools Required

Lists the necessary tools for assembly, including an adjustable wrench and a 1/4 in. spanner.

Hardware Included

Details the parts and quantities of hardware included for assembly, with a visual reference.

Package Contents

Lists all the parts included in the package with their corresponding labels and quantities for assembly.

Technical Data

Provides key specifications of the patio heater, including dimensions, weight, heat input, and gas pressure.

Assembly

Assembling the Legs

Instructions for attaching the base plate and cylinder chamber supports to the base.

Attaching the Cylinder Chamber Walls

Steps to attach the lower and upper cylinder chamber walls to the chamber supports.

Attaching the Lower Support Pole

Guide for attaching the lower support pole to the cylinder chamber supports using bolts and nuts.

Attaching the Cylinder Chamber Door

Instructions for assembling and attaching the upper and lower cylinder chamber doors.

Attaching the Upper Support Pole and Table Top

Steps to attach the table top and the upper support pole to the existing structure.

Attaching the Lantern

Instructions for feeding the hose through the support pole and securing the lantern.

Attaching the Regulator and Propane Bottle

Guide for connecting the lantern hose to the regulator, screwing on the regulator, and positioning the gas cylinder.

Fitting the Reflector Handle

Steps to secure the reflector handle to the bracket using a pre-fitted R-clip and pin.

Assembling the Reflector

Instructions for assembling the reflector side panels and attaching the top panel.

Attaching the Reflector to the Lantern

Steps to attach the assembled reflector to the lantern using bolts and washers.

Operation

Positioning Instructions

Guidelines for placing the heater in a well-ventilated outdoor area, maintaining safe distances from combustible materials.

Connecting to the Cylinder

Confirms control knobs are off and connects the regulator to the gas bottle.

Use Instructions

Details safe use of the heater in ventilated spaces, including specific enclosure requirements.

Lighting Instructions

Step-by-step guide for igniting the heater using the spark button or a match.

To Turn Off

Procedure for turning off the heater and disconnecting the gas supply.

Leak Testing

Instructions for checking gas connections for leaks using a soap solution and performing annual tests.

Gas and Regulator

Information on correct gas hose connection, propane usage, regulator specifications, and bottle storage.

Maintenance

Flame Characteristic

Guidance on visually checking the flame pattern and identifying issues like flame lift or black spots.

Screw and Bolt Connections

Recommendation to regularly check and tighten all screws and bolts for safety and performance.

Storage

Advice on proper storage, including reflector removal, and indoor storage precautions for the gas bottle.

Service

Recommendations for servicing frequency, contacting authorized agents, and obtaining spare parts.

Care & Cleaning

Instructions for cleaning the heater, ensuring it is cool and gas is off before maintenance.

Overview

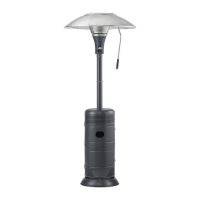
This document is a Use and Care Guide for a Hampton Bay 48,000 Commercial Grade Heat Focusing Patio Heater, identified by Item #1002693243 and Model #HDMIRAGECO PC.

Function Description

The Hampton Bay patio heater is designed for outdoor use to provide radiant heat. It operates on LP (liquefied propane) bottled gas and features a 48,000 BTU/h heat input, making it a commercial-grade appliance suitable for heating outdoor spaces. The heater incorporates a heat-focusing reflector to direct warmth efficiently. For safety, it includes a flame failure and tilt device that automatically cuts off the gas supply if the flame blows out or the unit tips over. The design emphasizes safe operation with specific instructions for positioning, gas cylinder connection, lighting, and shutdown.

Important Technical Specifications

  • Overall Height: Approximately 93.5 inches
  • Overall Weight: 124 lbs
  • Overall Width: 38.5 inches
  • Heater Heat Input (-Qn): 48,000 Btu/h
  • Heater Gas Consumption: 2.20 Lbs per hour
  • Heater Injector Size: 0.08 inches
  • Setting Pressure: 11.0 in. per W.C
  • Regulator Outlet Pressure: 11.0 in. per W.C
  • Standard: ANSI Z83.26-2014 • CSA2.37-2014 Gas Fired Outdoor infrared Patio heaters
  • Gas Supply Pressure: Max. 250 PSI, MIN.5 PSI
  • LP-Gas Cylinder Requirements:
    • Constructed and marked in accordance with U.S. Department of Transportation (DOT) or Canadian Standard CAN/CSA-B339 specifications.
    • Provided with a listed overfilling prevention device.
    • Compatible cylinder connection device.
    • 20LB (9kg) cylinder, LPG capacity 4.7 gallons (17.8 litres).
    • Cylinder Dimensions: Height 17.75 inches (451mm), Width 12.25 inches (311mm).
    • Must include a collar to protect the cylinder valve.
  • Clearances to Combustible Surfaces: Minimum of 40 inches (1m) from all sides and above.

Usage Features

  • Outdoor Use Only: The appliance is strictly for outdoor use in a well-ventilated area, defined as having a minimum of 30% of its surface area open. It should not be used indoors, in enclosed areas, or below ground level.
  • Heat Focusing Reflector: Designed to direct heat effectively, enhancing warmth in the surrounding area. The reflector should be in the full down position when not in use or during windy/rainy conditions.
  • Ignition System: Features a spark button for easy lighting. If the sparker fails, manual lighting with a match is possible through a designated gap.
  • Adjustable Flame: The control dial allows adjustment to high or low flame positions as required.
  • Safety Devices:
    • Flame Failure Device: Automatically cuts off gas supply if the flame extinguishes.
    • Tilt Device: Automatically cuts off gas supply if the unit is tipped over.
    • Gas Leak Testing: Instructions are provided for annual leak testing and after any part replacement or cylinder removal, using a 50% water and 50% dish soap solution.
  • Gas Cylinder Storage: The LP-gas cylinder must be stored outdoors in a well-ventilated area, out of reach of children, and disconnected with dust caps tightly installed. It should never be stored in a building, garage, or any enclosed area.
  • Hose and Regulator: The supplied pressure regulator and hose must be used, and any replacements must meet manufacturer specifications. An adjustable regulator should never be used with this appliance. The hose must be free from twisting, tension, cuts, cracks, or excessive wear.
  • Cylinder Positioning: The cylinder must be kept level and vertical when positioned inside the base and secured with the provided chain to ensure vapor withdrawal.
  • Pre-Operation Checks: Before each use, inspect the visible portion of the hose, ensure all control knobs are in the off position, and perform a leak test as necessary.
  • Windy Conditions: In windy conditions, the heater should be shielded from wind to ensure easy lighting and to maintain the flame.

Maintenance Features

  • Regular Cleaning: The patio heater should be cleaned regularly between uses and especially after extended periods of storage.
  • Cooling Requirement: Ensure the heater is fully cooled before cleaning or storing. Never douse hot surfaces with water.
  • Annual Inspection/Service: The heater should be inspected before use and at least annually by a qualified service person. Servicing is recommended after every 100 hours of use or annually, whichever comes first.
  • Part Replacement: Worn or damaged parts should be replaced immediately. Only genuine parts should be used.
  • Control Compartment Cleanliness: It is imperative to keep the control compartment, burners, and circulating air passageways clean and free from combustible materials, gasoline, and other flammable vapors and liquids.
  • Ventilation Openings: Keep the ventilation openings of the cylinder enclosure free and clear from debris.
  • Reflector Care: The reflector can be removed for long-term storage to save space, but care must be taken not to damage or deform its shape, as this will affect performance. The heater should never be operated without the reflector in place.
  • Screw and Bolt Connections: All screws and bolts should be checked and tightened on a regular basis.
  • Storage Conditions: Do not leave the patio heater exposed to outside weather or stored in damp, moist conditions. If stored indoors, the gas bottle must be disconnected and left outside in a dry, well-ventilated area, away from heat or ignition sources.
  • Flame Characteristic Check: Visually check the flame pattern at the burner mesh during operation. A normal flame is blue with yellow at the top, and the burner mesh should be red hot. If flames extend beyond the mesh, or if there is flame lift, light back, or black spots, the heater should be turned off immediately and serviced.

HAMPTON BAY HDMIRAGECO PC Specifications

General IconGeneral
BrandHAMPTON BAY
ModelHDMIRAGECO PC
CategoryPatio Heater
LanguageEnglish

Related product manuals