EasyManua.ls Logo

Hans Grohe Modern User Manual

Hans Grohe Modern
72 pages
Go to English
To Next Page IconTo Next Page
Page #1 background imageLoading...
Page #1 background image
DE Gebrauchsanleitung / Montageanleitung 2
FR Mode d'emploi / Instructions de montage 4
EN Instructions for use / assembly instructions 6
IT Istruzioni per l'uso / Istruzioni per Installazione 8
ES Modo de empleo / Instrucciones de montaje 10
NL Gebruiksaanwijzing / Handleiding 12
DK Brugsanvisning / Monteringsvejledning 14
PT Instruções para uso / Manual de Instalación 16
PL Instrukcja obsługi / Instrukcja montażu 18
CS Návod k použití / Montážní návod 20
SK Návod na použitie / Montážny návod 22
ZH 用户手册 / 组装说明 24
RU Руководство пользователя / Инструкция по
монтажу 26
HU Használati útmutató / Szerelési útmutató 28
FI Käyttöohje / Asennusohje 30
SV Bruksanvisning / Monteringsanvisning 32
LT Vartotojo instrukcija / Montavimo instrukcijos 34
HR Upute za uporabu / Uputstva za instalaciju 36
TR Kullanım kılavuzu / Montaj kılavuzu 38
RO Manual de utilizare / Instrucţiuni de montare 40
EL Οδηγίες χρήσης / Οδηγία συναρμολόγησης 42
SL Navodilo za uporabo / Navodila za montažo 44
ET Kasutusjuhend / Paigaldusjuhend 46
LV Lietošanas pamācība / Montāžas instrukcija 48
SR Uputstvo za upotrebu / Uputstvo za montažu 50
NO Bruksanvisning / Montasjeveiledning 52
BG Инструкция за употреба / Инструкция за
употреба 54
SQ Udhëzuesi i përdorimit / Udhëzime rreth
montimit 56
AR ﻊﻴﻤﺠﺘﻟا تﺎﻤﻴﻠﻌﺗ / ماﺪﺨﺘﺳﻻا ﻞﻴﻟد 59
Classic
15404000
PuraVida
15407000
Modern
15403000
Question and Answer IconNeed help?

Do you have a question about the Hans Grohe Modern and is the answer not in the manual?

Hans Grohe Modern Specifications

General IconGeneral
BrandHansgrohe
StyleModern
WarrantyLimited Lifetime
FinishChrome
MaterialBrass (may vary by specific model)

Summary

Safety and General Information

Installation Instructions Overview

Steps for installing, flushing, and testing the fitting according to norms.

Troubleshooting Common Issues

Insufficient Water Supply

Troubleshooting steps for resolving low water pressure problems.

Installation Guide Part 1

Step 1: Rough-in and Flange Installation

Preparation and installation of the rough-in unit and protective flange.

Step 2: System Flushing Procedure

Procedure for flushing the installed system to remove debris.

Step 3: Cartridge Orientation Check

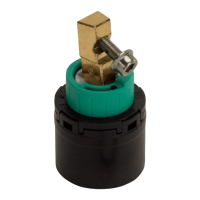
Checking and potentially rotating the cartridge 180 degrees for correct function.

Step 4: Post-Flushing System Verification

Verifying the system's readiness after the flushing process.

Step 5: Attaching Escutcheon and Handle

Mounting the escutcheon and attaching the control handle.

Step 6: Securing the Mixer Assembly

Final assembly and tightening of the mixer unit components.

Installation Guide Part 2

Step 7: Mounting Support Bracket

Installing the necessary support bracket for the mixer unit.

Step 8: Fixing the Escutcheon Plate

Securing the decorative escutcheon plate to the wall surface.

Installation Guide Part 3

Step 13: Water Temperature Measurement

Measuring the water temperature at the showerhead outlet for verification.

Step 14: Safety Function Temperature Setting

Adjusting the high-temperature limit for enhanced user safety.

Temperature Regulation

Setting Maximum Safe Temperature

Detailed steps for setting the maximum safe water temperature limit.

Handle and Cartridge Adjustments

Related product manuals