Do you have a question about the Happy Puzzle The Amazing Clock Kit and is the answer not in the manual?
Explains the internal mechanism of the wind-up clock, detailing how the spring tension and pendulum regulate its movement.
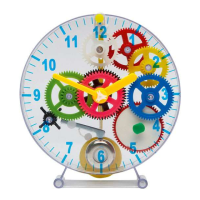
Place the clock base on a flat surface to begin the assembly process.
Attach the clear circle with tail, silver bell, large clear stopper, and silver hammer to the clock base pillars.
Insert the green wind-up crank and secure the white ratchet wheel, ensuring the flat side faces upwards.
Place the red, white, and yellow wheels onto the clock base in the specified order.
Connect the white gear and black wheel, then place them and the black cog onto the clock base.
Position the green wheel, ensuring it interlocks with black pieces, then place the pink wheel through the white gear.
Place the red and white wheel/spring and the blue wheel, ensuring correct interlocking.
Secure the clock face by inserting the yellow pin and green stopper into designated holes.
Place the hour and minute hands onto the clock mechanism and secure them with the grooved stopper.
Connect the clear fork and yellow lever, then insert the fork through the top hole of the clock.
Place the white stool over the clear fork and yellow lever, securing it through the yellow pin.
Assemble the yellow pendulum, place it on the white stool, and secure with stoppers.
The clock is now complete; wind the green crank to start its operation.
The Amazing Clock Kit is an educational self-assembly kit designed to help children aged 5 to 15 understand the mechanics of a wind-up clock. This kit allows users to build their own real wind-up clock, providing a hands-on learning experience about how timepieces function. The kit is not intended to be a long-term timepiece but rather a tool for educational exploration.
The core function of the Amazing Clock Kit is to demonstrate the principles of a wind-up clock mechanism. When the clock is wound, its internal spring is tightened, storing potential energy. As this spring gradually releases its tension, it transfers energy to a series of cogwheels, causing them to turn one by one. The pendulum plays a crucial role in regulating the speed at which this energy is released, thereby controlling the clock's timekeeping accuracy and the rate at which the cogwheels turn and the spring unwinds. Once the spring has fully unwound, it will no longer have energy to transfer, and the mechanism will stop, requiring the clock to be rewound to restart the process. When fully wound, the clock is designed to run for approximately six hours.
The kit comes with a comprehensive instruction booklet that guides users through the assembly process step-by-step. It emphasizes the importance of using an appropriate working area with a clear, flat surface to ensure all pieces fit together simply and correctly. Users are advised to always check that they are using the correct piece and placing it in the right orientation.
The assembly process begins by placing the clock base on a flat surface. Subsequent steps involve positioning various components such as the clear circle with tail, silver bell, large clear stopper, and silver hammer onto designated pillars. The green wind-up crank is inserted through the back of the clock, followed by the white ratchet wheel, ensuring the flat side of the ratchet wheel faces upwards.
The intricate gear system is then assembled, starting with the red, white, and yellow wheels placed in a specific order. The white gear is connected to the black wheel and positioned in the middle of the clock base, with the thin end of the white gear facing upwards. The black cog with four legs is placed on a pillar to the left of the silver hammer. The green wheel is positioned on a pillar to the left of the black wheel, ensuring it interlocks with both black pieces. The pink wheel is then placed through the white gear connected to the black wheel.
Further assembly involves positioning the red and white wheel/spring through the green wind-up crank, ensuring the white ratchet wheel remains secure. The blue wheel is placed on the last remaining pillar, making sure it overlaps the red and white wheel/spring and interlocks with the yellow wheel.
Once the internal mechanism is assembled, the clock face is attached to the top of the base. This is secured by inserting a yellow pin through a hole above the number 12 and a green stopper through a hole between numbers 4 and 5 on the clock face. The hour hand is placed over the pink wheel in the middle, followed by the minute hand over the hour hand. A clear triangular stopper with grooved ends is then placed over both hands to secure them in position.
The clock is then flipped over to assemble the pendulum mechanism. The clear fork and yellow lever are connected, forming a Z-shape with the arms of the clear fork facing downwards. This assembly is then inserted through a hole at the top of the clock, situated directly below the yellow pin holding the face and base together. The white stool is placed over the clear fork and yellow lever, and through the yellow pin, to secure the mechanism.
Finally, the yellow pendulum (top and bottom parts) are connected by locking their ridged edges together. The completed pendulum is placed on top of the white stool and yellow lever, ensuring the '+fast and –slow' print faces the user. A clear triangular stopper with solid ends is placed over the end of the white stool to hold the top of the pendulum in place, and a small clear stopper is attached on top of the yellow lever.
Once all steps are complete, the clock is ready to operate. To start it, the green crank at the back of the clock is wound.
As an educational kit, the primary "maintenance" involves careful handling during assembly and use. The instructions emphasize ensuring all pieces fit together simply and in accordance with the instructions, and to always check that the correct piece is being used and placed in the right way round. This attention to detail during assembly helps ensure the clock functions as intended for its educational purpose.
The kit is designed for children aged 5 to 15, and younger children may benefit from adult assistance during construction. This adult supervision can help prevent damage to the components during assembly and ensure proper functioning.
It is crucial to keep the small pieces of the kit away from children under the age of 36 months, as they present a potential choking hazard. This safety precaution is a key aspect of "maintenance" in terms of responsible storage and handling of the kit components.
Since the clock is not intended to be a long-term timepiece, extensive maintenance beyond proper assembly and careful handling is not specified. If the clock stops running after its six-hour cycle, it simply needs to be rewound using the green crank to restart the process. The design focuses on demonstrating the mechanics rather than requiring ongoing upkeep typical of a functional household clock.
| Category | Toy |
|---|---|
| Product Name | Happy Puzzle The Amazing Clock Kit |
| Assembly Required | Yes |
| Components | assembly instructions |
| Educational Focus | STEM, Time-telling, Mechanics |