EasyManua.ls Logo

Happy Trampoline Galactic Xtreme - User Manual

Happy Trampoline Galactic Xtreme
22 pages
Print Icon
To Next Page IconTo Next Page
Loading...
Galactic
Xtreme
Trampoline Installation
Manual
10x23
Questions or Help with Installation
Email: Customerservice@Happytrampoline.com
888-801-4403
Question and Answer IconNeed help?

Do you have a question about the Happy Trampoline Galactic Xtreme and is the answer not in the manual?

Summary

Step 1: Setting Up The Frame

Building the Legs

Assemble the trampoline legs using parts 1 and 2.

Connecting Legs

Bolt together the legs using parts 24 and 25.

Step 2: Building the Mid Frame

Mid Frame Assembly

Connect parts for the mid frame, ensuring spring slots face up and net cups outward.

Step 3: Finishing Up the Frame

Frame Completion

Bolt frame sections together using 2.75-inch nuts and bolts.

Step 4: Installing the Jumping Mat

Spring Installation Process

Install springs following numerical order, skipping slots, and alternating sides for even tension.

Step 5: Installing Spring Pad

Spring Pad Placement

Lay out spring pads, loop springs through loops, and ensure V rings are flat on fabric tabs.

Installing the Net

Net Enclosure Pole Assembly

Connect net enclosure poles (parts 18 & 19) and sleeve them with part 23.

Fiber Glass Net Rails

Net Rail Installation

Connect four fiberglass rod sections and lay them out according to the diagram for the net.

General Safety Instructions

Pre-Use Safety Checks

Consult a doctor, check trampoline for wear, and always use the safety enclosure.

Usage Safety Guidelines

Use one person at a time, under supervision, stop if unwell, and wear appropriate clothing.

Information on Trampoline Use

Basic Trampoline Control

Learn to control bounces, stop safely, and use proper landing techniques.

Prohibited Actions & Conditions

Avoid somersaults, foreign objects, poor maintenance, and adverse weather conditions.

Tips to Reduce Accident Risk

User Responsibilities

Maintain control, stay within competence, practice basic techniques, and consult instructors.

Supervisor Responsibilities

Enforce rules, advise users on correct techniques, and be aware of all safety warnings.

Trampoline Safety Instructions

Usage Precautions

Do not use under influence, climb carefully, master bounces, stay in control, and limit users.

Supervision Precautions

Supervise all users, check condition, keep area clear, and secure when not in use.

Accident Classification and Identification

Mounting and Dismounting Risks

Mount/dismount carefully, avoid grabbing pads or stepping on springs.

User Impairment Risks

Do not use under alcohol/drugs; this impairs judgment and coordination.

Multiple User Risks

Multiple users increase injury risk from collisions, loss of control, or landing on springs.

Frame and Control Risks

Stay centered, keep pads on frame, and don't attempt advanced maneuvers without mastering basics.

Trampoline Techniques: Basic Skills

Basic Skill 1: The Basic Bounce

Learn the basic bounce: standing, arm swing, leg tuck, controlled landing.

Basic Skill 2: The Knee Drop

Learn knee drop by landing on knees, maintaining balance, and returning to standing.

Basic Skill 3: The Seat Drop

Learn seat drop by landing on hips, then using momentum to return to standing.

Trampoline Techniques: Advanced Skills

Advanced Skill 1: Hands and Knees to Front Drop

Transition from hands and knees to a front drop landing.

Advanced Skill 2: Front Drop

Learn front drop by landing flat on stomach, then recovering to standing.

Trampoline Lesson Plan

Lesson 1: Basic Setup and Bounce

Covers mounting, basic bounce, braking, and knee drop landing.

Lesson 2: Bounce Progression

Reviews basic skills, knee bounce, and seat drop with variations.

Lesson 3: Advanced Skills Introduction

Focuses on hands/knees to front drop and routine practice, with instructor advice.

Lesson 4: Routine Development

Reviews all skills, front drop, and incorporates them into a user-chosen routine.

Overview

This document is an installation manual for the Galactic Xtreme 10x23 Trampoline, providing detailed instructions for assembly, safety guidelines, and basic to advanced usage techniques.

Function Description:

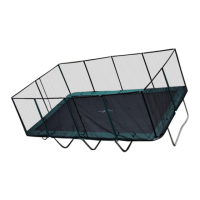
The Galactic Xtreme 10x23 Trampoline is designed for recreational bouncing and exercise. It features a rectangular frame with a jumping mat, surrounded by a safety enclosure net. The trampoline's primary function is to provide a safe and controlled environment for users to perform various jumps and exercises, from basic bounces to more advanced techniques, while minimizing the risk of injury through its robust construction and safety features.

Important Technical Specifications (derived from parts list and diagrams):

  • Dimensions: 10x23 feet (rectangular).
  • Frame Components:
    • L Leg Frame (Part #1): 6 units, thicker L-shaped legs.
    • L Leg Connector (Part #2): 3 units, thicker leg connectors.
    • Corner Frame (Part #3 & #4): 2 units each (bottom left/top right and bottom right/top left), each with 12x2 springs and 2 corner spring slots, totaling 16 spring slots per corner frame.
    • Short Side Rail (Part #5): 2 units, with a net cup in the middle (for the short side of the trampoline), 16 spring slots.
    • Side Rail (Part #6): 2 units (for 10x23 & 13x23 models), no net cup, 23 Ft Side, 14 spring slots.
    • Side Rail (Part #7): 2 units (for 10x23 & 13x23 models), net cup at the end, 23 Ft Side, 16 spring slots.
    • End Leg Support (L) shaped (Part #15): 4 units, thinner L-shaped legs.
    • End Leg Support Connector (Part #16): 2 units, thinner leg connectors.
  • Net Enclosure System:
    • Net Cups (Part #17): 12 units.
    • Bottom Net Enclosure Poles (Part #18): 12 units (square bottom), 4 of which are marked yellow (corner posts).
    • Top Net Enclosure Pole (Part #19): 12 units (both ends round).
    • Fiber Glass Net Rod (Part #20): 4 units.
    • Net Enclosure (Part #21): 1 unit.
    • Net Enclosure Sleeves (Part #23): 12 units, green net sleeves.
  • Jumping Mat (Part #22): 1 unit.
  • Spring Pads:
    • Short Side Spring Pad (Part #31): 2 units, L cut on the edge.
    • Long Side Spring Pad (Part #36): 2 units (2-panel).
    • Long Side Spring Pad (Part #37): 4 units (3-panel).
  • Fasteners:
    • 2.75" bolt (13mm head) (Part #24): 22 units.
    • 13 mm Nut (for trampoline frame) (Part #25): 22 units.
    • 1½" Screw (to connect 2 net enclosure poles) (Part #26): 12 units.
    • 2 1/4" leg frame screw (Philips head) (Part #27): 8 units.
    • 10 mm Nut (for net and end trampoline leg) (Part #28): 20 units.
    • 1 7/8" Top net pole bolt (Philips Head) (Part #30): 12 units.
  • Springs: The trampoline uses over 100 springs, with 8 short springs specifically for the corners.

Usage Features:

  • Assembly: The manual provides a step-by-step guide for setting up the frame, installing the jumping mat, and attaching the spring pads and net enclosure. It highlights the need for multiple adults (2-3) for spring installation due to high tension and suggests using a mallet for tight connections and a ratchet tie-down strap for squeezing the frame if needed.
  • Safety Enclosure: The trampoline includes a safety enclosure designed to prevent users from falling off. It is emphasized that the enclosure is not meant to be jumped into unnecessarily.
  • Spring Pad Coverage: Spring pads cover the springs and frame to prevent direct contact and reduce injury risk. These pads are reversible and can be flipped for maintenance.
  • Skill Progression: The manual outlines a structured lesson plan for learning trampoline skills, starting from basic bounces and progressing to knee drops, seat drops, and advanced techniques like hands and knees to front drop, and front drop. It strongly advises consulting a qualified instructor for advanced skills.
  • Supervision: All users, regardless of skill level or age, must be supervised.
  • Controlled Use: Users are instructed to always remain in control of their jumps, land in the middle of the mat, and avoid bouncing towards the springs.
  • Weather Considerations: Users are warned about using the trampoline in wet or windy conditions and advised to dismantle it during extreme weather to prevent injury or damage.
  • Access Restriction: When not in use, the access ladder should be stored securely to prevent unsupervised children from playing on the trampoline.

Maintenance Features:

  • Regular Inspection: Before each use, the trampoline should be checked for bent steel tubes, torn mats, loose or broken springs, and overall stability.
  • Spring Pad Care: Spring pads should be regularly cleaned and treated with UV protectant to extend their lifespan, especially in hot climates. It's recommended to bring soft parts (mat, pad, net) indoors during hot months.
  • Frame Integrity: The manual notes that the frame may appear un-level or lopsided initially, but will even out once all springs are installed and the frame is "sucked together."
  • Net Rod Taping: The fiberglass net rods must be securely connected and taped with black electrical tape (at least 3 inches on each side of connectors, 4-5 layers) to prevent play and dropping during use.
  • Anchoring: It is recommended to purchase an anchor kit to prevent the trampoline from flipping or flying away in windy conditions.
  • Storage: The trampoline should not be used if it is wet, damaged, dirty, or worn out.
  • Assembly Tooling: While not provided, optional tools like wrenches (13mm, 10mm, 16mm), mallet, step drill bit, Philips screwdriver, black electrical tape, protective eye goggles, gloves, and a ratchet tie-down strap are suggested for assembly and maintenance.

Happy Trampoline Galactic Xtreme Specifications

General IconGeneral
BrandHappy Trampoline
ModelGalactic Xtreme
CategorySports & Outdoors
LanguageEnglish