EasyManua.ls Logo

Harbor Freight Tools PITTSBURGH AUTOMOTIVE 63862 User Manual

Harbor Freight Tools PITTSBURGH AUTOMOTIVE 63862
4 pages
To Next Page IconTo Next Page
Page #1 background imageLoading...
Page #1 background image
Visit our website at: http://www.harborfreight.com
Email our technical support at: productsupport@harborfreight.com
Owners Manual & Safety Instructions
Save This Manual Keep this manual for the safety warnings and precautions, assembly,
operating, inspection, maintenance and cleaning procedures. Write the product’s serial number in the back
of the manual near the assembly diagram (or month and year of purchase if product has no number). Keep
this manual and the receipt in a safe and dry place for future reference. 20h
When unpacking, make sure that the product is intact
and undamaged. If any parts are missing or broken,
please call 1-888-866-5797 as soon as possible.
Copyright
©
2020 by Harbor Freight Tools
®
. All rights reserved.
No portion of this manual or any artwork contained herein may be reproduced in
any shape or form without the express written consent of Harbor Freight Tools.
Diagrams within this manual may not be drawn proportionally. Due to continuing
improvements, actual product may differ slightly from the product described herein.
To ols required for assembly and se rv ic e m ay n ot b e i nc lu de d .
Read this material before using this product.
Failure to do so can result in serious injury.
SAVE THIS MANUAL.
Question and Answer IconNeed help?

Do you have a question about the Harbor Freight Tools PITTSBURGH AUTOMOTIVE 63862 and is the answer not in the manual?

Harbor Freight Tools PITTSBURGH AUTOMOTIVE 63862 Specifications

General IconGeneral
CategoryTest Equipment
Model63862
BrandPittsburgh Automotive
ManufacturerHarbor Freight Tools
TypeDigital Multimeter
DisplayLCD
Battery9V
DC Voltage200mV/2V/20V/200V
AC Voltage200V
DC Current200µA/20mA/200mA/10A
Resistance200Ω/2kΩ/20kΩ/200kΩ

Summary

Owner's Manual and Safety Introduction

Important Safety Information

Prevent Steam Burns and Hot Radiator Cap

Instructions to prevent steam burns by not opening hot radiator caps.

Use Hand Pump for Pressurization

Pressurize the system only with the hand pump, not the engine.

Handle Radiator Cap Slowly

Loosen the radiator cap slowly to release pressure gradually.

Avoid Hot Engine Parts and Fluids

Keep clear of hot engine components and fluids during operation.

Follow Product Instructions Carefully

Use the product strictly according to instructions to avoid hazards.

Wear Safety Gear

Wear ANSI-approved goggles and heat-resistant gloves during use.

Consult Vehicle Service Manual

Refer to the vehicle's manual for specific pressure testing procedures.

Clean Up Spills and Dispose Fluids

Clean coolant spills immediately and dispose of fluids properly.

Maintain Clean and Lit Work Area

Ensure the work area is kept clean and well-lit for safe operation.

Maintain Balance and Footing

Keep proper footing and balance for better control in unexpected situations.

Keep Bystanders Away

Ensure bystanders remain outside the assembly and use area.

Avoid Operating When Impaired

Do not operate if tired or under the influence of drugs or medication.

Product is Not a Toy

This product is not a toy; keep children away from it.

Use Product as Intended

Use the product only for its intended purpose.

Inspect Before Use

Inspect the product for missing or damaged parts before each use.

Maintain Labels and Nameplates

Keep product labels and nameplates legible for safety information.

Operating Instructions

Consult Vehicle Service Manual

Refer to the vehicle's service manual for specific testing instructions.

Loosen Radiator Cap Slowly

Slowly loosen the radiator cap to relieve pressure before removal.

Select and Attach Adapter

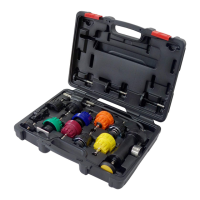
Choose the correct adapter and securely attach it to the radiator filler neck.

Connect Hand Pump

Attach the Quick Connector of the Hand Pump onto the adapter.

Pressurize Radiator

Pump the Hand Pump to the optimal pressure, watching the gauge.

Release Pressure and Disconnect

Release pressure via the valve and disconnect the coupler and adapter.

Store Kit Safely

Store the kit in its case in a clean, dry, safe location away from children.

Parts List and Diagram

Disclaimer and Warranty Information

Repair and Parts Replacement Disclaimer

States that repairs and parts replacements should be done by certified technicians.

Limited 90 Day Warranty

Details the 90-day warranty against defects in materials and workmanship.