EasyManua.ls Logo

Harbor Freight Tools Schneider 58005 User Manual

Harbor Freight Tools Schneider 58005
12 pages
To Next Page IconTo Next Page
Page #1 background imageLoading...
Page #1 background image
Visit our website at: http://www.harborfreight.com
Email our technical support at: productsupport@harborfreight.com
58005
Owners Manual & Safety Instructions
Save This Manual Keep this manual for the safety warnings and precautions, assembly,
operating, inspection, maintenance and cleaning procedures. Write the product’s serial number in the
back of the manual near the assembly diagram (or month and year of purchase if product has no number).
Keep this manual and the receipt in a safe and dry place for future reference. 21k
When unpacking, make sure that the product is intact
and undamaged. If any parts are missing or broken,
please call 1-888-866-5797 as soon as possible.
Copyright
©
2021 by Harbor Freight Tools
®
. All rights reserved.
No portion of this manual or any artwork contained herein may be reproduced in
any shape or form without the express written consent of Harbor Freight Tools.
Diagrams within this manual may not be drawn proportionally. Due to continuing
improvements, actual product may differ slightly from the product described herein.
To ols required for assembly and se rv ic e m ay n ot b e i nc lu de d .
Read this material before using this product.
Failure to do so can result in serious injury.
SAVE THIS MANUAL.
Question and Answer IconNeed help?

Do you have a question about the Harbor Freight Tools Schneider 58005 and is the answer not in the manual?

Harbor Freight Tools Schneider 58005 Specifications

General IconGeneral
BrandHarbor Freight Tools
ModelSchneider 58005
CategorySoldering Gun
LanguageEnglish

Summary

Warning Symbols and Definitions

DANGER Symbol

Indicates a hazardous situation which, if not avoided, will result in death or serious injury.

WARNING Symbol

Indicates a hazardous situation which, if not avoided, could result in death or serious injury.

CAUTION Symbol

Indicates a hazardous situation which, if not avoided, could result in minor or moderate injury.

NOTICE CAUTION Symbol

Addresses practices not related to personal injury.

Important Safety Information

General Power Tool Safety Warnings

Read all safety warnings and instructions to prevent electric shock, fire, or serious injury.

Work Area Safety

Maintain a clean, well-lit work area, avoid explosive atmospheres, and keep bystanders away.

Electrical Safety

Electrical Safety Precautions

Follow guidelines for plugs, grounding, and avoiding wet conditions to prevent electric shock.

Personal Safety

Personal Safety Practices

Stay alert, use PPE, dress properly, and maintain balance for safe tool operation.

Power Tool Use and Care

Proper Power Tool Operation

Use the correct tool, ensure trigger control, and disconnect power before adjustments.

Tool Maintenance and Storage

Maintain tools, store them safely away from children, and use as instructed.

Specific Safety Rules

Soldering Iron Safety

Avoid burns, do not open the unit, de-energize circuits, and handle fumes safely.

Product Handling and Warnings

Keep product away from children, maintain labels, and never leave unattended when plugged in.

Grounding

Grounding Wire Connection

Ensure proper grounding to prevent electric shock and death from incorrect wiring.

Grounded Tools: Tools with Three Prong Plugs

Three Prong Plug and Outlet

Connect tools with grounding plugs to properly grounded outlets for user safety.

Extension Cords

Selecting and Using Extension Cords

Choose the correct gauge and condition for extension cords to ensure safety and performance.

Symbology

Electrical and Safety Symbols

Understand symbols for Volts, AC, Amperes, and safety warnings for proper use.

Specifications

Product Specifications

Details electrical rating, temperature range, tip leakage voltage, and soldering tip types.

Setup - Before Use

Components and Controls Overview

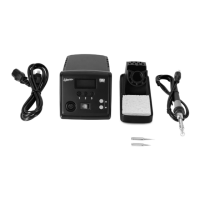
Identify and understand the function of each part of the soldering station.

Operating Instructions

Workpiece and Work Area Setup

Designate a clean, well-lit area, route cords safely, and prepare wires for soldering.

Tool Setup Procedures

Set up the soldering station on a fireproof surface, plug in the iron, and prepare the sponge.

General Operating Instructions

Operating the Soldering Station

Plug in, turn on, set temperature, clean and tin the tip, and apply solder.

Post-Operation Procedures

After use, clean and tin the tip, turn off, unplug, and store the cool tool safely.

Settings

Calibration and Temperature Settings

Calibrate temperature, set increments, and switch between Celsius and Fahrenheit scales.

Advanced Settings

Configure automatic standby, shutdown, sound, and restore factory settings.

Manually Exit Settings

Learn how to exit the settings mode manually after making adjustments.

Maintenance and Servicing

Pre-Use Inspection and Cleaning

Inspect the tool for damage, loose parts, or wiring before each use.

Soldering Tip Replacement

Procedure for safely removing and replacing the soldering tip when needed.

Parts List and Diagram

Component Identification

Detailed list and diagram of all parts included with the soldering station.

Limited 90 Day Warranty

Warranty Terms and Conditions

Understand the warranty coverage, exclusions, and procedures for making a claim.