Citation 7.0 Owner’s Manual
Preliminary Draft
Page # 13
Enitre Contents Copyright ©1995 - Harman Kardon Inc.
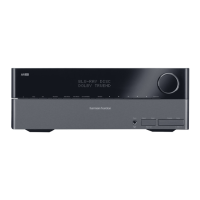
FRONT PANEL DISPLAY AND CONTROLS
Note: This section is meant to be used in conjunction with a photo or line art of the front panel. There should be
callouts to each button or indicator which will correlate to the description.
Front Panel Controls
1. Power Switch: This is an electronic “soft” switch which will take the unit form the ”stand-by” mode to a full “on”
condition. In order for this switch to be operational, the master power switch on the rear panel must be in the “on”
position. Push the bottom once to turn the unit on, push it again to turn the unit off. This function may also be
performed using the “power” button on the remote control.
2. Stand By and Power Indicators: This light is illuminated when the unit is plugged in and turned on at the master
power switch to indicate that it is in the standby mode. When power the unit is turned “on”, the green indicator will go
out, and the word “Citation” will illuminate.
3. Source \/: This button will scroll down through the eight inputs connected to the processor. Use it to select an input
to view and listen to.
4. Source /\: This button will scroll up through the eight inputs connected to the processor. Use it to select an input to
view and listen to.
5. Surround \/: This button will scroll down through the eight factory pre-set surround modes and the four user
configurable surround modes available on the Citation 7.0. Use it to select the mode you wish to apply to the input
sound.
6. Surround /\: This button will scroll up through the eight factory pre-set surround modes and the four user
configurable surround modes available on the Citation 7.0. Use it to select the mode you wish to apply to the input
sound.
7. Mute: Pressing this button will lower the volume level by ?XX? db. A the word “Mute” will replace the volume level
on the unit’s front panel display and the word “mute” will blink on an on screen display to remind you that the mute
function is engaged. Press the mute button a second time to return to your normal volume setting.
8. Volume - : This button will lower the volume in 1 db increments. Keep the button depressed until the volume is at
the desired level. You will see the volume indicator lower in the front panel display. The on screen display will confirm
a lowering in volume by moving the bar graph to the left and a lowering in the absolute volume reading. To quickly
lower the volume, press and hold the “-” button on the remote control.
9. Volume +: This button will raise volume in 1 db increments. Keep the button depressed until the volume is at the
desired level. You will see the volume indicator increase in the front panel display. The on screen display will confirm
the increasing volume by moving the bar graph to the right and an increase in the absolute volume reading. To quickly
raise the volume, press and hold the “-” button on the remote control.
NOTE: When some of the front panel controls are used, there may be a slight delay in completing the selected
action. This is a normal indication that the 7.0’s internal computer is processing the new settings. A
“****PROCESSING*****” or *****BUSY***** indication will show briefly on the bottom line of the unit’s front
panel display to alert you to this.
 Loading...