Page 5
1. Take the button pads from the old face plate and
move them onto the new one. Just drop the two
pads right in and pat them down, making sure that
they are fully inserted. Also make sure that the on/
off button is oriented the correct way. There are two
tiny holding pins (part of the front cover) that are
actually inserted into the on/off button pad to help
hold it in. Turn the front cover face up to verify that
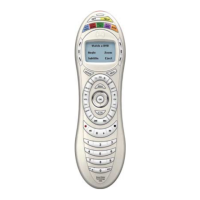
the button is in correctly. Now, if the white plastic
button guide is not attached to the logic board and
is just another part on the table, then place it on top
of the button pads.
Make sure that the guide hole with rectangular
sides is placed on the pad so it is at the top right as
shown in the picture.
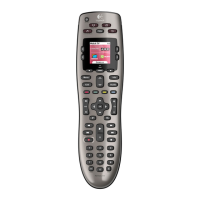
2. Now drop the logic board back on top of the button
pad (or button guide if not attached to the board).
Make sure that the post at the top of the front cover
has been fully inserted into the hole in the logic
board. Push down gently on the board and reach
your hand around to the front and click the but-
tons so you can feel if the board and front cover are
aligned correctly.
3. Re-insert the ribbon cable into the connector. Push
it all the way in and close the connecting clamp
slowly and carefully. If you close the clamp quickly
or aggressively, it may come forward too far and ac-
tually detach from the connector. You can reinstall
the clamp, but it can be difcult to do. If this hap-
pens to you, pull the ribbon cable out before you
attempt to reseat the clamp.
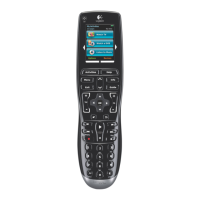
4. With the ribbon cable installed, replace the two
shorter screws that you removed before. Make sure
they are the shorter screws! At this point it is a
good idea to turn the remote face up and simply
press the keys and test that they seem to be aligned
correctly and have the appropriate tactile response.
Reassembly Procedure
 Loading...