The Harper/Goossen Straw Blower is a versatile piece of equipment designed for chopping and applying straw for erosion control, bedding, and mulching. It is available in both engine-powered and PTO-powered versions, offering flexibility for various operational needs.
Function Description:
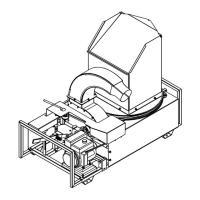
The primary function of the Straw Blower is to process bales of straw by chopping them into smaller pieces and then discharging them to a desired area. The machine utilizes a rotating tub to secure and feed the bale into cutting knives. The chopped straw is then expelled either through a Super-flex hose for precise placement or a directional spout for broadcast operations. The cutting depth is adjustable, allowing the operator to control the fineness of the chopped straw to suit different materials and conditions.
Important Technical Specifications:
Engine Powered Models (1300, 1600, 1800):
- Engine: 4-cycle Honda or Briggs & Stratton gasoline engine.
- Horsepower Rating:
- 1300 model: 13 hp
- 1600 model: 16 hp
- 1800 model: 18 hp
- Dimensions: Width – 31", Height – 51", Length – 55".
- Weight: 490 lbs (shipping weight 565 lbs).
- Cutting Device: 4-blade impeller, 16.5" diameter.
- Knives: 32.
- Discharge: 6" x 30' Super-flex hose or directional spout.
PTO Powered Model (5400):
- Drive: 540 RPM PTO.
- Dimensions: Width – 31", Height – 51", Length – 60".
- Weight: 525 lbs (shipping weight 600 lbs).
- Cutting Device: 4-blade impeller, 16.5" diameter.
- Knives: 32.
- Discharge: 6" x 30' Super-flex hose or directional spout.
General Specifications:
- Cutting Depth: Easily adjustable during operation.
- Hose: Standard 30' Super-flex hose, pliable down to 20°F (temperatures below 20°F may cause polyurethane to crack when stretched).
- Optional Spout: 360° directional spout available for broadcast operations.
- Materials: Designed for straw; not suitable for shredding cardboard due to potential damage to cutting knives and rotor.
Usage Features:
Control Identification (Engine Powered Models):
- Tub: Secures the bale and feeds it into the cutting knives as it rotates.
- Tub Engagement Lever: Engages the rotation of the tub.
- Engine: Powers the straw blower.
- Safety Door: Spring-loaded door on the tub to prevent objects from falling into the cutting knives and debris from flying out when no bale is present.
- Hose Adapter (option): Feeds straw into the Super-flex hose or serves as the mounting location for the directional spout.
- Cutting Knife Engagement Lever: Engages the cutting knives and controls belt tension.
- Retractable Bale Rack: Pulls out to hold an extra bale.
Control Identification (PTO Powered Model):
- PTO Shaft: Transfers power from the tractor to the Straw Blower.
- Tub: Bale is placed in the tub, which rotates when engaged, feeding the bale into the cutting knives.
- Tub Engagement Lever: Engages the rotation of the tub.
- Safety Door: Spring-loaded door on the tub to prevent objects from falling into the cutting knives and debris from flying out when no bale is present.
- Retractable Bale Rack: Pulls out to hold an extra bale.
- Directional Spout (option): Directs straw to the desired area; hose adapter can also be mounted here.
- Spout Crank: Turns the directional spout for discharge.
Operation:
- Starting (Engine Powered): Ensure tub and cutting rotor are disengaged, fill fuel tank (check vent on 1600/1800 models), start engine, engage cutting rotor, place bale in tub, engage tub rotation, and add new bales when approximately 1/3 of the current bale remains.
- Stopping (Engine Powered): Stop tub rotation, then disengage rotor mechanism.
- Starting (PTO Powered): Ensure tub engagement lever is disengaged, engage PTO to start blade rotation, place first bale in tub, engage rotor, and add new bales when approximately 1/3 of the current bale remains.
- Stopping (PTO Powered): Disengage tub, then disengage tractor PTO.
- Gravity-fed System: The straw blower is gravity-fed, and chopping rate may slow as the bale becomes lighter.
- Bale Preparation: Remove wire from bales bound by wire before placing them in the tub.
- Belt Readjustment: Belts will stretch during initial operation and require readjustment after the first 10-15 bales. Pulleys should be aligned with a straightedge.
Safety Guidelines:
- Always wear approved eye and ear protection.
- Keep all guards in place; never operate with the tub removed.
- Ensure all belt guides and snubbers are in place to prevent accidental engagement or belt slippage.
- Check the bale tub for children, pets, or foreign objects before operating.
- Never push material onto cutters with hands or feet.
- Periodically clean chopped material from engines to reduce fire risk.
- Keep a fire extinguisher nearby.
- Use genuine factory parts or equivalents.
- Ensure hardware is secure and properly tightened.
- Gasoline is extremely flammable and explosive; handle with care, use approved containers, avoid open flames/sparks, do not refuel a hot or running engine, refuel outdoors, and clean spills immediately.
- Battery electrolyte is corrosive; wear splash-proof goggles and protective clothing, avoid skin/eye contact, keep out of reach of children, and follow first aid instructions for exposure.
- Battery charging produces explosive gases; ventilate, avoid sparks/flames/smoking, shield eyes, and keep vent caps tight.
- Replace worn, damaged, or missing safety shields and guards.
- Replace illegible or removed safety decals.
Adjustments:
- Belt Tension: Use industrial V-belts only. Adjust by moving idler pulleys in slotted holes. Ensure pulleys are aligned with a straightedge. Avoid overtightening to prevent premature bearing, gearbox, and clutch failure.
- PTO Powered: Blade shaft drive belt adjusted via threaded rods; gearbox belt adjusted by moving idler pulley.
- Engine Powered: Tub rotation belt and gearbox drive belt adjusted by moving respective idler pulleys.
- Cutting Depth: Adjusted by moving a lever into a slot at the rear of the machine (low for coarse cut, high for finer cut).
Maintenance Features:
Knife Replacement:
- Wear protective gloves.
- Knives and hardware rotate at high speeds; ensure secure mounting.
- Knives can be turned around if serrations are worn but the tip is intact.
- Procedure: Remove belt from tub, loosen rear tub carrier bearings, slide bearings rearward, remove tub, unbolt/remove grate guide, rotate grate upwards, remove/replace knives (using Grade 5, 1/4"-20 x 1 1/2" bolts and lock nuts, treated with Loctite®, tightened to 18 in. lbs.), return grate to original position, reinstall tub.
- Balance Maintenance: Mount replacement knives in original positions. Add additional knives in opposing pairs and specified patterns. Do not remove nuts/bolts used as weights unless mounting knives in those holes. Mount knives with bevel facing impeller, alternating front and back of plate.
Service:
- Break-in Service (after first 10-15 bales): Check and tighten belts, tighten setscrews on bearings, check and adjust tub carrier bearings (should run in the tub bearing groove for even spinning).
- Bearings (All Models): Sealed and require no lubrication.
- Gearbox (PTO Powered - at 100 hours & every 6 months): Drain while warm, flush with light oil, refill with 6 oz of 80-90 weight gear oil.
- Gearbox (Engine Powered): No maintenance required unless unit leaks; use Mobil SHC 634 worm gear lubricant or equivalent.
- Engine: Follow manufacturer's maintenance recommendations. Contact certified Honda repair center for warranty work.
Troubleshooting:
- Engine: Low fuel/oil, clogged air breather.
- Belts: Tension adjustment needed, excessive load, dull knives, low grate setting, foreign material in chopper, seized bearings, misaligned pulleys.
- Cutting and Discharge: Material too moist, RPM too low (540 RPM max for PTO, adjust throttle for engine models), foreign material in hose, grate setting too low/high, wet material, dull knives.
- Gearbox: Loose housing bolts, worn oil seals, low oil level, dirt/grease accumulation, worn/damaged components, excessive load.
Standard Torque Chart:
Provides torque values (In-Lbs, Ft-Lbs, N-m) for various bolt sizes (No. 10-24 to 1/2 in.). Emphasizes tightening multiple fasteners in sequence to avoid distortion (one-third, then two-thirds, then full torque value).