7 – English
OPERATION
WARNING:
Donotallowfamiliaritywiththisproducttomakeyou
careless. Remember that a careless fraction of a second
issufficienttoinflictseriousinjury.
WARNING:
Battery products are always in operating condition.
Therefore, the switch should always be in the center
lockpositionwhennotinuseorcarryingatyourside.
WARNING:
Alwaysweareyeprotectionwithsideshieldsmarkedto
complywithANSIZ87.1.Failuretodosocouldresultin
objectsbeingthrownintoyoureyesandotherpossible
seriousinjuries.
WARNING:
Do not use any attachments or accessories not
recommendedbythemanufacturerofthisproduct.The
use of attachments or accessories not recommended
canresultinseriouspersonalinjury.
APPLICATIONS
Youmayusethisproductforthepurposeslistedbelow:
Drivingscrewswithscrewdriverbits
Light-dutydrilling
CHARGING
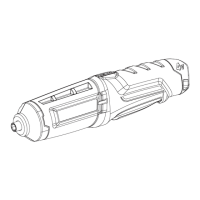
See Figure 1, page 9.
When charging the screwdriver, a red charge light on the
switch trigger side of the screwdriver will illuminate. This red
charge light will go off when the screwdriver is fully charged.
Insert charger plug into input jack making sure it is
properlyconnected.
Charger can be used with normal household current of
120 V, AC only, 60 Hz.
Connectchargertopowersupply.
Afternormalusage,aminimumof9hoursofcharging
timeisrequiredtofullyrechargethescrewdriver.
Do notplacechargerinanareaofextremeheatorcold.
Itwillworkbestatnormalroomtemperature.
Remove the product from the charger once it is fully
charged and ready for use.
DIRECTION OF ROTATION SELECTOR
(FORWARD/REVERSE/CENTER LOCK)
See Figure 2, page 9.
The direction of bit rotation is reversible and is controlled
by a selector located in the center of the handle. With the
screwdriver heldinnormaloperatingposition,thedirection
ofrotationselectorshouldbepositionedfullyupwardfor
forward motion. The direction is reversed when the selector
is fully down.
Setting the direction of rotation selector in the center
(locked)positionhelpsreducethepossibilityofaccidental
starting when not in use.
NOTE: The screwdriver will not run unless the direction of
rotationselectorispushedfullyupordown.
NOTICE:
To prevent gear damage, always allow the collet to
cometoacompletestopbeforechangingthedirection
of rotation.
Tostopthescrewdriver, release the switch trigger and allow
thechucktocometoacompletestop.
LOADING/RELEASING BITS
See Figure 3, page 9.
Insertthebitintothecolletandpushthebitinasfaraspos-
sible.Toremoveabit,pullthebitstraightoutofthecollet.
DRIVING SCREWS
See Figure 4, page 9.
Check the direction of rotation selector for the correct
setting(forwardorreverse).
Holdthetoolfirmlyandplacethebitatthepointwhere
thescrewistobedriven.
WARNING:
Do not drive a screw where there is likely to be hidden
wiring behind the surface. Contact with a “live” wire
will make exposed metal parts of the tool “live” and
possiblyshocktheoperator.Ifyoumustdriveascrew
wherehiddenwiremaybepresent,alwaysholdtoolby
insulatedgrippingsurfaces(handle)whenperformingthe
operationtopreventashocktotheoperator.
Depresstheswitchtriggertostartthetool.
Applyonlyenoughpressuretokeepdrivingthescrew.
Do not force the tool. Let the tool do the work.
 Loading...