8 – English
ASSEMBLY
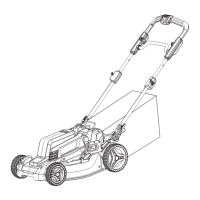
UNFOLDING AND ADJUSTING THE HANDLE
ASSEMBLY
See Figure 2.
NOTICE:
Donotallowthestartercabletobecomepinchedor
trappedwhenraisingthehandle.
To raise the handle assembly:
Pullthehandleadjustmentknobsoutandrotate90de-
grees.
Raisethehandleassembly.Avoidpinchingortrapping
anycables.
NOTE: Therearetwo stop positions for a higher and
loweradjustmentofthehandle.Thisallowsforamore
comfortableoperatingposition.
Rotatetheknob90degreesagain tosecurehandlein
place.
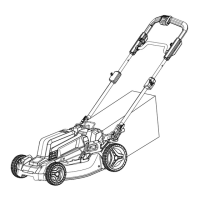
EXTENDING THE UPPER HANDLE
See Figure 3.
Movebothhandlelockleverstotheunlockedposition.
Fullyextendtheupperhandle.
Movebothhandlelockleverstothelockedpositionto
securetheupperhandleinplace.
Toretracttheupperhandle,movebothhandlelocklevers
totheunlockedpositionandpushtheupperhandleinto
thelowerhandle.Movebothhandlelockleverstothe
lockedpositiontosecure.
ASSEMBLING THE GRASS CATCHER
See Figures 4 - 5.
Placethegrasscatcherframeonaflatsurfacewiththe
handlefacingdown.
Orientthegrasscatcherbagsothevinylfloorisfacingup,
thenslidethebagontotheframe.Wheninstalling,allow
theframehandletoremainoutsidethebagandmake
surethebagseamsarelocatedattheframeedges.
Pulltheclipovertheframerailtosecureinplace.
Liftthebag’svinylfloortothetopoftheframerailand
secureinplace.
Usingthesamemethod,attachtheremainingclipson
eachsideofthebagtotheframerailtosecure.
INSTALLING THE GRASS CATCHER (FOR
REAR BAGGING OPERATION)
See Figures 6 - 7.
NOTE:
When using the grass catcher, do not install the
mulchingplug.
Removethestartkeyandbatterypack.
Placethegrasscatcherontothemowersotheopening
onthegrasscatchercoversthereardischargeopening
andthegrasscatcher’smetallocksareinsidetheslots
onthemowerhousing.
Gentlypushdownonthegrasscatcher to ensure the
metallocksarefullyseatedintheslots.Themowerwill
notstartifthemetallocksarenotfullyseated.
Reinstall the start key and battery pack when you are
readytomow.
INSTALLING THE MULCHING PLUG
(FOR MULCHING OPERATION)
See Figure 8.
NOTE:
When using the mulching plug, do not install the
grasscatcher.
Removethestartkeyandbatterypack.
Raisethemetallockonthemulchingplug.
Insertthemulchingplugintothemower’sreardischarge
openingandlowerthemulchingplug’smetallockinto
theslotontherightsideofthemowerhousing.
Gentlypushdownonthemetallocktoensureitisfully
seatedintheslot.Themowerwillnotstartifthemetal
lockisnotfullyseated.
Reinstall the start key and battery pack when you are
readytomow.
SETTING THE BLADE HEIGHT
See Figure 9.
Whenshipped,thebladeonthemowerissettoalow-cutting
position.Beforeusingthemowerforthefirsttime,raisethe
cuttingpositiontotheheightbestsuitedforyourlawn.The
averagelawnshouldbebetween1-1/2in.to2in.duringcool
monthsandbetween2in.and3-1/4in.duringhotmonths.
To adjust the blade height:
Removethestartkeyandbatterypack.
Toraisethebladeheight,squeezetheheightadjustment
triggerandliftthemowerdeckup.
NOTE:Usethescaleontopofthemowerdecktoselect
theappropriatebladeheight.
Tolowerthebladeheight,squeezetheheightadjustment
triggerandpushthemowerdeckdown.
Reinstall the start key and battery pack when you are
readytomow.
 Loading...