5
Wk mmA mm1B mm2B mm3B mm4B
61aivraH61065038.n0001.n0831.n0751.n
S/orPSE02,S/orP02aivraH81065058.n089.n0141.n0451.n
S/orP62aivraH22096039.n0701.n0941.n0361.n
63aivraH03086039.n0701.n0941.n0361.n
05aivraH040980321.n0731.n--
Figure 7.
Abbildung 7.
EN
DE
Figure 5.
Abbildung 5.
Figure 6.
Abbildung 6.
A
B3
B2
B1
B4
Flue/Abzug
Pipe container /
Schornsteinbehälter
the safety distance area of the stove.
The local authorities in charge of
approving of the installations will give more
detailed instructions about fire safety
regulations.
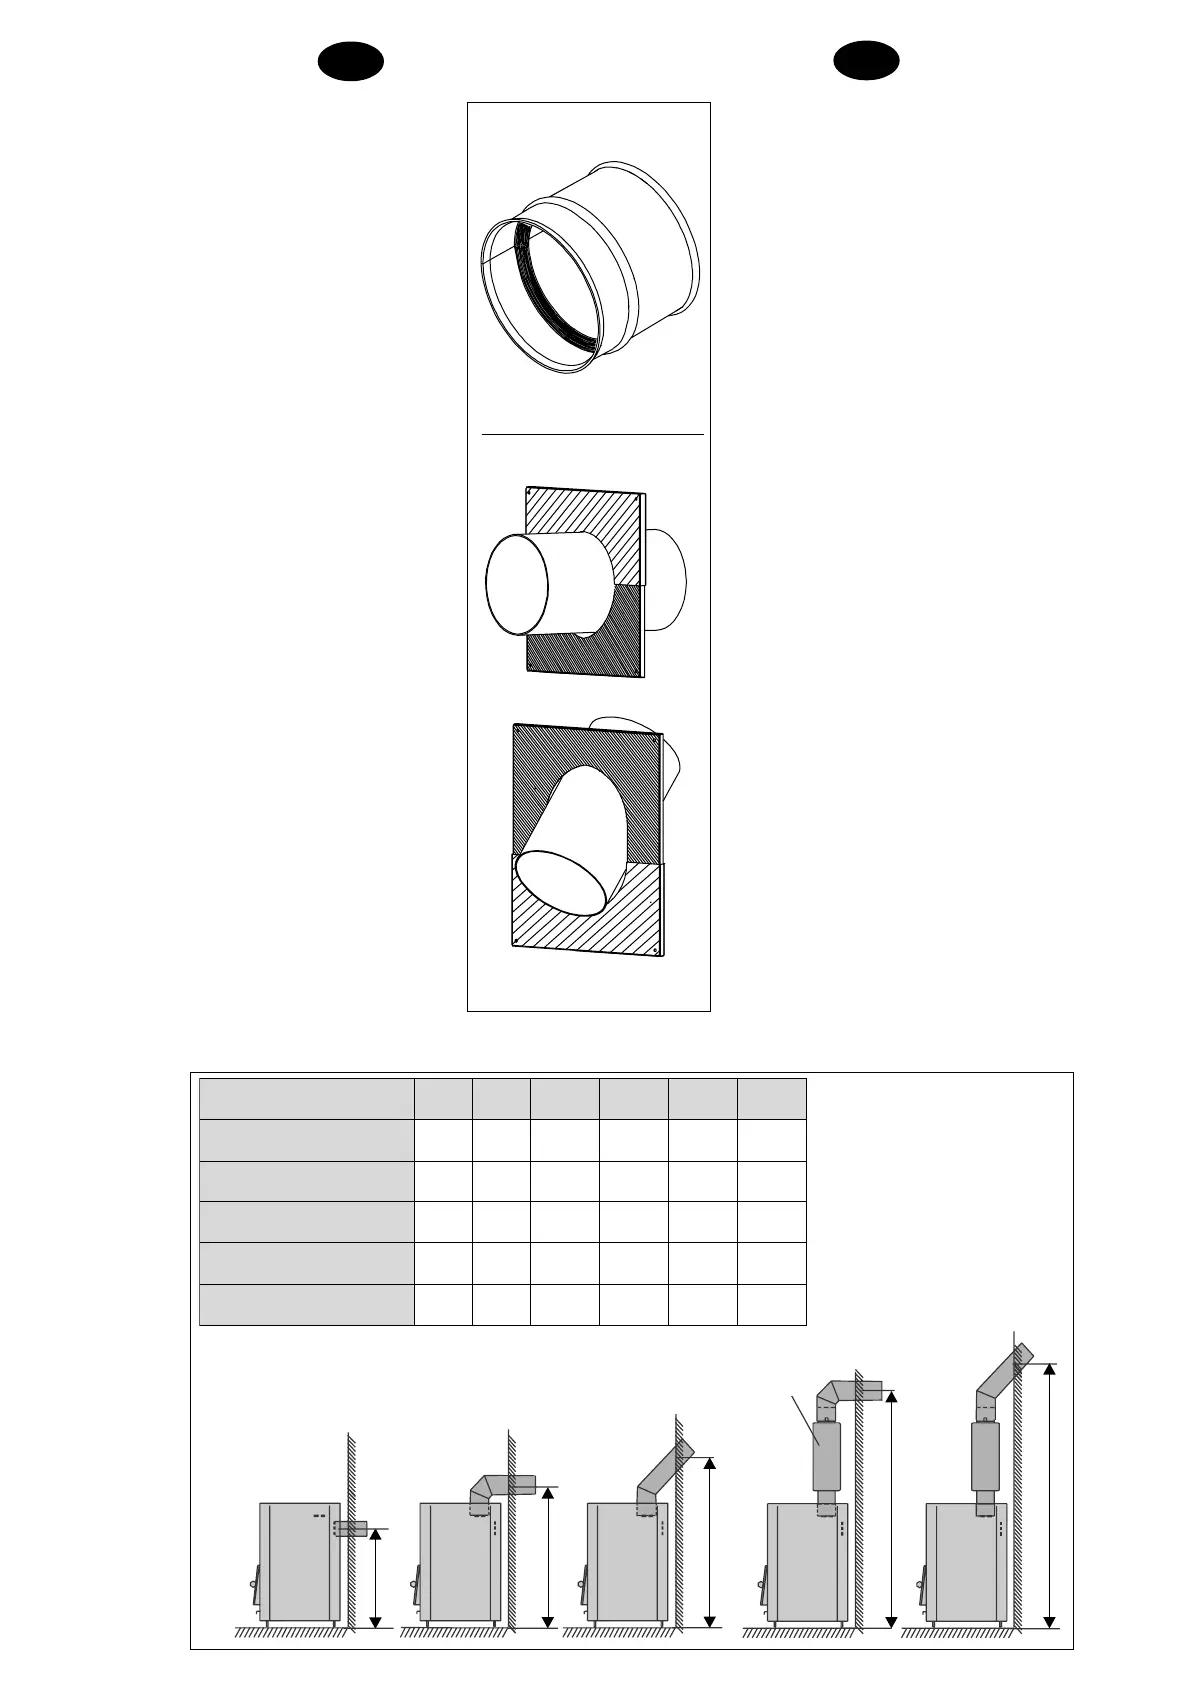
Installing the stove to a masoned flue
The stoves manufactured by Harvia have
one opening for smoke at the back of the
stove and the other on top of the stove, at the
back of the stone chamber. The stoves are
delivered ex works with connection at the
back and a direct pipe for flue connection.
If the flue connection is made from the top
of the stove, the opening for smoke at the
back of the stove should be covered carefully
with a free blanking plug. When the blanking
plug is adjusted in place, the retaining
springs of the plug should be bent, via the
above opening for smoke, enough towards
the sides so that the plug will not fall from
the opening at the back. Often a bent pipe,
which can be purchased separately, is also
needed.
For the flue connection, measure an
opening in the fireproof wall and make it
slightly larger than the connecting pipe. Pack
the pipe well in the opening with fireproof
mineral wool, for example. A suitable gap to
be left around the pipe is about 1 cm.
It is advisable to round off the re-entrant
corners of the flue opening so that flue gases
have free access to the flue opening. The
connecting pipe must not be positioned too
deep into the flue. If necessary, the pipe can
be made shorter.
First, adjust the flue connecting pipe in
place in the opening for smoke. Make sure
that the pipe is solidly packed in place. Move
the stove at the flue opening and push the
stove towards the flue. Press fireproof
mineral wool around the connecting pipe and push the
stove in place.
Ein vor Ort gegossener Betonuntergrund mit
einer Stärke von mindestens 60 mm erfordert
keinen separaten Schutz, wenn der Untergrund
die Bestimmungen über Sicherheitsabstände
auch in Seitenrichtung erfüllt.
Achtung! Im Bereich der Sicherheitsabstände des
Saunaofens dürfen sich keine Elektrogeräte oder -
kabel befinden.
Nähere Informationen zu Brandschutzbestim-
mungen erhalten Sie von der lokalen Brandschutz-
behörde, die die Installationen genehmigt.
Installation des Saunaofens an einen
gemauerten Rauchabzug
Harvia-Saunaöfen haben eine Rauchöffnung an der
Rückseite und eine an der Oberseite, im hinteren Teil der
Steinkammer. Die Saunaöfen werden ab Werk mit der
Möglichkeit zur rückseitigen Installation und mit einem
geraden Abzugsanschlußrohr geliefert.
Wenn der Abzugsanschluß oberseitig ausgeführt
wird, bedecken Sie die Rauchöffnung an der Rückseite
sorgfältig mit dem freibleibenden Verschlußdeckel.
Wenn der Verschlußdeckel richtig platziert ist, müssen
die Federhalterungen durch das Loch der oberen
Rauchöffnung ausreichend zu den Seiten gebogen
werden, damit der Deckel nicht in die rückseitige
Öffnung fällt. Oft wird auch ein gesondert zu
beschaffendes Winkelrohr benötigt.
Messen Sie an der Brandmauer für den
Abzugsanschluß die Stelle für die Öffnung aus und
fertigen Sie das Loch etwas größer an als es zu sein
braucht. Das Abzugsanschlußrohr wird zuletzt in der
Brandmaueröffnung z.B. mit feuerfester Mineralwolle
verdichtet. Ein geeigneter Dichtungsspalt um das Rohr
herum beträgt etwa 1 cm.
Die inneren Ecken der Abzugsöffnung sollten
abgerundet werden, damit die Rauchgase ungehindert
durch die Abzugsöffnung gelangen. Das
Abzugsanschlußrohr darf nicht zu tief in den Abzug
geschoben werden. Wenn erforderlich, muß das Rohr
verkürzt werden.
Befestigen Sie zunächst das Abzugsanschlußrohr
an seinem Platz in der Rauchöffnung des Saunaofens.
Überprüfen Sie, daß das Rohr dicht und stabil festsitzt.
Bringen Sie den Saunaofen an die Stelle der
Abzugsöffnung und schieben den Saunaofen in
Richtung Abzug. Drücken Sie feuerfeste
Mineralwolle um das Anschlußrohr und schieben den Saunaofen
an seinen Platz.
 Loading...