1
4
2
5
3
6
• USB-Live2 video capture device with removable A/V cable
• Hauppauge Capture download document
• WinTV v10 application for Windows (download with included Activation Code*)
* Please keep the Activation Code in a safe place. It is required for all future
installations.
Hauppauge Inc.
909 Motor Parkway
Hauppauge, NY 11788
Telephone (U.S. sales): 1-631-434-1600
Email: techsupport@hauppauge.com
How USB-Live2 works
USB-Live2 is a Windows video capture device. It can be used for digitizing and
compressing video from video cameras, video tape recorders and other devices which
create analog video signals.
Two applications come with USB-Live2 (as downloads):
• Hauppauge Capture, which is used for recording and displaying live video and
making simple video cuts.
• WinTV v10, which is used for displaying live video on your PC screen, in a window
or full screen, and to create video recordings.
USB-Live2
Quick Installation Guide for Windows
Locate a free USB 2.0 or 3.0 port (normally located at the side or back on the laptop or
desktop PC). Plug USB-Live2 into the USB port.
Note: We do not recommend connecting via a USB Hub.
Indicator LEDs
The blue LED will be lit when USB-Live2 has been activated by Windows.
The green LED will be lit in addition if a video signal is detected.
Installing the USB-Live2 device
Installing the WinTV v10 Application for Windows
Contents of the package
N
ote: this step requires the USB-Live2 is connected to the USB port.
N
ote: An Internet connection is required for download and software activation.
N
ote: Please disable your antivirus
software for the duration of the software
installation. We find that sometimes antivirus
apps block the temporary folders needed for
the installation of WinTV
You will find the website and directions on the
WinTV v10 Download and Activation code
card along with the Activation code for WinTV
v10.
The WinTV v10 download can be found here:
www.hauppauge.co.uk/wintv10
Step 1:
Download the WinTV v10 installer by clicking
the download button. The WinTV v10 Installer is
normally saved in your Download folder
Step 2:
Run wintv10setup from the Download folder
on your PC. Halfway through the installation, a
message will pop up asking for you to enter the
Activation Code.
When recording live video with the WinTV v10 application, USB-Live2 creates a .TS
(transport stream) file. Using options in the WinTV v8 application, you can also create
.MPEG files.
With Hauppauge Capture you can record your video, perform simple cuts and can
then directly upload your video to YouTube.
USB-Live2 is based on a Windows WDM capture driver, which is compatible with most
video applications which use WDM capture devices.
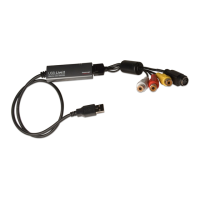
Connecting the A/V Source to USB-Live2
• Plug the A/V input cable into the connector on the side of the USB-Live2 (see picture
below). The A/V connector can be removed from USB-Live2 by pressing the ‘Push’
button.
• Connect the video signal of your video source to the yellow RCA plug or the black
S-Video plug on the A/V input cable.
• Connect the audio signal to the red and white RCA plugs.
Connectors on the A/V input cable
RCA yellow: Composite Video Input
RCA red: Audio Input, right channel
RCA white: Audio Input, left channel
4-pin Mini-DIN black: S-Video Input
Connecting a Video Recorder with SCART (in Europe)
To connect a video recorder with SCART connector, you need a SCART-to-RCA adapter
labeled “Video Out” or a switchable adapter (not included). The direction of the signal
must be from SCART to RCA. A SCART-to-RCA adapter labeled “Video In” is not
suitable.
VHS video recorders usually do not supply an S-Video signal on the SCART output.
When using a SCART-to-S-Video adapter on such a recorder the video will be just black
and white.
Installing the Hauppauge Capture Application
N
ote: this step requires the USB-Live2 is connected to the USB port.
N
ote: An Internet connection is required for download and software activation.
N
ote: Please disable your antivirus software for the duration of the software
installation. We find that sometimes antivirus apps block the temporary
folders needed for the installation of Hauppauge Capture
Hauppauge Capture allows you to quickly record and then trim your videos. It also has
a convenient source selector in case you want to switch from S-Video to composite
video. To download and install Hauppauge Capture, visit this site:
www.hauppauge.com/capture
Features of the Hauppauge Capture application include live video preview, record
video, snapshots, simple cuts and upload of recordings to YouTube. The bit rate for
recordings can be set up to 10 MBit/s and the recording length can be set by a timer.
Record Video
The Capture tab is used to record video. The device selected should be “Hauppauge
USB-Live2”.
Select the “Video Input”:
• “Composite”, when using the yellow RCA plug
• “S-Video”, when using the black 4-pin Mini-DIN connector
The audio input is automatically set to ‘RCA’.
It is recommended to select the file format ‘TS’.
You should now see live video from your video source and hear the audio.
Start Recording
Click on the ‘Record’ button, to start recording. The button changes to ‘Stop’. When
you are finished recording, click on this button again.
You can limit the recording duration by entering a time (format HH:MM:SS) before
starting to record.
Edit Recordings
To trim your recordings, select the Edit tab.
Capture Device: “Hauppauge USB-Live2”
Start / Stop recording
Recording timer
Video input: S-Video or Composite
Audio input: RCA
Standard: in Europe, this is ‘PAL’. In North America,
this is ‘NTSC’.
Aspect Ratio: normally 4:3
Bit Rate: adjustable
Snapshot: take a still frame snapshot