gb
26
Scalping
Use extreme caution when scalping. Keep a
distance of 30M (100 ft) between operator,
other people and animals during operation.
Scalping refers to removal of all vegetation
down to the ground. To do this, tilt the line-
head to about a 30 degree angle to the left.
By adjusting the handle you will have better
control during this operation. Don’t attempt
thisprocedureifthereisanychanceying
debris could injure the operator, other people
or cause damage to property.
WArNINg
!
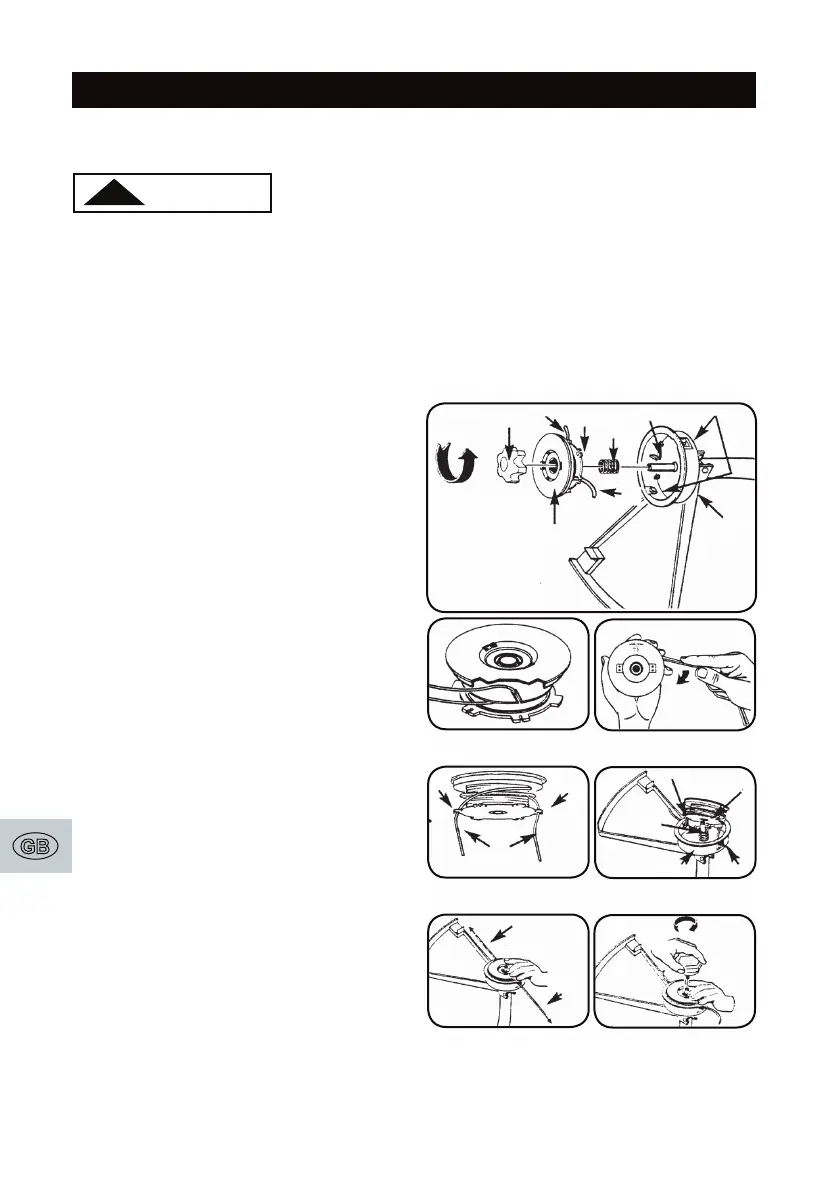
Replacing trimming line-standard head
1. Turn knob (A) COUNTERCLOCKWISE
and remove (Fig. 7A). Use knob
spanner supplied.
2. Remove spool (B) and spring (C) from
spindle (D).
3. Remove any remaining trimming line (H).
4. Double a 4.3M (14’) length of 2 mm
(0.80’’) trimming line. Place the looped
center in one of the slots of the spool
divider (Fig. 7D).
5. Wind trimming line clockwise as shown
in illustration (Fig. 7C), keeping tension,
with each half separated by the spool
driver. Wind to within 15 cm (6”) of the
ends.
6. Lock each end of line (H) into a slot (F)
on opposite sides of the spool (Fig. 7D).
7. Install the spring( C) over the spindle
(D). Insert each end of the line through
the eyelets (G) in the housing (E)
(Fig. 7E).
8. Lower the spool into the housing (E)
while feeding the line through the eyelets
(G). Ensure the spring seats itself into
the spool (Fig. 7E).
MAINTENANCE
MAINTENANCE
9. Once the spool is in place, apply
pressure on the spool compressing the
spring. Pull each end of the line (H)
sharply to unlock the line from the slots
(Fig. 7F).
10. Continue to apply pressure to the spool
until the knob can be threaded clock-
wise onto the spindle. Tighten the knob
securely by hand only (Fig. 7G).
11. Trim the excess line to approximately 13
cm (5”). This will minimize load on the
engine during starting and warm-up.
F
A. Knob
B. Spool
C. Spring
D. Spindle
E. Housing
F. Slots
G. Eylets
H. Trimming line
Fig. 7A
Fig. 7B
Fig. 7C
Fig. 7D
Fig. 7E
Fig. 7F
Fig. 7G
A
H
B
F
C
H
D
G
E
F
H
G
C
E
D
G
H
H
 Loading...