12 Starting system - testing
2
Note: Refer to the precautions given in
“Safety first!” and in Section 1 of this Chapter
before starting work.
1 If the starter motor fails to operate when the
ignition key is turned to the appropriate
position, the following possible causes may
be to blame.
a) The battery is faulty.
b) The electrical connections between the
switch, solenoid, battery and starter
motor are somewhere failing to pass the
necessary current from the battery
through the starter to earth.
c) The solenoid is faulty.
d) The starter motor drive pinion may be
jammed in the flywheel ring gear teeth
(inertia type starters).
e) The starter motor is mechanically or
electrically defective.
2 To check the battery, switch on the
headlights. If they dim after a few seconds, this
indicates that the battery is discharged -
recharge (see Section 3) or renew the battery. If
the headlights glow brightly, operate the
ignition switch and observe the lights. If they
dim, then this indicates that current is reaching
the starter motor, therefore the fault must lie in
the starter motor. If an inertia type starter is
fitted, check it is not jammed by placing the car
in gear (manual transmission only) and rocking
it to and fro. Alternatively, turn the armature
with a small spanner on the square end
protruding from the commutator end bracket. If
the lights continue to glow brightly (and no
clicking sound can be heard from the starter
motor solenoid), this indicates that there is a
fault in the circuit or solenoid - see following
paragraphs. If the starter motor turns slowly
when operated, but the battery is in good
condition, then this indicates that either the
starter motor is faulty, or there is considerable
resistance somewhere in the circuit.
3 If a fault in the circuit is suspected,
disconnect the battery leads (including the
earth connection to the body), the
starter/solenoid wiring and the engine/
transmission earth strap. Thoroughly clean
the connections, and reconnect the leads and
wiring, then use a voltmeter or test lamp to
check that full battery voltage is available at
the battery positive lead connection to the
solenoid, and that the earth is sound.
4 If the battery and all connections are in
good condition, check the circuit by
disconnecting the wire from the solenoid
blade terminal. Connect a voltmeter or test
lamp between the wire end and a good earth
(such as the battery negative terminal), and
check that the wire is live when the ignition
switch is turned to the “start” position. If it is,
then the circuit is sound - if not the circuit
wiring can be checked as described in
Chapter 12.
5 The solenoid contacts can be checked by
connecting a voltmeter or test lamp between
the battery positive feed connection on the
starter side of the solenoid, and earth. When
the ignition switch is turned to the “start”
position, there should be a reading or lighted
bulb, as applicable. If there is no reading or
lighted bulb, the solenoid is faulty and should
be renewed.
6 If the circuit and solenoid are proved
sound, the fault must lie in the starter motor.
In this event, it may be possible to have the
starter motor overhauled by a specialist, but
check on the cost of spares before
proceeding, as it may prove more economical
to obtain a new or exchange motor.
13 Starter motor - removal and
refitting
1
Removal
1 Disconnect the battery negative lead.
2 If an ignition shield is fitted to the front of
the engine, release the three retaining lugs
and lift off the shield.
3 For improved access if necessary, release
the horn and horn bracket, and move them to
one side.
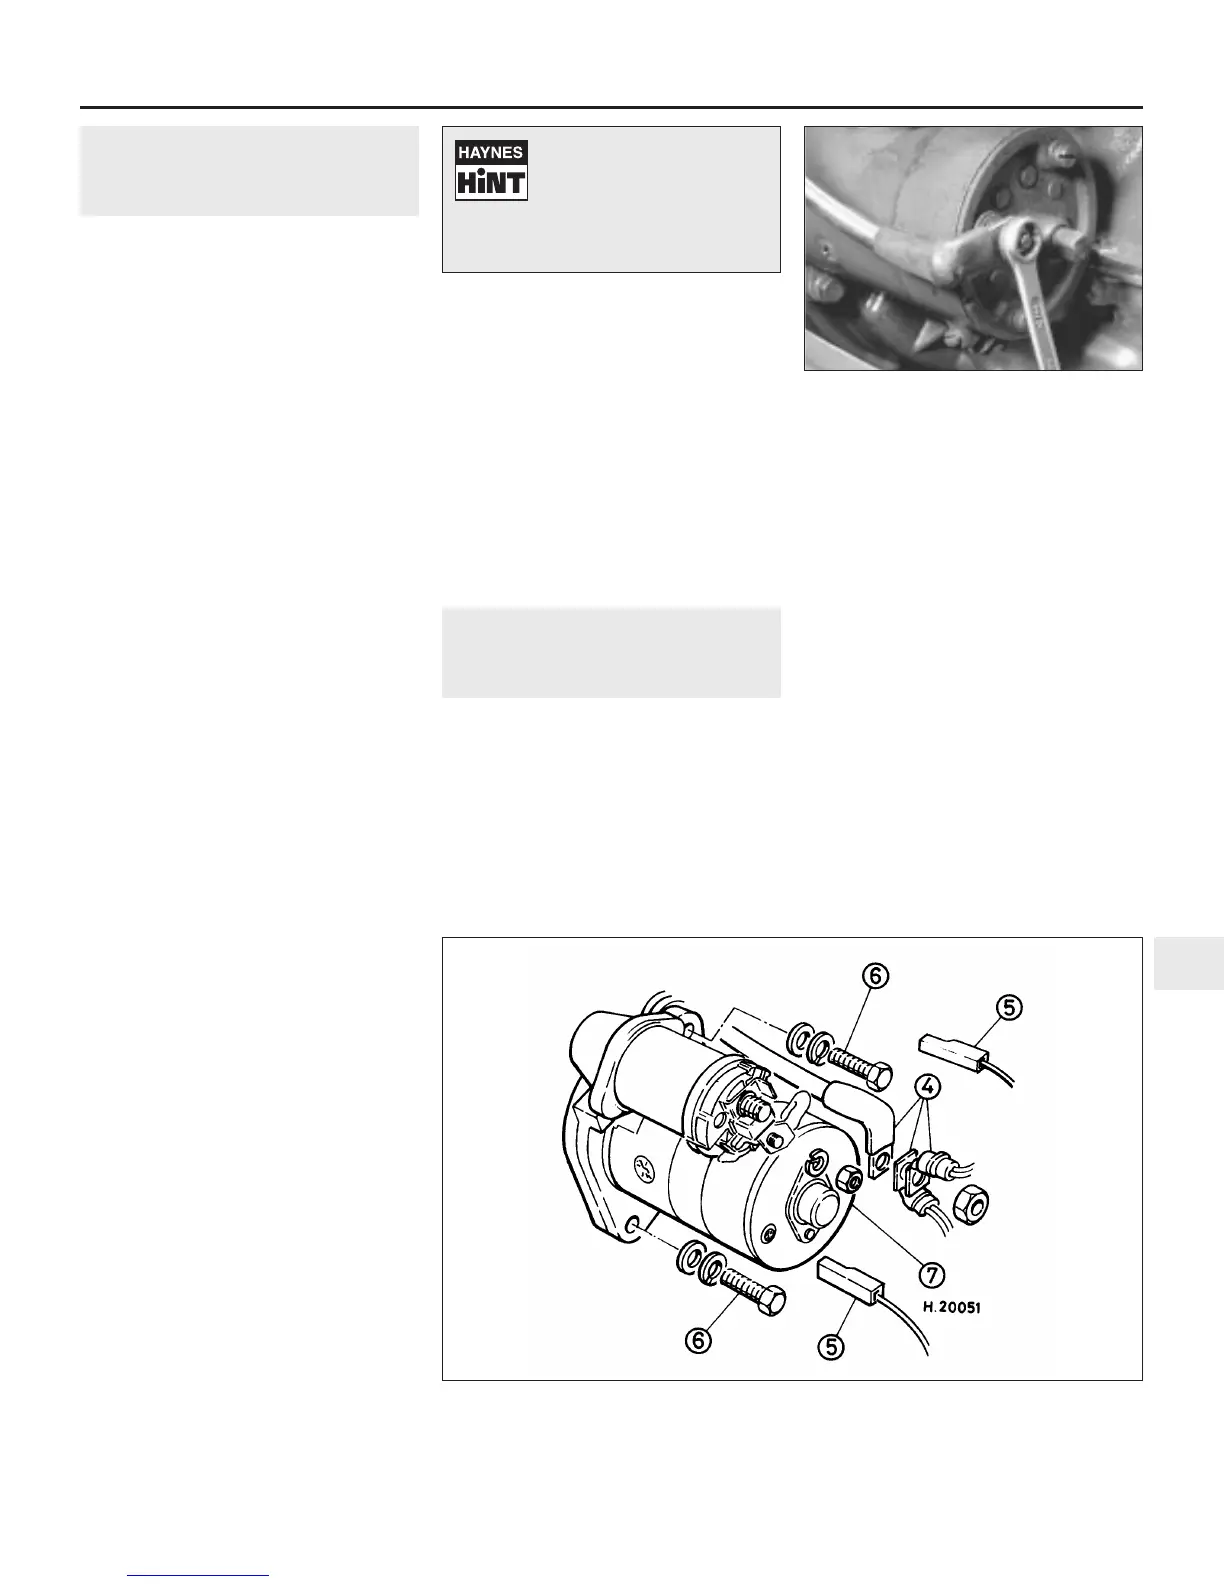
4 On inertia type starters, undo and remove
the nut and spring washer and then detach
the starter motor cable from the terminal stud
(see illustration). On pre-engaged type
starters, undo the nut, and disconnect the
leads at the upper terminal on the solenoid.
Disconnect the leads at the two solenoid
spade terminals, after identifying their
positions (see illustration).
5 If the ignition coil is mounted on a bracket
secured to the cylinder head, undo and
remove the nut securing the bracket to the
head and place the coil to one side.
6 Undo and remove the two bolts securing
the starter motor to the flywheel housing, then
lift the motor upwards and out of the engine
compartment.
Refitting
7 Refitting is the reverse sequence to
removal.
Starting and charging systems 5A•7
5A
13.4a Unscrew the nut securing the starter
motor cable
13.4b Pre-engaged starter motor attachments
4 Solenoid upper terminal leads
5 Solenoid spade terminal leads
6 Retaining bolts
7 Starter motor
Smear petroleum jelly
around the battery terminals
to prevent corrosion -
corroded connections are
amongst the most frequent causes of
electrical system faults.
 Loading...