30.13b Lift off the lid and remove the
element
30 Air cleaner element renewal
1
Carburettor models except
Cooper S
1 On models with an air intake duct over the
top of the engine, unscrew the two nuts
securing the duct to the rocker cover studs.
Release the clip and disconnect the duct from
the air cleaner body.
2 Undo and remove the single wing nut and
washer on early models, or the twin wing bolts
and washers on later models, securing the air
cleaner to the carburettor
3 If the air cleaner is retained by a single wing
nut lift off the air cleaner top cover. Detach the
rocker cover hose, then lift the air cleaner
body off the carburettor, tip it up at the front
and slide it sideways until it is clear of the long
retaining stud and can be lifted away. Recover
the sealing ring.
4 If the air cleaner is retained by two wing
nuts, detach the hot air duct (where fitted) and
then lift the air cleaner body off the
carburettor.
5 With the air cleaner removed from the
engine, recover the rubber sealing ring if it
stayed behind on the carburettor flange.
6 Lift off the air cleaner cover and withdraw
the paper element. On the later type moulded
plastic air cleaners the cover is removed by
prising it off with a screwdriver inserted in the
slots on the periphery of the cover (see
illustrations).
7 Thoroughly clean the inside of the air
cleaner body.
8 Refit the air cleaner and element using a
reverse of the removal procedure. Make sure
that where an alignment arrow is stamped on
the top cover, it is pointing toward the
location lug on the air cleaner body (see
illustration). Ensure also that the rubber
sealing ring is in position before refitting the
air cleaner.
9 If the air cleaner body incorporates an
adjustable air intake spout, this should be
positioned adjacent to the exhaust manifold in
winter and away from it in summer.
Cooper S carburettor models
10 Undo and remove the two wing bolts and
washers and lift off the air cleaner top cover.
Lift out the paper elements and thoroughly
clean the inside of the air cleaner body.
11 The air cleaner body may be removed if
necessary after disconnecting the engine
breather pipe and the throttle return spring.
Take care not to lose the two rubber sealing
washers from the carburettor flanges.
12 Refitting the air cleaner and elements is
the reverse of the removal procedure.
Fuel injection models
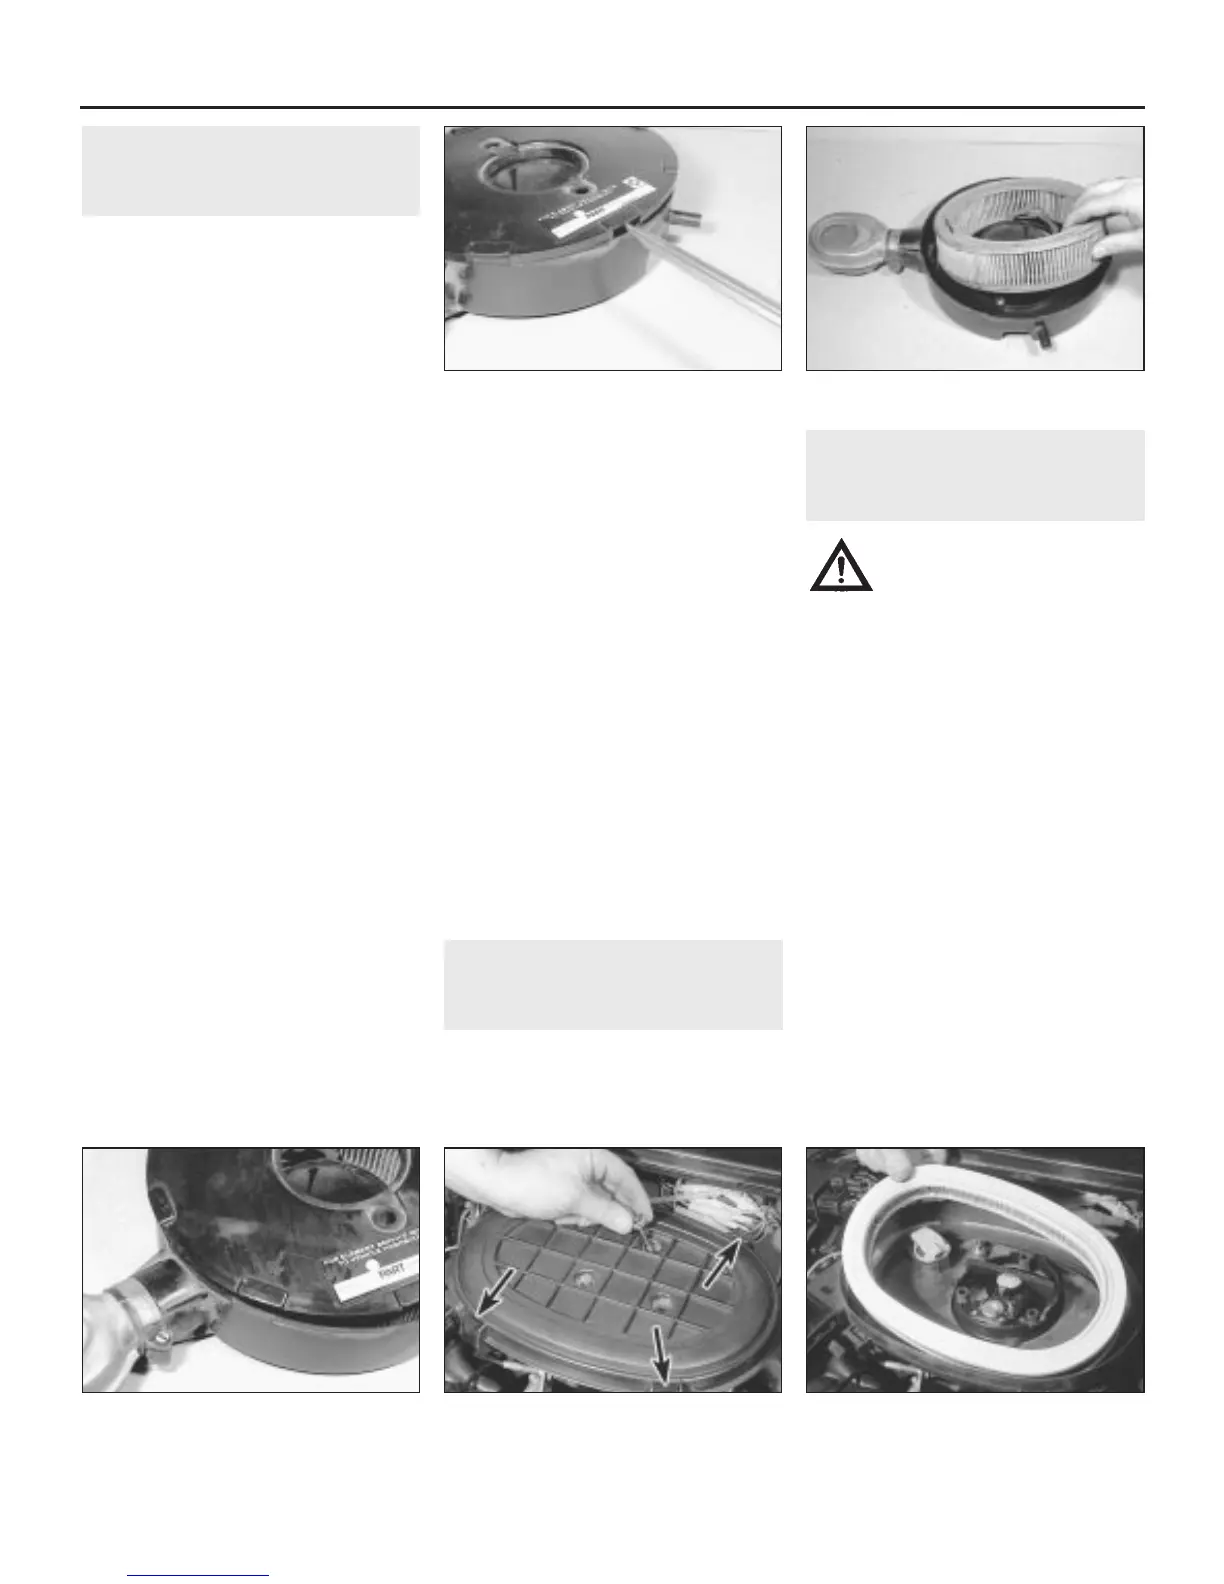
13 Release the four retaining clips, then
slacken and remove the three screws
securing the air cleaner assembly to the
throttle body, and lift off the air cleaner lid.
Remove the filter element (see illustrations).
14 Wipe the body of the air cleaner clean,
then fit the new element, ensuring that it is
correctly seated.
15 Refit the air cleaner lid, and secure it in
position with the retaining screws (tightening
them securely) and clips.
31 Valve clearance adjustment
2
Refer to Chapter 2A.
32 Distributor cap, rotor arm
and HT lead check
1
Warning: Voltages produced by
an electronic ignition system are
considerably higher than those
produced by conventional
ignition systems. Extreme care must be
taken when working on the system if the
ignition is switched on. Persons with
surgically-implanted cardiac pacemaker
devices should keep well clear of the
ignition circuits, components and test
equipment.
1 The spark plug (HT) leads should be
inspected one at a time, to prevent mixing up
the firing order, which is essential for proper
engine operation. Gain access to the leads
and disconnect them as described for the
spark plug check and renewal.
2 Check inside the boot for corrosion, which
will look like a white crusty powder. Clean this
off as much as possible; if it is excessive, or if
cleaning leaves the metal connector too badly
corroded to be fit for further use, the lead
must be renewed. Push the lead and boot
back onto the end of the spark plug. The boot
should fit tightly onto the end of the plug - if it
doesn’t, remove the lead and use pliers
carefully to crimp the metal connector inside
the boot until the fit is snug.
3 Using a clean rag, wipe the entire length of
the lead to remove built-up dirt and grease.
1•18 Every 12 000 miles or 12 months
30.6b . . . and lift out the element30.6a Prise off the later type air cleaner
moulded plastic cover . . .
30.8 Make sure the alignment arrow is
toward the lug on the air cleaner body
30.13a On fuel injection models, release
the clips (three arrowed) and remove the
screws
 Loading...