Cooling system filling
13 Refit the cylinder block and radiator drain
plugs or bottom hose connection as
applicable.
14 Prepare a sufficient quantity of coolant
mixture (water and antifreeze), in the specified
concentration, to allow for a surplus, so as to
have a reserve supply for topping-up. Note:
On models with no cylinder block drain plug, it
is not possible to fully drain the coolant. To
establish a suitable antifreeze concentration it
will be necessary to pour adequate antifreeze
directly into the radiator and then top-up with
water. Subsequent topping-up should be
done with an antifreeze/water mixture.
15 Set the heater control knob to the
maximum heat position and then fill the
cooling system slowly. Slow filling reduces the
possibility of air being trapped and forming
air-locks. It helps also, if the large radiator
hoses are gently squeezed during the filling
procedure.
16 Do not fill the system higher than within 12
mm of the filler orifice. Overfilling will merely
result in coolant loss down the overflow pipe
due to expansion.
17 When the system is full, refit the filler cap
and turn it firmly clockwise to lock it in
position. Start the engine and run it at idle
speed, until it has warmed-up to normal
operating temperature.
18 Stop the engine, allow it to cool down
completely (overnight, if possible), then
remove the radiator filler cap and top-up if
necessary. Refit the filler cap, tightening it
securely, and wash off any spilt coolant from
the engine compartment and bodywork.
19 After refilling, always check carefully all
components of the system (but especially any
unions disturbed during draining and flushing)
for signs of coolant leaks. Fresh antifreeze has
a searching action, which will rapidly expose
any weak points in the system.
36 Brake fluid renewal
3
Warning: Brake hydraulic fluid
can harm your eyes and damage
painted surfaces, so use
extreme caution when handling
and pouring it. Do not use fluid that has
been standing open for some time as it
absorbs moisture from the air. Excess
moisture can cause a dangerous loss of
braking effectiveness.
The procedure is similar to that for the
bleeding of the hydraulic system as described
in Chapter 9, except that the brake fluid
reservoir should be emptied by siphoning,
and allowance should be made for the old
fluid to be removed from the circuit when
bleeding a section of the circuit.
37 Fuel filter renewal (fuel
injection models)
3
Warning: Before carrying out the
following operation, refer to the
precautions given in “Safety
first!” at the beginning of this
manual, and follow them implicitly. Petrol
is a highly dangerous and volatile liquid,
and the precautions necessary when
handling it cannot be overstressed.
1 Disconnect the battery negative lead.
2 Chock the front wheels then jack up the
rear of the car and support it on axle stands
(see “Jacking and vehicle support”).
3 To minimise fuel loss during the following
operation, working inside the luggage
compartment, remove the top stud, then pivot
the fuel tank trim panel downwards and fit a
hose clamp to the fuel tank feed hose.
4 Refer to the information on fuel system
depressurisation contained in Chapter 4B,
Section 6.
5 From underneath the vehicle, slacken the
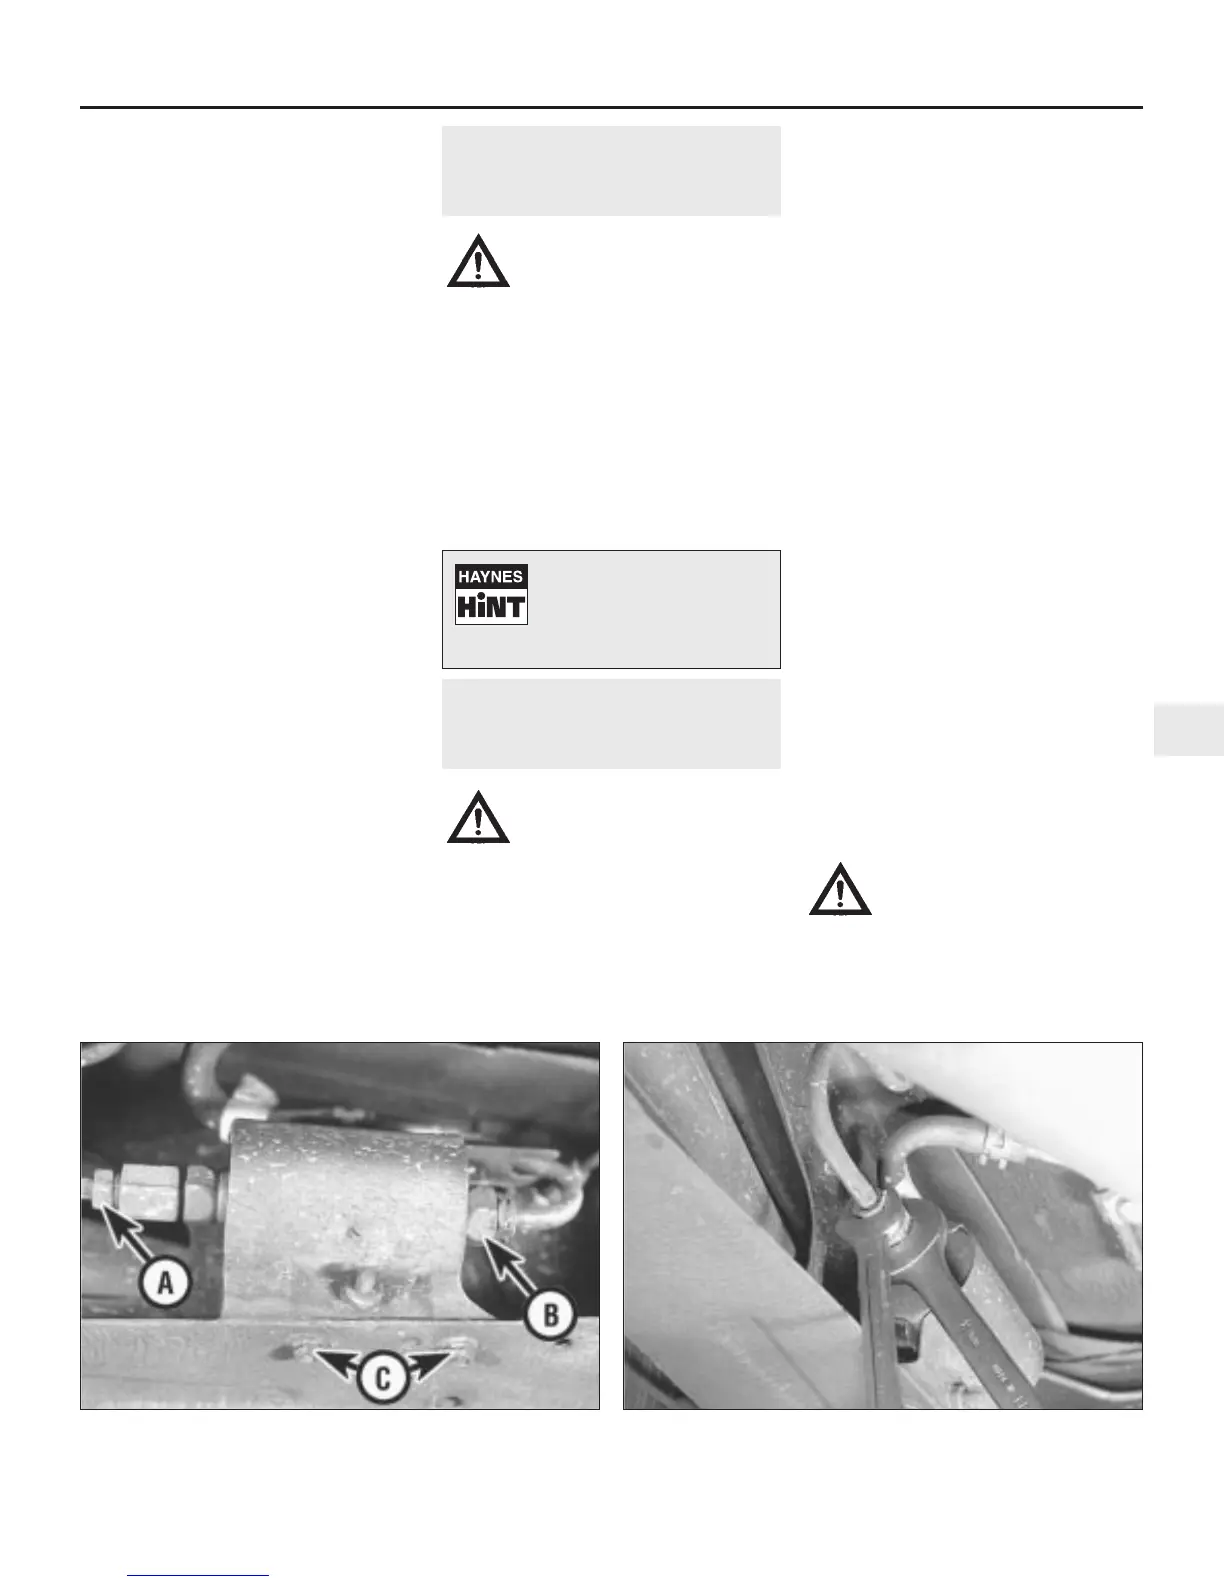
union nuts and disconnect the inlet and outlet
pipes from the fuel filter, whilst retaining the
union adapter/filter with an open-ended
spanner (see illustrations).
6 Remove the two bolts securing the filter
mounting bracket to the subframe, and
remove the filter assembly from the car.
7 Slacken and remove the outlet pipe adapter
and O-ring from the filter, then slacken the
clamp bolt and slide the filter out of the
mounting bracket, noting which way the arrow
stamped on the filter is pointing.
8 Remove the plugs from the filter, then fit the
outlet pipe adapter (using a new O-ring), and
tighten it securely. Ensuring that the arrow is
pointing in the direction of the flow of fuel,
slide the filter into position in the mounting
bracket, and securely tighten the clamp bolt.
9 Refit the filter assembly to the car,
tightening its mounting bolts securely.
10 Refit the inlet and outlet pipes to the filter,
and securely tighten their union nuts.
11 Lower the car to the ground, then remove
the clamp from the fuel tank feed hose, and
secure the trim panel in position with its
retaining stud. Reconnect the battery, then
start the engine and check the filter unions for
leakage.
Warning: Dispose of the old filter
safely; it will be highly
flammable and may explode if
thrown on a fire.
Every 24 000 miles or 24 months 1•21
1
37.5a Fuel filter inlet union “A”, outlet union “B” and mounting
bracket retaining bolts “C”
37.5b Slacken the union nuts whilst retaining the union
adapter/filter with an open-ended spanner
Old hydraulic fluid is
invariably much darker in
colour than the new, making
it easy to distinguish between
the two.
 Loading...