chisel or screwdriver through the radiator
grille in the wing. Using a suitable socket or
spanner remove the bolt and locking washer.
This bolt is sometimes very difficult to shift,
and hitting the free end of the spanner with a
heavy hammer is often the only way to start it.
Engage top gear and apply the handbrake
hard to prevent the engine from turning.
Alternatively, remove the starter motor
(Chapter 5A) and lock the flywheel with a
screwdriver or similar tool engaged with the
ring gear teeth.
7 Once the bolt has been slackened, set the
engine at TDC for No 1 piston as described in
Section 3.
8 Placing two large screwdrivers behind the
crankshaft pulley at 180º to each other,
carefully lever the pulley off. It is preferable to
use a proper pulley extractor if this is
available, but large screwdrivers or tyre levers
are quite suitable, providing care is taken not
to damage the pulley flange.
9 Remove the Woodruff key from the
crankshaft nose with a pair of pliers and store
it safely as it is a very small part and can easily
be mislaid.
10 Unscrew the bolts holding the timing
cover to the block. Note: Four of the bolts are
larger than the others and each bolt makes
use of a large flat washer as well as a spring
washer.
11 Take off the timing cover and gasket. If
fitted, detach the engine breather hose from
the cover.
12 With the timing cover removed, slide off
the oil thrower. Note: The concave side faces
forward.
13 Bend back the locking tab on the washer
under the camshaft retaining nut and unscrew
the nut, noting how the locking washer
locating tag fits in the camshaft sprocket
keyway (see illustration).
14 To remove the camshaft and crankshaft
sprockets complete with chain, ease each
sprocket forward a little at a time, levering
behind each one in turn with two large
screwdrivers at 180º to each other. If the
sprockets are locked solid, it will be
necessary to use a suitable puller. With both
sprockets removed, extract the Woodruff
keys from the crankshaft and camshaft with a
pair of pliers and store them safely. Note that
there may be a number of very thin packing
washers behind the crankshaft sprocket; if so
carefully remove them.
15 On later models, unscrew the timing chain
tensioner retaining bolt and remove the bolt
and tensioner. Note that there is a washer on
each side of the tensioner arm.
Inspection
16 Thoroughly clean all the components with
paraffin or a suitable solvent and dry
thoroughly. Pay particular attention to the
timing cover and the mating face on the
engine front plate, ensuring that all traces of
old gasket are removed.
17 Examine the teeth on both the crankshaft
and camshaft sprockets for wear. Each tooth
forms an inverted “V” with the sprocket
periphery and, if worn, the side of each tooth
under tension will be slightly concave in shape
when compared with the other side of the
tooth. If any sign of wear is present the
sprockets must be renewed.
18 Examine the links of the chain for side
slackness and renew the chain if any
slackness is noticeable when compared with
a new chain. It is a sensible precaution to
renew the chain at about 60 000 miles, and at
a lesser mileage if the engine is dismantled for
a major overhaul. The actual rollers on a very
badly worn chain may be slightly grooved.
Cooper S type engines use duplex chains.
19 Also check the rubber tension rings in the
camshaft sprocket, where fitted. It is quite
likely that the rubber will have become hard
due to heat and oil contamination and it is
advisable to renew them as a matter of
course. The rings are simply prised out with a
screwdriver and new rings stretched over the
sprocket flanges and into the grooves (see
illustration). A spring-loaded rubber
tensioning pad may be fitted to the timing
cover on Cooper S type and later engines in
place of the tensioning rings. If the rubber pad
is grooved where it bears against the chain, it
should also be renewed.
20 It is advisable to renew the timing cover
oil seal at this stage. Drive out the old seal and
tap in the new one using the old seal to
spread the load. Ensure that the open side of
the seal faces inward, towards the chain.
Refitting
Note: Before reassembly begins check that
the original packing washers are in place on
the crankshaft nose. If new sprockets are
being fitted it may be necessary to fit
additional washers (see paragraph 25). These
washers ensure that the crankshaft sprocket
lines up correctly with the camshaft sprocket.
21 Refit the Woodruff keys in their respective
slots in the crankshaft and camshaft, and
ensure that they are fully seated. If their edges
are burred they must be cleaned with a fine
file.
22 Lay the two sprockets on a clean surface
so that the timing dots are adjacent to each
other. Slip the timing chain over them and pull
Engine in-car repair procedures 2A•5
2A
5.19 Fitting a new tensioning ring to the
camshaft
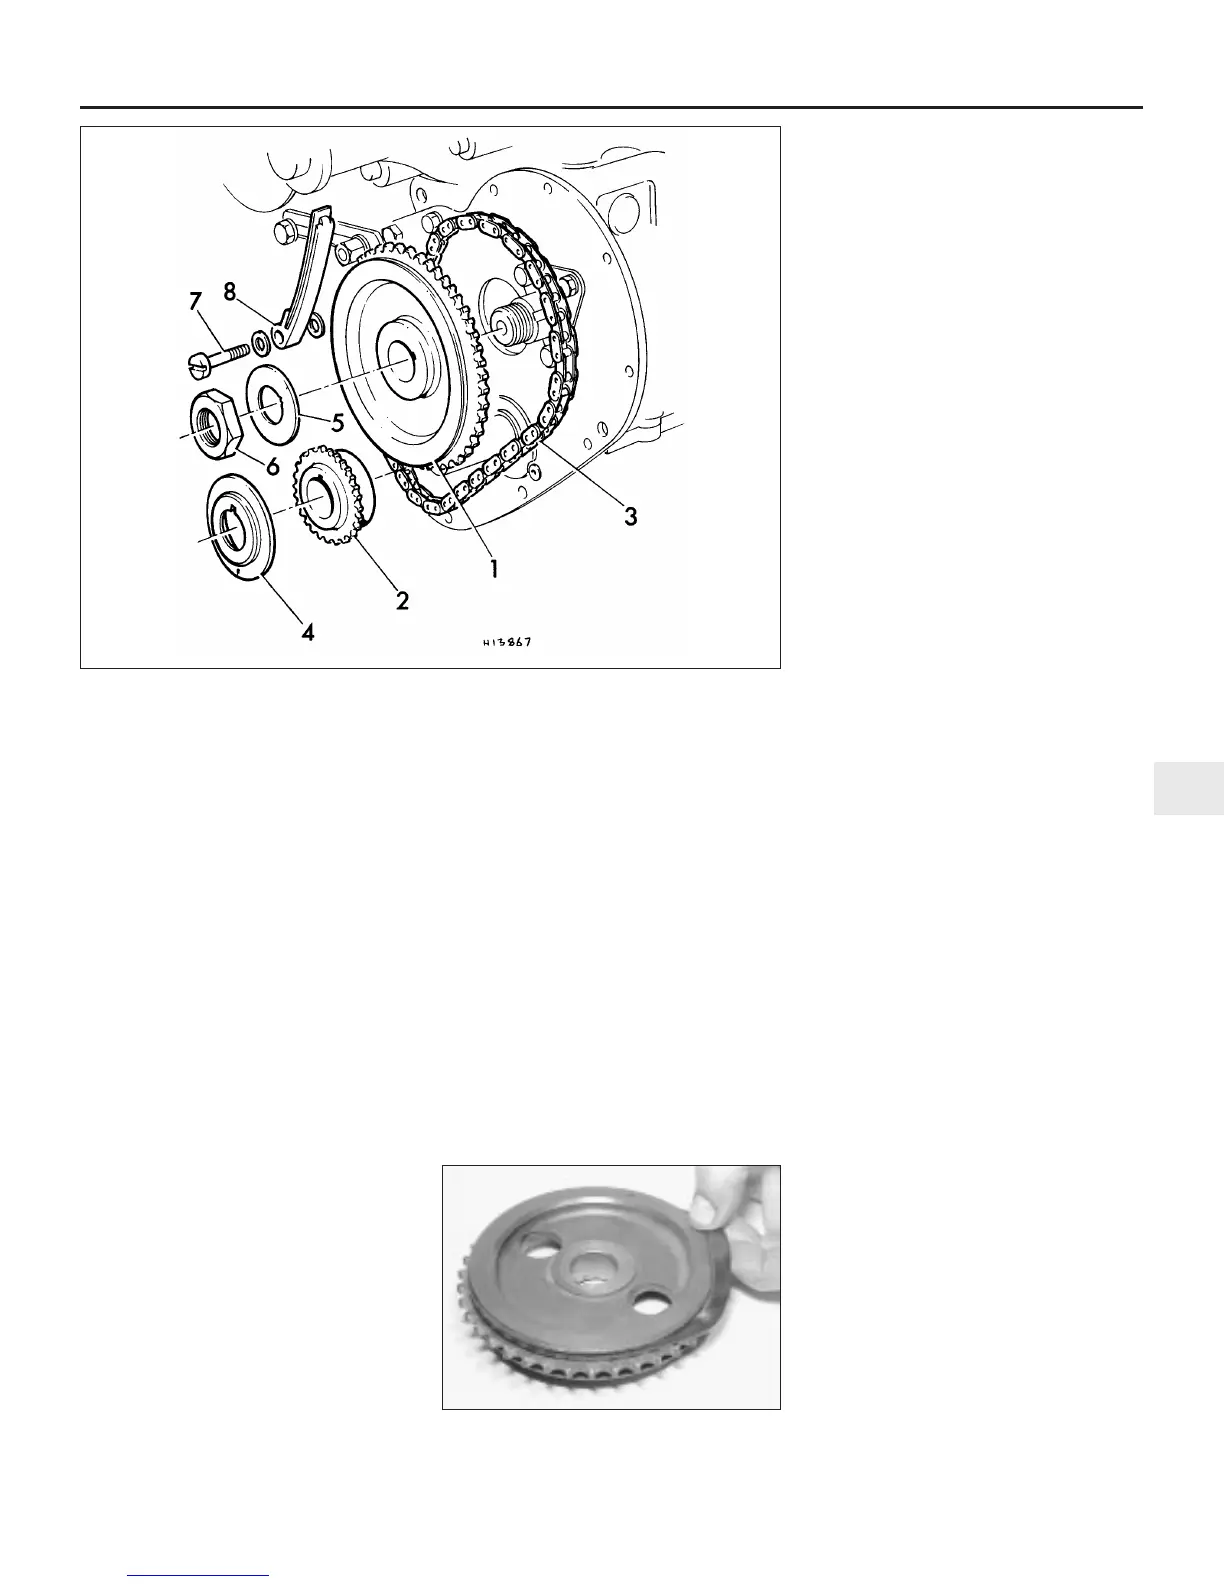
5.13 Timing sprocket and chain assembly - later type with tensioner arm
1 Camshaft sprocket
2 Crankshaft sprocket
3 Timing chain
4 Oil thrower
5 Lockwasher
6 Nut
7 Tensioner retaining
bolt
8 Tensioner
 Loading...