EasyManua.ls Logo

Heater Sports Xtender30' User Manual

Default Icon
12 pages
To Next Page IconTo Next Page
Page #1 background imageLoading...
Page #1 background image
IMPORTANT
DO NOT RETURN THIS BATTING CAGE TO THE RETAIL STORE WHERE
PURCHASED. CALL TOLL FREE: (800) 492-9334
IMPORTANT WARRANTY WARNING:
DO NOT LEAVE THE XTENDER CAGE ASSEMBLED DURING STRONG WINDS, HEAVY SNOW, SLEET,
OR ICE STORMS. THE XTENDER IS NOT DESIGNED TO WITHSTAND EXTREME WEATHER
CONDITIONS AND DAMAGE TO THE FIBERGLASS FRAMES CAUSED BY EXTREME WEATHER
MAY NOT BE COVERED IN THE MANUFACTURERS WARRANTY.
WARNING:
USE THIS PRODUCT WITH ADULT SUPERVISION ONLY. SERIOUS BODILY INJURY MAY OCCUR!
READ WARNING LABELS CAREFULLY.
Home Batting Cage
Assembly Instructions
95 West 650 South St. George, Utah 84770 PH: 800-492-9334 PH: 435-656-1756 Fax: 435-688-0741
Xtender30
Xtender30
®
Question and Answer IconNeed help?

Do you have a question about the Heater Sports Xtender30' and is the answer not in the manual?

Heater Sports Xtender30' Specifications

General IconGeneral
BrandHeater Sports
ModelXtender30'
CategorySports & Outdoors
LanguageEnglish

Summary

General Information and Warnings

Important Product Information

Instructions not to return the cage to the store and to call toll-free for assistance.

Warranty and Weather Advisory

Warning against leaving the cage assembled during extreme weather conditions.

Usage Safety Warning

Advises adult supervision and careful reading of warning labels due to potential injury.

Parts List

Core Assembly Instructions

Step 1: Install Ground Stakes

Pound ground stakes (Part F) into the ground 12 feet apart, ensuring they are straight.

Steps 2 & 3: Assemble Pole Sections

Slide and tape together pole sections for End and Middle Pole Assemblies.

Steps 4-6: Frame Assembly and Securing

Clip net support ropes, lift, bend, and secure pole assemblies to ground stakes.

Step 7: Install Stabilizer Ropes

Hammer rope stakes and clip stabilizer ropes to secure the frame against wind.

Step 8: Connect Pole Ends with Rope

Wrap and tie rope (Part E) around pole joints for added stability and support.

Step 9: Install Batting Cage Net

Unfold and place the batting cage net over the assembled frame, ensuring correct orientation.

Step 10: Attach to Pitching Machine

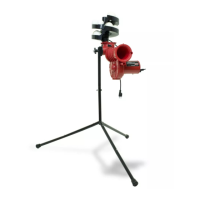
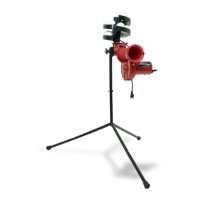
Slide batting cage harness tubes into the pitching machine tubes and lock them.

Optional: Joining Two Cages

Step 1: Position Cages

Assemble two batting cages and place them end-to-end, 4-2 inches apart.

Step 2: Weave Cages Together

Match reinforced seams and use extra support ropes to weave the two cages together.

Step 4: Cut Netting Openings

Cut an opening in the netting where the stitched netting comes together on both cages.

Step 5: Add Optional Netting Support

Attach extra netting to the cage end opposite the pitching machine for support.

Related product manuals