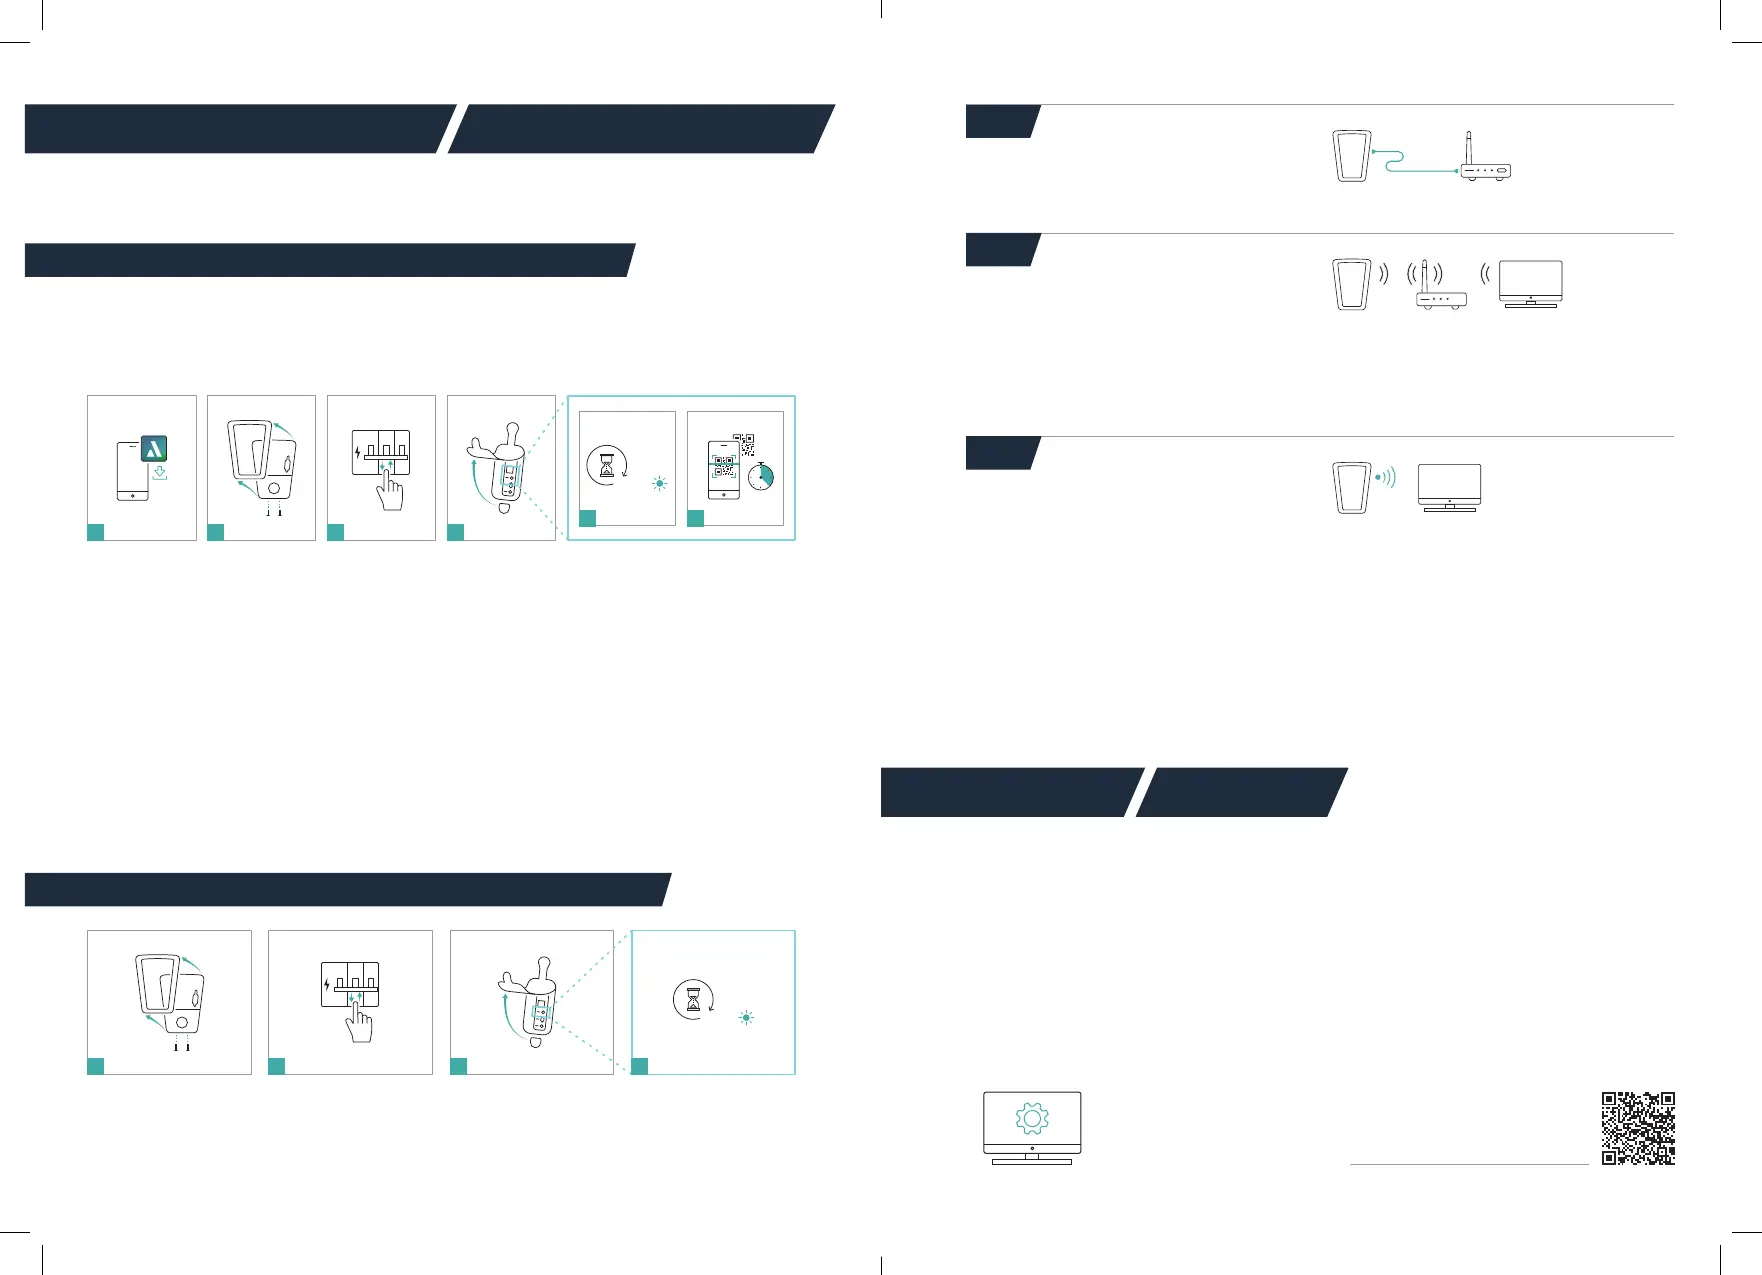
1. Gebe im Suchfeld des Google Play Store oder App
Store den Begriff „myAmpered“ ein und lade die App
auf dein Smartphone. Hinterlege deine persönlichen
Daten in der Eingabemaske und folge den Anweisun-
gen der App.
2. Sollte das Frontelement montiert sein, öffne die
beiden unteren Schrauben und schiebe das Front-
element nach oben aus der Fixierung.
3. Schalte die Spannungsversorgung der Wallbox aus
und wieder ein.
4. Öffne die Gummidichtung. Das Kommunikationsmo-
dul bendet sich dahinter.
5. Warte, bis das Kommunikationsmodul betriebsbereit
ist (Status-LED leuchtet grün oder gelb).
6. Für die Inbetriebnahme hast du nun 20 Minuten Zeit.
Nach dem Einscannen des QR-Codes wirst du inner-
halb der App durch den Einrichtungsprozess geführt.
1. Enter the term "myAmpered" in the search eld of
the Google Play Store or App Store and download the
app to your smartphone. Enter your personal data in
the input mask and follow the instructions of the app.
2. If the front element is mounted, open the two lower
screws and slide the front element upwards out of
the xation.
3. Switch the power supply to the wallbox off and on
again.
4. Open the rubber seal. The communication module is
located behind it.
5. Wait until the communication module is ready for
operation (status LED lights up green or yellow).
6. You now have 20 minutes for the setup. After scan-
ning the QR code, you will be guided through the
setup process within the app.
Die Verbindung deiner Wallbox mit deinem Heimnetz-
werk kann über LAN oder WLAN hergestellt werden.
Eine Schritt-für-Schritt Anleitung ndest du in der
Betriebsanleitung im Kapitel „Einrichten der Netzwerk-
verbindung“. Alternativ ndest du auch das passende
Tutorial, wenn du den QR-Code unten rechts scannst.
Beachte hierzu bitte folgende Hinweise:
Führe zunächst die Schritte 1,2,3 durch. Die benötigen
Informationen für die nächsten Schritte, ndest du auf
dem Aufkleber auf der Rückseite dieses Infoblatts. Stelle
nun mit einer der drei nachfolgenden Möglichkeiten
eine Verbindung zu deinem Netzwerk her.
You can nd step-by-step instructions in the operating
manual in the chapter "Setting up the network connec-
tion". Alternatively, you can also nd the appropriate tuto-
rial if you scan the QR code at the bottom on the right.
Please note the following information:
First perform steps 1,2,3. The information needed for the
next steps can be found on the sticker on the back of
this info sheet. Now connect to your network using one
of the three following options.
Your wallbox can be connected to your home network
via LAN or WLAN.
Netzwerkverbindung einrichten Set up network connection
Status
1 2 3 4
Status
20 min
1 2 3 4
5 6
1. Öffne deinen Internet-Browser und trage den Host-
Namen in die Adresszeile ein.
Den Host-Namen (https://HDM...) ndest du auf
der Rückseite dieses Dokuments unter dem Punkt
"Web-Interface". Alternativ kannst du auch die von
deinem Router erkannte IP-Adresse in die Adresszeile
eintragen (Bsp.: „https://192.168.5.2“).
Folgt ein Hinweis einer unsicheren Verbin-
dung, kannst du diese bestätigen.
2. Bei der Initial-Anmeldung musst du als Benutzerna-
me „admin“ und das Passwort auf der Rückseite unter
dem Punkt "Web-Interface" eingeben.
Detaillierte Informationen ndest du in der
Betriebsanleitung im Kapitel „Initial-Anmeldung
Weboberäche“.
1. Open your Internet browser and enter the host name
in the address line.
You can nd the host name (https://HDM...) on
the back of this document under "Web Interface".
Alternatively, you can also enter the IP address
recognized by your router in the address line (e.g.:
"https://192.168.5.2").
If a message about an insecure connection
follows, you can conrm this.
2. During the initial login you have to enter "admin" as
username and the password on the back side under
the item "Web interface"..
Detailed information can be found in the
operating manual in the chapter "Initial login web
interface".
Hier ndest du unsere Tutorials /
Here you can nd our tutorials
1. Status-LED gelb (Bild 4) - Hotspot-Modus aktiv.
2. Drücke kurz (<1Sek.) die Connect-Taste, Status-LED -
gelb/grün.
3. Betätige die WPS-Taste an dem Router.
4. Status-LED blinkt grün - Verbindung hergestellt.
1. Status LED yellow (Fig. 4) - Hotspot mode active.
2. Press the Connect button briey (<1sec), status
LED - yellow/green.
3. Press the WPS button on the router.
4. Status LED ashes green - connection esta-
blished.
Einrichten über WLAN und WPS /
Setting up via WLAN and WPS
WPS
Konguration Conguration
1. Status-LED gelb (Bild 4)- Hotspot-Modus aktiv.
2. Suche mithilfe deines Smartphones oder Computer
nach dem WLAN-Netzwerk der Wallbox (Bsp.: "HDM-
SMART-xxx") und stelle die Verbindung her.
3. Dein Passwort ndest du auf der Rückseite dieses
Dokuments unter dem Punkt "WiFi Access"
4. Status-LED blinkt gelb - Verbindung mit Wallbox
hergestellt.
5. Öffne deinen Internet-Browser und trage "192.168.0.1"
in die Adresszeile ein und bestätige. Verbinde dich
nun mit deinem bevorzugten Netzwerk.
6. Status-LED blinkt grün - Verbindung zwischen Wall-
box und deinem Netzwerk hergestellt.
1. Status LED yellow (Fig. 4) - Hotspot mode active.
2. Use your smartphone or computer to search for
the wallbox's WiFi network (e.g.: "HDM-SMART-
xxx") and establish the connection.
3. You will nd your password on the back of this
document under "WiFi Access".
4. Status LED ashes yellow - connection with
wallbox established.
5. Open your Internet browser and enter 192.168.0.1
in the address line and conrm. Now connect to
your preferred network.
6. Status LED ashes green - connection between
wallbox and your network established.
Manuelle Eingabe WLAN /
Manual WLAN entry
Durch das aktivierte DHCP auf deiner Wallbox wird die
Netzwerkverbindung automatisch hergestellt.
Due to the activated DHCP on your wallbox, the
network connection is automatically established.
Einrichten über LAN Schnittstelle /
Setting up via LAN interface
 Loading...