Wallbox connect.solar
Einbinden PowerMeter 63 / Integration PowerMeter 63
Wallbox connect series
Modbus
Download:
Modbus ist ein sehr verbreitetes und
exibles Protokoll, das für die Kommu-
nikation und Steuerung zwischen ver-
schiedenen Geräten in einem lokalen
Energiemanagement verwendet wird.
Die Befehle und Daten jedes Geräts
sind in sogenannten Registern organi-
siert. Das Ampered Wallbox Modbus
Register-Layout ist im Downloadbe-
reich auf unserer Website veröffentlicht.
Modbus is a very common and
exible protocol used for com-
munication and control between
different devices in a local energy
management. Each device has its
commands and data organized in
so-called registers. The Ampered
Wallbox modbus register layout is
published in the download area of
our website.
Die Ampered Wallbox der connect series kann somit
über LAN oder WLAN mit dem Modbus TCP-Protokoll
gesteuert werden. Beispielsweise ist ein Home Energy
Management System (HEMS) in der Lage, das Laden mit
der Ampered Wallbox zu steuern, wenn das Ampered
Modbus Register-Layout im HEMS implementiert ist.
Ampered unterstützt alle Gerätehersteller, die unser
Register-Layout implementieren möchten. Bitte wenden
Sie sich hierfür an.
The Ampered Wallbox of the connect series can thus
be controlled via LAN or WLAN with the Modbus TCP
protocol. For example, a Home Energy Management
System (HEMS) can control charging with the Amper-
ed Wallbox if the Ampered modbus register layout is
implemented in the HEMS.
Ampered supports all device manufacturers who want
to implement our register layout. Please contact
for this.
Download:
WALLBOX INSTALLIEREN /
INSTALL
Installiere die Wallbox und verbinde sie mit dem vorhande-
nem Netzwerk.
Install the wallbox and connect it to the existing network.
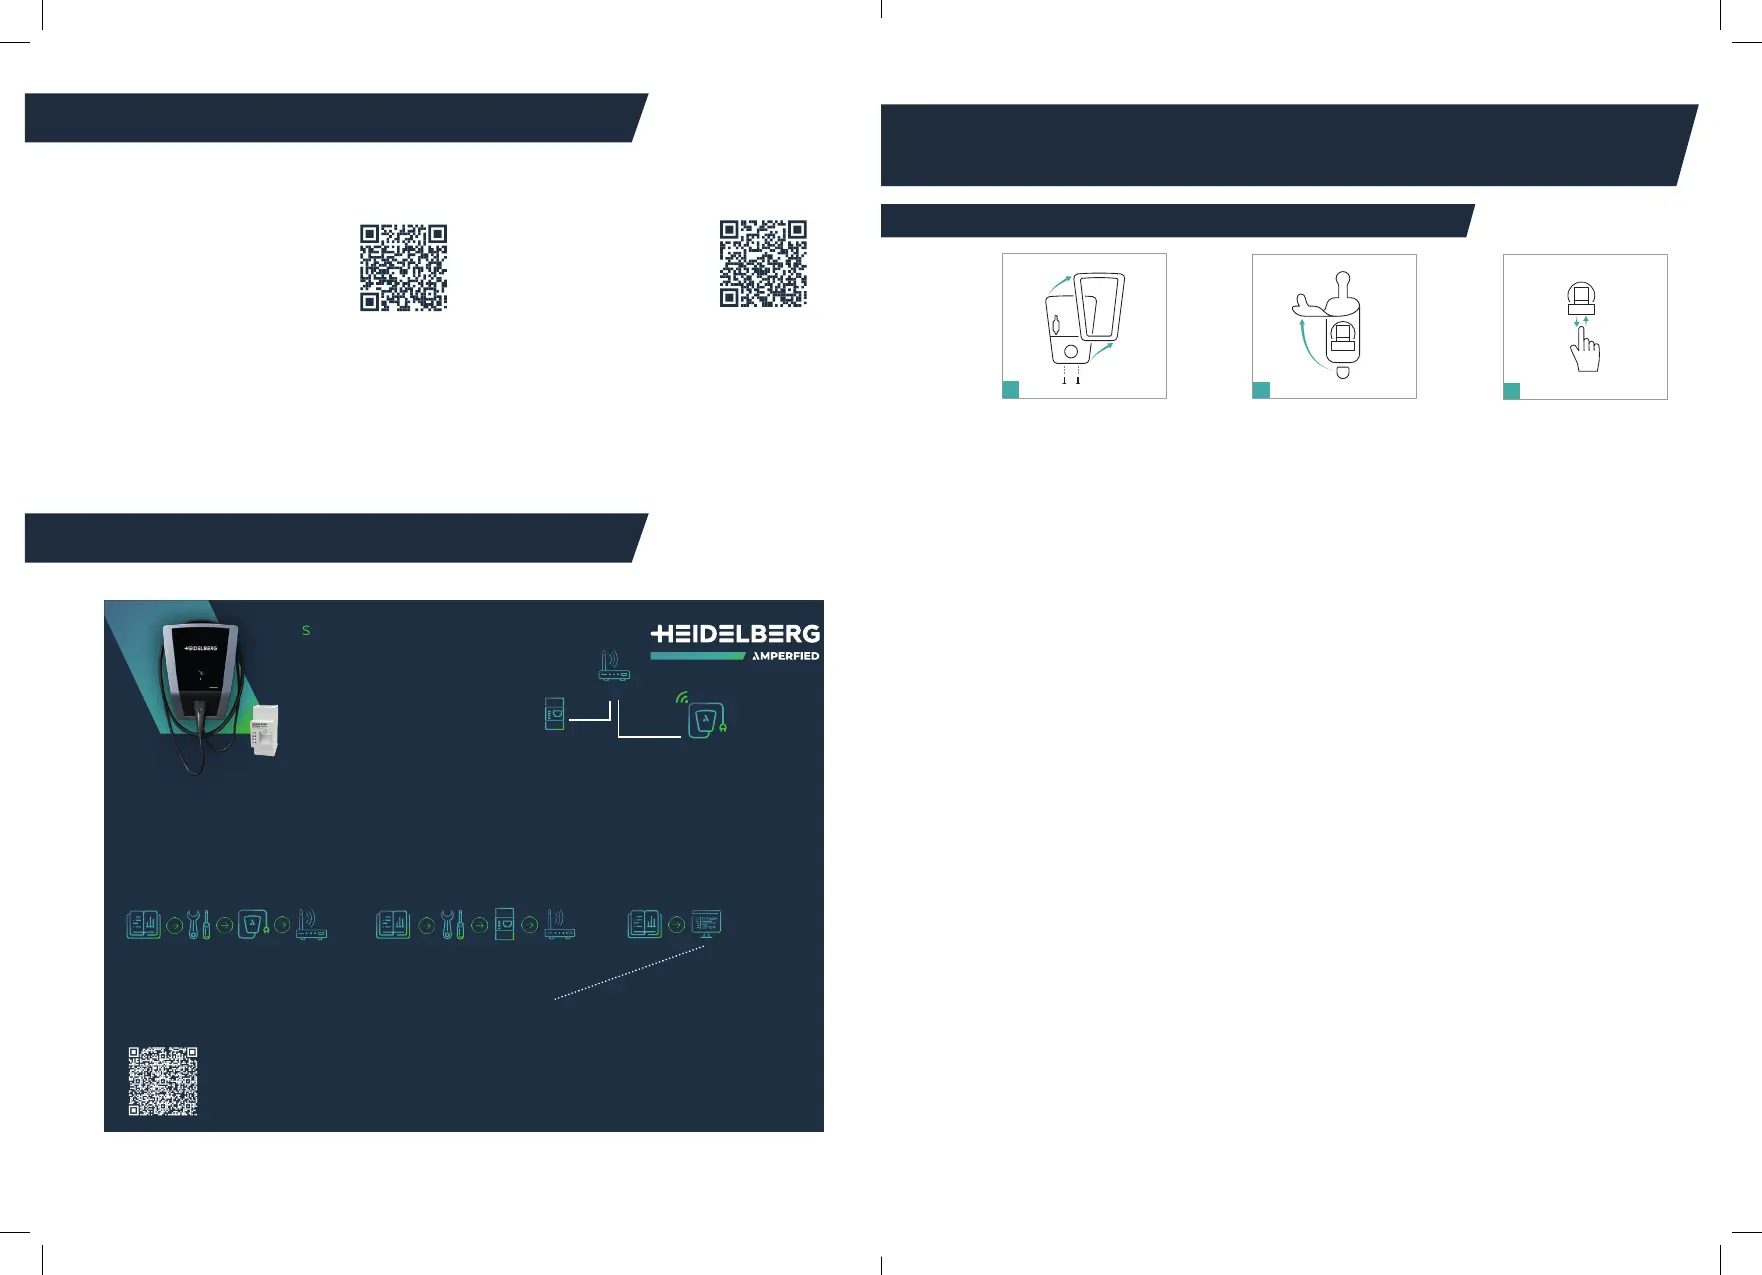
01
SO VERBINDEST DU DIE WALLBOX
MIT DEM POWERMETER 63!
HIER GEHT ES ZUM TUTORIAL
FÜR DIE INSTALLATION.
CLICK HERE FOR THE
INSTALLATION TUTORIAL.
02
POWER METER 63 INSTALLIEREN /
INSTALL
Installiere das PowerMeter 63 und binde es per LAN im
vorhandenem Netzwerk ein.
Install the PowerMeter 63 and integrate it into the
existing network via LAN.
03
POWER METER 63 VERBINDEN /
PAIRING
Verbinde die Wallbox mit dem PowerMeter 63 mithilfe
der Weboberäche.
Connect the wallbox to the PowerMeter 63 using the
web interface.
WIE KOMME ICH ZUR WEBOBERFLÄCHE? /
HOW DO I GET TO THE WEB INTERFACE?
Auf der Rückseite der mitgesendeten Zusatzanleitung ndest Du die Zugangsdaten (URL, Nutzername und Passwort), mit
denen Du Dich im Login-Bereich der Weboberäche anmelden kannst. Unter dem Reiter „External measuring instrument“
kannst Du alle Einstellungen rund um den PowerMeter 63 vornehmen.
On the back of the additional instructions you will nd the access data (URL, user name and password) with which you
can log in to the login area of the web interface. Under the „External measuring instrument“ tab, you can make all settings
relating to the PowerMeter 63.
PowerMeter 63
Router
LAN
Wallbox
WiFi
LAN (optional)
HOW TO CONNECT THE WALLBOX
TO THE POWERMETER 63!
Wallbox connect.home / Wallbox connect.business / Wallbox connect.solar
Integrierter
RCD-Typ A / Integrated RCD-Type A
• Löse die zwei Schrauben und ent-
ferne die Abdeckung
• Unscrew both screws and remove
the cover
• Dévisse les deux vis et retire le
couvercle
• Desatornillar los dos tornillos y
retirar la tapa
• Allentare le due viti e rimuovere la
copertura
• Draai de twee schroeven los en
verwijder de afdekking
• Desaperte os dois parafusos e retire
a cobertura
• Odkręć dwie śruby i zdejmij
pokrywę
• Разхлабете двата винта и свалете
капака
• Uvolněte oba šrouby a sejměte kryt
• Λύστε τις δύο βίδες και αφαιρέστε το
κάλυμμα
• Keera kaks kruvi lahti ja eemalda
kate
• Avaa kaksi ruuvia ja poista suojus
• Otpusti dva vijka i ukloni poklopac
• Lazítsa meg a két csavart, és vegye
le a fedelet
• Atsukite du varžtus ir nuimkite
uždangą
• Atskrūvējiet divas skrūves un
noņemiet pārsegu.
• Deșurubați cele două șuruburi și
scoateți capacul
• Uvoľnite dve skrutky a odoberte
kryt
• Odvijte oba vijaka in odstranite
pokrov
• Lossa de två skruvarna och ta bort
kåpan
• Løsn de to skruer, og fjern afdæk-
ningen
• Öffne die linke Gummidichtung
• Open the left rubber seal
• Ouvre le joint en caoutchouc
gauche
• Abrir la junta de goma de la
izquierda
• Aprire la guarnizione in gomma
di sinistra
• Open de linker rubber afdichting
• Abra a vedação de borracha
esquerda
• Otwórz lewą uszczelkę gumową
• Отворете лявото гумено
уплътнение
• Otevřete levé pryžové těsnění
• Ανοίξτε το αριστερό λάστιχο
στεγανοποίησης
• Ava vasak kummitihend
• Avaa vasen kumitiiviste
• Otvori lijevu gumenu brtvu
• Nyissa ki a bal oldali gumitömítést
• Atidarykite kairį gumos sandariklį
• Atveriet kreiso gumijas blīvējumu.
• Deschideți garnitura de etanșare
din cauciuc din stânga
• Otvorte ľavé gumové tesnenie
• Odprite levo gumijasto tesnilo
• Öppna den vänstra gummität-
ningen
• Åbn den venstre gummipakning
• Spannungsversorgung über den
RCD Typ A wieder einschalten
• Switch the power supply back on
via the RCD type A
• Remettre l'alimentation en tension
via le RCD de type A
• Volver a conectar la alimentación a
través del RCD tipoA
• Riattivare l’alimentazione di tensio-
ne mediante RCD tipo A
• Schakel de spanningsvoorziening
via de RCD type A weer in
• Volte a ligar a alimentação de
tensão através do RCD Tipo A
• Ponownie włączyć zasilanie
napięciowe wyłącznikiem RCD
typu A
• Включете отново захранването
през RCD тип A
• Znovu zapněte napájení pomocí
proudového chrániče typu A
• Ενεργοποιήστε ξανά την τροφοδοσία τάσης
μέσω του RCD τύπου A
• Lülita toitepinge varustus RCD
tüüp A uuesti sisse
• Kytke jännitesyöttö takaisin päälle
RCD tyypin A avulla
• Ponovno uključi opskrbu naponom
putem RCD tip A
• Kapcsolja be újra a tápegységet az
A típusú RCD-n keresztül
• Per A tipo RCD vėl įjunkite maitini-
mo įtampą
• Ieslēdziet atpakaļ sprieguma pade-
vi, izmantojot Atipa RCD
• Restabiliți alimentarea cu energie
prin intermediul dispozitivului de
deconectare de protecție RCD tip A
• Znovu zapnite zdroj napätie cez
RCD typu A
• Ponovno vklopite napajanje s
stikalom RCD tipa A
• Tillkoppla spänningsmatningen
med jordfelsbrytaren typ A på nytt
• Tænd for strømforsyningen igen
via RCD type A
1
2
3
 Loading...