Do you have a question about the Heininger PortablePet 3048 and is the answer not in the manual?
Read instructions, follow recommendations, and use the product only for its intended use.
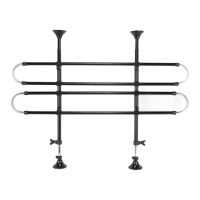
Verify all parts are included: 2 Rungs, 4 Feet, 2 Vertical bars, 2 Vertical Adjusters.
Scan QR code for installation video and call toll-free for assistance.
Insert vertical tubes through the plastic brackets during initial assembly.
Connect the bottom of each vertical bar to a foot, repeating for the second bar.
Attach the two remaining feet to the top of the two vertical bars.
Center the assembled Pet Partition within the vehicle as illustrated.
Ensure rungs are level, then adjust height using knobs and secure lower adjustment by turning counter-clockwise.
Tighten the phillips screw in the vertical plastic bracket to lock the rung position securely.
Details the two-year warranty coverage, limitations, and claim procedures for the PortablePET product.
Links to follow on Facebook and Twitter, and contact details for inquiries.
| Material | Polyester |
|---|---|
| Color | Black |
| Features | Adjustable straps |
| Safety Features | Seat belt loop, Non-slip bottom |
| Ventilation | Mesh sides for breathability |
| Additional Features | Portable |
| Product Type | Portable Pet Booster Seat |