The Hella Gutmann SEG IV (8PA 007 732-301 and 8PA 007 732-311) is a headlight aiming device designed for inspecting and configuring various headlight systems, including DE, FF, LED, and XENON headlights. It is a mobile beamsetter that can also be permanently installed with optional rails. The device ensures accurate headlight adjustment in compliance with national road traffic regulations and ISO 10604 standards.
Function Description:
The primary function of the SEG IV is to precisely measure and adjust the aim of vehicle headlights. It features a Fresnel lens that projects the headlight beam onto an inspection screen, allowing technicians to evaluate the cut-off line, main beam position, and light intensity. The device is equipped with a digital light meter (Luxmeter) to check the maximum permissible glare value for dipped beams and ensure the main beam's illuminance levels are within specified minimum and maximum ranges. A laser positioning aid assists in accurately aligning the beamsetter with the vehicle's headlights.
The SEG IV supports the adjustment of different headlight types:
- Symmetrical Dipped Beams: The cut-off line should be horizontal across the screen, and the main beam's center should align with the center marking.
- Asymmetrical Dipped Beams: The cut-off line follows the dividing line on the test surface, with a sharp angle running vertically through the center marking. The bright center of the light beam should be closer to the near side.
- Fog Lamps: The cut-off line should be horizontal across the screen.
- Special Long-Range Headlamps (Auxiliary Driving Lamps): The middle of the light beam must lie on the center marking.
- Separate Main Beam Modules (e.g., bi-xenon headlamps): These are set according to manufacturer instructions, which may vary.
The device's cutting-edge test screen allows for the inspection and configuration of vehicles with special high beam advanced driver assistance systems, with scaling in degrees for diagnostic tester input (angular minutes or percent).
Important Technical Specifications:
- Models:
- Type 8PA 007 732-311: Headlight aiming device with rubber castors, laser sight, digital light meter, laser positioning aid, and eccentric axle.
- Type 8PA 007 732-301: Headlight aiming device with rubber castors, broad-band sight, digital light meter, and laser positioning aid.
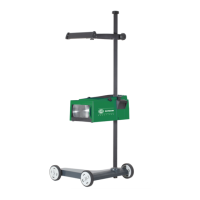
- Components:
- Column
- Sight holder
- Broad-band sight with clamping screw (for 8PA 007 732-301)
- Scaled wheel
- Switch for photoelectric Luxmeter
- Diagnosis mirror with setting wheel
- Fresnel lens
- Operating lever for raising and lowering the beamsetter box
- Base with rubber-covered wheels
- Hand-wheel for locking column
- Adjustment lever for horizontal alignment (8PA 007 732-311 only)
- Set screw with lock nut for temporary horizontal alignment (8PA 007 732-311 only)
- Set screw for permanent horizontal alignment (8PA 007 732-311 only)
- Spirit level for horizontal alignment (8PA 007 732-311 only)
- Luxmeter Reference Values:
- Dipped beam: Main headlamp <= 1.2 Lux
- Main beam: 48-240 Lux for halogen, 70-180 Lux for xenon.
- Laser Positioning Aid: Requires a customary trade monoblock 9V battery (not supplied).
- Floor Area Requirements (ISO 10604):
- Mobile Beamsetters: Even floor surface with irregularities not greater than ± 0.5 mm/m (for passenger cars) or ± 1 mm/m (for commercial vehicles). Minimum car length 4m, commercial vehicle 8.5m.
- Permanently Installed Beamsetters: Rails mounted firmly on the floor, parallel to the vehicle's longitudinal axis. Height difference between rails not greater than 0.5 mm. Rails must lie in contact with the floor along their whole length. Distance between rails: 625 mm.
- Headlight Setting Dimension 'e' (Inclination): Varies by vehicle type and headlight height (e.g., 1.2% for passenger cars, 3.0% for lorries with load floor at rear). 'e' is the cut-off line inclination at 10 meters distance.
- Headlamp Height (H): Height of the center of the headlamp above the floor.
- Test Area Height (h): Height of the dividing line of the test area above the floor.
Usage Features:
- Assembly: The device is assembled by inserting the column into the base, attaching the beamsetter box, sight holder, and hand-wheel. Coloured markings on the column and base ensure correct alignment during assembly.
- Vehicle Preparation:
- Vehicle tires must have prescribed pressure.
- Loading requirements: 75 kg in the driver's seat for cars; commercial vehicles and multi-axle vehicles unloaded; 75 kg in the driver's seat for single-track vehicles.
- Hydraulic/air suspension vehicles: Engine running at medium speed until height stabilizes.
- Automatic headlamp adjustment: Follow manufacturer's instructions.
- Setting Up and Alignment:
- Position the beamsetter in front of the headlamp, aligning the beamsetter box with the middle of the headlamp (within 3 cm horizontally or vertically).
- Distance between beamsetter box and headlamp: 30-70 cm.
- Broad-band sight is used to align the beamsetter box with the vehicle's longitudinal axis.
- Vertical adjustment of the broad-band sight is done by loosening the hand-wheel and moving the sight holder.
- The laser positioning aid projects a red dot onto the headlamp's center or bulb for precise alignment.
- Headlamp Checking and Setting:
- Set the scale wheel according to the adjustment table.
- Switch on the dipped beam, main beam, or fog lamp and adjust using the vehicle's adjustment screws until the beam pattern on the screen matches the prescribed specifications.
- For vehicles with headlamps >140 cm above the floor, specific lines (A, B, C, D, H) must be drawn on a wall 10 meters away for accurate adjustment.
- Luxmeter Usage: Set the scale wheel, press the right button on the light meter, and read the light intensity value to ensure compliance with glare and illuminance standards.
Maintenance Features:
- Lens Cleaning: The Fresnel lens should always be cleaned with a soft cloth and glass-cleaning liquid to prevent scratches, which can distort the projected image.
- Calibration Check: Beamsetters are factory-adjusted and calibrated. However, regular checks using an adjusting machine (e.g., 8 PD 860 757-001) are advisable, especially if the device has been mishandled or knocked over, to ensure continued accuracy. This can be arranged through wholesalers.
- Spare Parts: A comprehensive list of spare parts is available, including hand-wheels, buttons, sights, windows, Luxmeter, Fresnel lens, protective glass panel, wheels, clamping piece, column, and switches, ensuring long-term usability and repairability of the device.