2
2
Instalación General /
General Installation
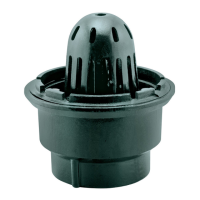
Desenrosque los tornillos hexagonales y retire el anillo
coladera con la cúpula. / Unscrew the hexagonal screws and
remove the ring with the dome.
tornillo
hexagonal
hexagonal
screw
anillo coladera
strainer ring
cúpula
strainer ring
anillo coladera
strainer ring
3
adhesivo
adhesive
adaptador 4"
(no incluido)
4" adapter
(not included)
tubería sanitaria
(no incluida)
sanitary tubing
(not included)
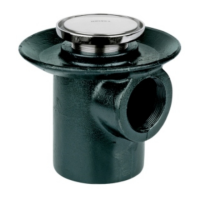
Para el modelo 444, enrosque el cople (no incluido) y conecte
la tubería. / For model, thread the coupler (not included) and
connect tubing.
4
5
Para los modelos 444-X y 446-X, coloque la coladera en el
tubo tisa 4" (no incluido) y retaque con formula 2000 para
sellar; siga conectando tubería Tisa Fofo.
/ For the 444-X and
446-X models, place the strainer on the tisa tube 4 "(not
included) and retake with formula 2000 to seal, continue to
connect Tisa Fofo tubing.
tubo Tisa con
campana 4"
(no incluida)
4" Tisa tube
with hood
(not included)
tubería Tisa Fofo
(no incluida)
Tisa Fofo tubing
(not included)
90°
90°
6 7
Nivele como se muestra.
/ Align as shown.
relleno de compresión
compression stuffing
pendiente
slope
Rellene con tezontle al nivel indicado, de acuerdo a su
instalación. / Fill with tezontle at the level indicated
according to your installation.
Coloque el relleno de compresión y realice pendiente hacia
coladera. / Place the compression filler and slope toward the
strainer.
tezontle
muro piso inferior
lower floor wall
tezontle
muro piso inferior
lower floor wall