EasyManua.ls Logo

Henny Penny HMR-103 User Manual

Henny Penny HMR-103
8 pages
To Next Page IconTo Next Page
Page #1 background imageLoading...
Page #1 background image
Model HMR-103,104,105,106,107
To remove the heated merchandiser from the carton, you should:
1. Carefully cut banding straps.
2. Open flaps of carton and remove packing.
3. Lift carton from unit.
4. Remove four bolts mounting the merchandiser to the skid.
5. If installing the unit on a merchandiser base, use existing bolts to
mount unit.
6. Unpack doors, cutting board, and pan supports, and install.
7. The heated merchandiser is now ready for location and setup.
203 2-1
SECTION 2. INSTALLATION
2-1. INTRODUCTION
This section provides the installation instructions for the Henny
Penny Heated Merchandiser.
Installation of this unit should be performed only by a qualified
service technician.
Do not puncture the heated merchandiser with any objects
such as drills or screws as component damage or electrical
shock could result.
2-2. UNPACKING
The Henny Penny Heated Merchandiser is tested, inspected and
expertly packed to ensure arrival at its destination in the best possible
condition. The unit has been bolted to wooden skid. All items have
been packed and taped inside of the unit. The unit is then packed
inside a triple wall corrugated carton with sufficient padding to with-
stand normal shipping treatment.
Any shipping damage should be noted in the presence of the
delivery agent and signed prior to his or her departure.
Question and Answer IconNeed help?

Do you have a question about the Henny Penny HMR-103 and is the answer not in the manual?

Henny Penny HMR-103 Specifications

General IconGeneral
BrandHenny Penny
ModelHMR-103
CategoryFood Warmer
LanguageEnglish

Summary

Introduction and Unpacking

Unit Introduction

Provides an overview of the installation section and general safety notices for the Henny Penny Heated Merchandiser.

Unpacking the Merchandiser

Detailed steps for safely removing the merchandiser from its shipping carton and skid, including checking for damage.

Electrical Connection and Safety

Power Connection Details

Specifies power requirements, NEMA plug types, and voltage/phase configurations for the merchandiser.

Electrical Safety Precautions

Highlights critical safety warnings regarding grounding, shock hazards, and bonding for CE marked equipment.

Electrical Data Table

Merchandiser Electrical Specifications

Comprehensive table detailing voltage, amperage, and wattage for various Henny Penny merchandiser models and configurations.

Cabinet Dimensions

Profile Views and Widths

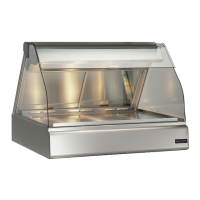
Illustrations of different merchandiser profiles (Curved, Flat, Vision, Advantage) and a table of unit widths by well count.

Center Glass Installation

Center Glass Installation Steps

Step-by-step guide for installing the center glass panel on combination, self-serve, and standard merchandisers.

Side Glass Installation

Side Glass Installation Procedure

Instructions for installing the side panel glass, including securing it with the retainer plunger.

Related product manuals