Page 7For technical questions, please call 1-888-866-5797.Item 58607
General Instructions for Use
TO PREVENT SERIOUS INJURY FROM
INJECTION: Wear ANSI-approved eye protection
and heavy-duty work gloves during use.
1. Make sure that the Trigger is in the
off-position, then attach the Battery Pack.
2. Prime Gun by simultaneously squeezing
the Trigger and opening the Air
Bleed Valve to expel any air pockets.
3. If grease will not flow, then air pockets likely remain:
a. Pull back on the Follower Rod Handle until
the Follower Rod is fully extended.
b. Open Air Bleed Valve and pull Trigger
repeatedly to pump grease through the Valve.
c. Push Follower Rod back into Grease Tube.
4. Clean the grease zerk fitting of the object to
be lubricated carefully and completely with
a clean cloth prior to attaching the Grease
Gun’s Coupler onto the zerk fitting.
5. Attach the Coupler by pressing it straight onto
the clean grease zerk fitting. Make sure that
the Coupler is fully seated on the zerk fitting.
WARNING! TO REDUCE THE RISK OF SERIOUS
INJURY FROM INJECTION:
It may be necessary to hold the Coupler in place
on the zerk fitting while lubricating. While wearing
heavy-duty work gloves, hold the end of the
hose by the spring guard only. Keep hands
away from exposed rubber part of hose.
6. Squeeze the Trigger several times or
until a small amount of grease begins to
flow out of the greased bushing.
7. If maximum PSI is exceeded, grease will come out of
the Pressure Relief Valve, indicating a line blockage.
If tool continues to run while blocked, the motor
will overload and tool will stall. To clear blockage,
see ‘Clearing Contaminants’ on page 6.
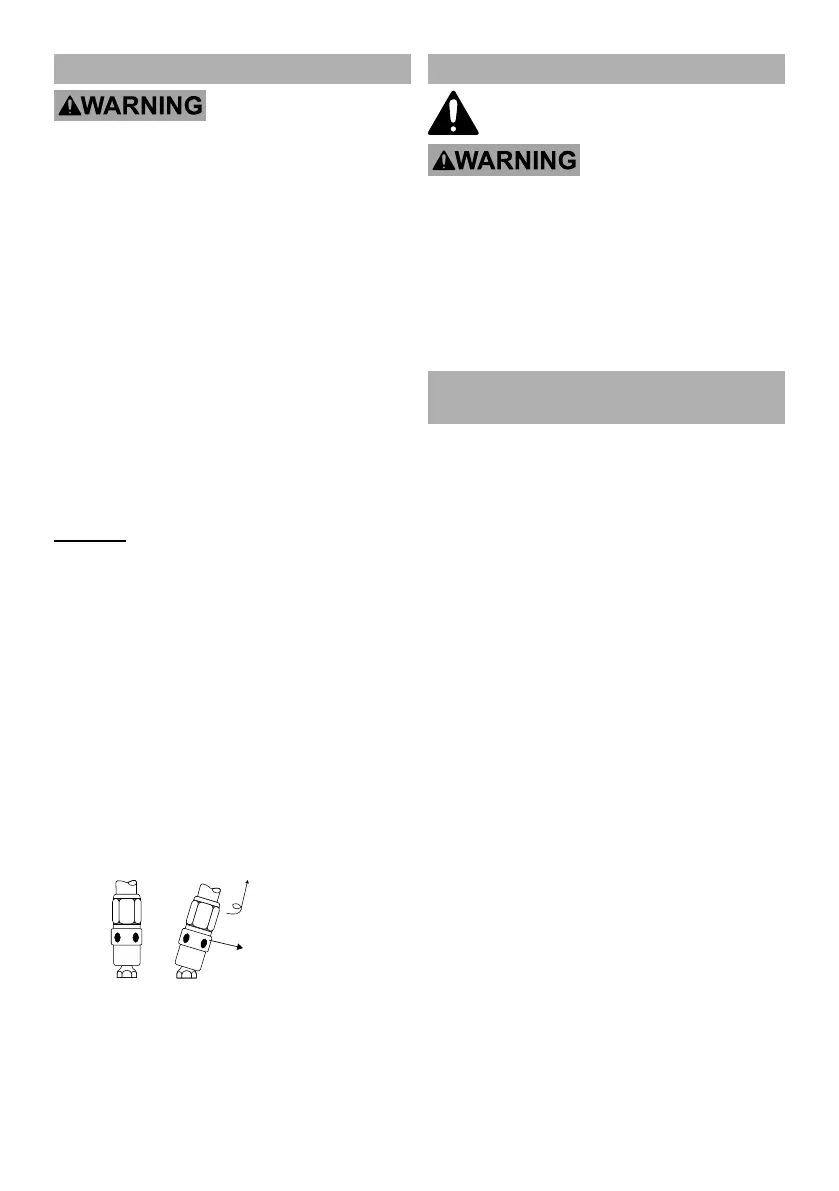
8. When greasing is complete, lock Trigger Lock,
then tilt Coupler, twist nozzle of grease gun,
and pull back to remove from zerk fitting.
(See below.) Wipe any excess grease from
exterior of the grease fitting and Coupler.
To Remove:
Tilt, Twist & P
9. To prevent accidents, turn off the tool and
remove its Battery Pack after use. Clean, then
store the tool indoors out of children’s reach.
Maintenance and Servicing
Procedures not specifically explained
in this manual must be performed
only by a qualified technician.
TO PREVENT SERIOUS INJURY FROM
ACCIDENTAL OPERATION:
Make sure that the Trigger is locked and
Battery Pack is removed before performing
any procedure in this section.
TO PREVENT SERIOUS INJURY
FROM TOOL FAILURE:
Do not use damaged equipment.
If abnormal noise or vibration occurs, have
the problem corrected before further use.
Cleaning, Maintenance,
and Lubrication
1. BEFORE EACH USE, inspect the general
condition of the tool. Check for:
• leaking, swollen, or cracked battery pack
• loose hardware
• misalignment or binding of moving parts
• cracked or broken parts
• any other condition that may
affect its safe operation.
2. AFTER USE, wipe external surfaces
of the tool with clean cloth.
3. Li-Ion BATTERY MUST BE RECYCLED OR
DISPOSED OF PROPERLY.
Do not short, incinerate or open battery.
4. Disconnect Battery Pack and store Battery Pack,
Charger, and Tool in dry, indoor area out of
reach of children and away from metal objects
(i.e., paperclips, coins) to prevent shorting.
 Loading...