EasyManua.ls Logo

hernest HEFTCF-6012 - User Manual

hernest HEFTCF-6012
19 pages
Print Icon
To Next Page IconTo Next Page
Loading...
IMPORTANT, RETAIN FOR FUTURE REFERENCE: READ CAREFULLY.
Coffee Table
ASSEMBLY INSTRUCTIONS
Seller SKU: HNFTCT-60101
Seller SKU: HNFTCT-60102
Seller SKU: HNFTCT-60105
Seller SKU: HNFTCT-60107
HEFTCF-6005 HEFTCF-6006
HEFTCF-6018 HEFTCF-6019
HEFTCF-6039 HEFTCF-6040
HEFTCF-6012 HEFTCF-6013
WYAJ-VERSION 2.0
Question and Answer IconNeed help?

Do you have a question about the hernest HEFTCF-6012 and is the answer not in the manual?

Summary

Assembly Instructions

Explosion Diagram Overview

Visual representation of all parts and their assembly sequence for the coffee table.

Step 01: Initial Component Assembly

First stage of assembly involving parts W84, W1, W2, W59, and drawer components.

Step 02: Assembling the Box Frame

Assembly of the primary box structure using parts B15 and B16 with fasteners W113.

Step 03: Constructing the Side Unit

Building a side compartment structure using parts B8, B4, B9, B5 with various fasteners.

Step 04: Integrating Vertical Supports

Connecting vertical panels B10, B17, B6, B7 to the base B8 and side unit B10.

Step 05: Attaching Drawer Slides

Installing drawer slides W8 and fasteners W28 onto the assembled side and vertical structures.

Step 06: Assembling Upper Frame Section

Connecting upper structural components B12, B11 to the base B8, B6, B10 with fasteners.

Step 07: Integrating Side Structures

Combining side panels B4, B5, B9 with the upper frame section B11, B12, B8, B6, B10.

Step 08: Combining Main Cabinet Sections

Assembling the main cabinet structure by joining previously built sections.

Step 09: Attaching Top Surface Supports

Installing support structures B7, B17, B8, B6, B4, B12, B11, B5, B9 onto the main base B3.

Step 10: Connecting Rolling Storage Units

Attaching wheeled storage units B15, B16, B17, B6 to the main cabinet structure.

Step 11: Installing Drawer Fronts;Doors

Attaching drawer fronts or doors (B26) using hinges W74 and fasteners W28.

Step 12: Assembling Drawers

Assembling the drawer boxes using parts B18, B19, B20, B21, B22, B23, B24, B25.

Step 13: Installing Lifting Mechanism

Mounting the lifting mechanism W62(L) and W62(R) using fasteners W28.

Step 14: Final Assembly and Completion

Attaching the top surfaces B1 and B2 to complete the coffee table assembly.

Overview

This document provides assembly instructions for a coffee table from the brand "hernest". The manual is identified as WYAJ-VERSION 2.0.

Function Description:

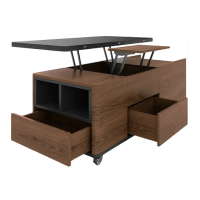
The device is a coffee table designed for household use. It appears to feature multiple storage compartments, including drawers and open shelves, and a lift-top mechanism, suggesting versatility in its use as a surface for drinks, a workspace, or for storage. The assembly process involves constructing the main body of the table, integrating various panels, and attaching hardware for the lift-top and drawers.

Important Technical Specifications:

The manual lists several Seller SKUs and corresponding HEFTCF part numbers, indicating different models or configurations of the coffee table:

  • Seller SKU: HNFTCT-60101 corresponds to HEFTCF-6012 and HEFTCF-6013.
  • Seller SKU: HNFTCT-60102 corresponds to HEFTCF-6005 and HEFTCF-6006.
  • Seller SKU: HNFTCT-60105 corresponds to HEFTCF-6018 and HEFTCF-6019.
  • Seller SKU: HNFTCT-60107 corresponds to HEFTCF-6039 and HEFTCF-6040.

The assembly requires various components, including:

  • Screws: W1 (1512, 48 pcs), W2 (840, 48 pcs), W3 (840, 48 pcs), W113 (738, 12 pcs), W84 (435, 12 pcs), W28 (3.514, 64 pcs), W59 (4*15, 20 pcs).
  • Hardware: W74 (4 pcs), W63 (5 pcs), W358 (2 pcs), W62(L) (left lift mechanism, 1 pc), W62(R) (right lift mechanism, 1 pc), W8 (3 pcs).
  • Panels: B1, B2, B3, B4, B5, B6, B7, B8, B9, B10, B11, B12, B15, B16, B17, B18, B19, B20, B21, B22, B23, B24, B25, B26. The quantities for these panels vary, with most being 1, 2, or 3 pieces.

The estimated installation time is 30-60 minutes, and two installers are recommended. A screwdriver is needed but not included.

Usage Features:

The coffee table's design suggests several usage features:

  • Lift-top mechanism: Components W62(L) and W62(R) indicate a lift-top feature, allowing the tabletop to be raised, potentially for dining, working, or easier access to hidden storage. This feature enhances the table's versatility, transforming it from a standard coffee table to a functional surface at a more ergonomic height.
  • Multiple storage options: The presence of numerous panels (B1-B26) and the explosion diagram reveal a design with various storage compartments. These include:
    • Drawers: Panels B18, B19, B20, B21, B22, B23, B24, B25 are clearly identified as components for constructing drawers, providing enclosed storage for items.
    • Open shelves: The design also shows open compartments, likely formed by panels such as B15, B16, B17, B7, B10, B11, B12, B4, B5, B6, B8, and B9, which can be used for displaying decorative items or storing frequently accessed objects.
    • Hidden storage: The lift-top mechanism often conceals a storage area beneath the main tabletop, offering discreet storage for clutter.
  • Mobility/Stability: The inclusion of W63 (5 pcs) suggests the possibility of casters or feet, which would determine whether the table is designed for mobility or stationary stability. The diagram on page 5 shows W63 attached to the bottom panel B3, implying it functions as a foot or a caster, though its exact nature (fixed foot or rolling caster) isn't explicitly stated.
  • Modular Assembly: The step-by-step instructions (Steps 01-14) indicate a modular assembly process, where sub-assemblies (like drawers or side compartments) are built first and then integrated into the main structure. This approach simplifies the installation and ensures proper alignment of components.

Maintenance Features:

The manual primarily focuses on assembly and does not explicitly detail maintenance features. However, general maintenance practices for furniture of this type would apply:

  • Cleaning: Regular dusting and wiping with a damp cloth would likely be sufficient for general cleaning. Specific cleaning instructions for the material (wood, laminate, metal) would depend on the actual product materials, which are not specified in this document.
  • Hardware checks: Given the presence of numerous screws and a lift-top mechanism, periodic checks to ensure all screws are tight and the lift mechanism operates smoothly would be advisable to maintain the table's stability and functionality. The instruction to "fully tighten screws only once all pieces which are correctly assembled" suggests that initial tightening is crucial for long-term stability.
  • Protection: The "Notice" section advises placing a carpet on the floor before unpacking to avoid scratching the item, implying that the table's finish may be susceptible to scratches during handling and assembly. This suggests that users should be mindful of protecting the surface during use.
  • Repair/Replacement: While not explicitly mentioned, the detailed component list would be useful for identifying and ordering replacement parts if any components are damaged or lost.

In summary, this coffee table is a versatile piece of furniture with significant storage capabilities and a functional lift-top, designed for relatively straightforward home assembly.

hernest HEFTCF-6012 Specifications

General IconGeneral
Brandhernest
ModelHEFTCF-6012
CategoryIndoor Furnishing
LanguageEnglish