QUICK START GUIDE OXYMO
1. CONNECTION TO AN OXYGEN CYLINDER
Check the oxygen cylinder (1) is closed. Connect the
pressure regulator (2) (in the figure, Hersill P-300).
Open the cylinder valve slowly. Check for leaks and that
the cylinder has enough oxygen (the arrow points to the
green area).
Connect the regulator OXYMO P-15 MICRO (3) to the
cylinder regulator.
Do not connect the OXYMO device to any other
regulator than the OXYMO P-15 MICRO
Connect the spiral hose to the regulator OXYMO P-15
MICRO.
Connect the other terminal of the spiral hose to the inlet
connection of the unit.
Insert batteries (back door of the device) and/or connect
de AC/DC adapter. Turned-
on by pressing the yellow
button. During the boot sequence the display will blink
three times and the buzzer will beep
Does not turn on OXYMO with nasal cannula connected
to the patient .
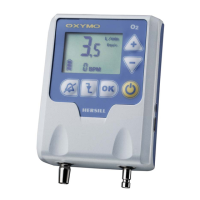
After powering on, the display shows the last flow
setting (in the figure, 3.5 L/min).
To set a different value: Press the buttons + / - (if the
keyboard is blocked, the flow cannot be changed)
To confirm the set: Press the button OK..
Connect the nasal cannula to the inlet connection of the
device and to the patient.
Check that with each breath, a bolus of oxygen is
released: you can see on the screen the symbol
To properly detect inspiratory effort, intranasal
should not be too thin (HERSILL advised to be flared-
tipped)
To switch off the device:
Press the button ON / OFF.
Confirm by pressing OK.