EasyManua.ls Logo

Hills Portable 170 - User Manual

Hills Portable 170
16 pages
Print Icon
To Next Page IconTo Next Page
Loading...
Product Manual
PortableTM
Indoor Outdoor Clotheslines
TO SUIT MODELS:
Portable
TM 170
PortableTM 120
Question and Answer IconNeed help?

Do you have a question about the Hills Portable 170 and is the answer not in the manual?

Summary

Safety Information

Safety Warnings and Precautions

Important safety advice for operation and handling, including warnings about movement and misuse.

Assembly Guide

Hinge Rotation for Opening

Instructions for rotating the hinges to the open position, ensuring the latch clicks securely.

Attaching Legs to Hinge Assemblies

Detailed steps for fastening the leg tubes to the hinge assemblies using nuts and screws.

Attaching Leg Brace

Securing the leg brace to the leg assemblies using countersunk screws for structural support.

Positioning the Clothesline

Guidance on turning the assembled clothesline upright and positioning it on the ground.

Attaching Drying Arms

Instructions for attaching the arms to the hinge assemblies with correct orientation for drying.

Attaching and Securing the Clothes Line

Steps for threading the line through tensioners and sleeves, and initial tie-off.

Line Tensioning

Line Tensioning and Adjustment

Procedure for adjusting line tension, including removing caps and re-tying lines.

Operation

Folding and Unfolding Operation

Instructions on how to safely fold and unfold the portable clothesline for storage and use.

Accessories

Hanging Bracket and Door Adaptor

Information on using the included hanging bracket and door adaptor for convenient storage.

Usage and Maintenance

Hills Handy Usage Hints

Tips for efficient drying of various items like towels, sheets, and quilts on the clothesline.

Care and Maintenance Guide

Recommendations for inspecting, cleaning, and maintaining the clothesline for longevity.

Hills Smart Pegs Information

Details about the features and availability of Hills Smart Pegs for clothes.

Warranty and Support

Hills Product Warranty Details

Comprehensive warranty terms, conditions, and duration for the portable clothesline.

Hills Customer Contact Information

Contact details for customer service, support, and inquiries across different regions.

Overview

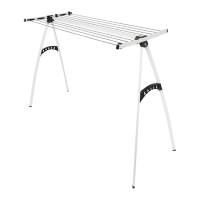
The Hills Portable Clothesline is an indoor/outdoor clothesline designed for efficient drying. It is available in two models: Portable™ 170 (10 line) and Portable™ 120 (8 line).

Function Description:

The device serves as a portable clothes drying rack, suitable for both indoor and outdoor use. It features multiple lines for hanging laundry and a foldable design for convenient storage. The clothesline is designed to be stable when in use and can be easily moved by lifting it from the floor.

Important Technical Specifications:

The manual does not provide specific technical dimensions or weight capacities, but it does list the components included in the carton and accessory pack, along with fastener descriptions.

  • Carton Contents:

    • Spreader and hinge assembly: 1
    • Arm assembly: 2
    • Leg assembly - LH: 2
    • Leg assembly - RH: 2
    • Leg brace: 2
    • Hanging bracket: 1
    • Door adaptor: 1
    • Line: 2
    • Accessory pack: 1
  • Accessory Pack Contents:

    • Cover cap: 4
    • Cover cap tool: 1
    • M6 x 12 low profile screw: 4
    • M6 x 16 countersunk screw: 8
    • M6 x 30 button head screw: 4
    • M6 Nyloc nut: 4
    • Door adaptor screw: 1
    • Hex key - 4mm: 1
  • Fastener Descriptions:

    • M6 x 12 low profile screw
    • M6 x 16 countersunk screw
    • M6 x 30 button head screw
    • M6 nyloc nut (always ensure nyloc nut is screwed on as shown)

Usage Features:

  • Assembly: The clothesline is designed for quick and easy assembly. Key steps include:

    • Rotating Hinges: Hinges are rotated into an "open" position by pulling out a latch until it "clicks" into place.
    • Attaching Legs: Legs are attached to the hinge assemblies using M6 Nyloc nuts and M6 x 30 button head screws. Correct leg orientation is crucial, ensuring threaded inserts for the leg brace face each other.
    • Attaching Brace: The leg brace is attached to the threaded inserts in the legs using M6 x 16 countersunk screws.
    • Attaching Arms: Arms are located into recesses in the hinge assemblies and fastened with M6 x 12 low profile screws, ensuring the curve of the arms faces upwards.
    • Attaching Line: The line is fastened to the innermost line tensioner by fitting a cover cap, inserting the line through the front slot, looping it around the rear groove, and pulling it tight. The line is then fed through line sleeves, ensuring all lines are parallel, and tied off to the outer line tensioner. It is important not to overtighten the line to avoid distorting the frame.
    • Line Tensioning: Cover caps are fitted by rotating clockwise using the provided tool until a slight "click" is felt. Excess line is trimmed flush with the end of each cover cap. For re-tensioning, cover caps are removed by rotating anti-clockwise, the existing line is untied, and the attachment steps are repeated.
  • Folding and Unfolding:

    • Folding: To fold, pull the latch out firmly while supporting and rotating the legs up and around until the latch "clicks" back into place, locking the legs closed. Repeat for the other end. The folded product can then be stored vertically.
    • Unfolding: Simply unlatch each leg and rotate it into the locked open position.
    • Safety during folding/unfolding: Always ensure hands are positioned to provide support and avoid being caught in moving parts. Check that legs are not caught in the lines before unfolding.
  • Storage:

    • Hanging Bracket: A hanging bracket is included for convenient storage. It can be fastened to a wall or vertical surface using appropriate fasteners (not supplied).
    • Door Adaptor: The hanging bracket and door adaptor can be used over most doors. Place the bracket and adaptor over the door, ensuring the clothesline is centered and does not contact door handles or furniture when the door is opened/closed. Secure the door adaptor to the top of the door with the provided small screw. Check for clearance between the top edge of the door and door frame before fixing.
  • Handy Hints:

    • For heavy or large items (towels, sheets, quilts), place them over inner lines, leaving outer lines for smaller objects.
    • Spread the load over two lines for better air circulation and faster drying.
    • Sheets can be folded in half and dried over two lines.
    • Quilts can be laid over the clothesline and pegged at the ends/corners to keep them off the floor.
    • Balance the weight of washing evenly on both sides.
    • The clothesline can be used almost anywhere but should be secured in strong wind conditions or placed in a protected area.
    • The braces supporting the legs include holes for additional hanging space.
    • Place pegs over clothing seams to avoid or minimize peg marks.

Maintenance Features:

  • Regular Inspection: Periodically inspect all components for wear, tear, or damage.
  • Part Replacement: If any damage is found, replace parts with original Hills spares or repair the Portable Clothesline before further use.
  • Cleaning: Wipe the clothesline clean periodically with a damp cloth and mild detergent.

Safety Warnings:

  • Moving the Clothesline: Do not push or pull the clothesline across the floor to avoid breakage of legs. Lift it completely from the floor (may require two persons) to move it, preventing injury or damage.
  • Children and Pets: Do not allow children or pets to swing on the clothesline or laundry items.
  • Hands during Operation: Ensure hands are positioned for support and not caught in moving parts when opening and closing.
  • Intended Use: Do not use the clothesline for any purpose other than hanging and drying washing.
  • Damaged Parts: Do not use the clothesline if parts are worn or damaged.
  • Choking Hazard: Small parts are a choking hazard. Not for children under 3 years. Not to be used as a toy.

Warranty:

Hills provides a 3-year warranty for the Portable Clothesline from the date of purchase, and a 1-year warranty for polycore line. The warranty covers faults arising from defects in workmanship or materials. Hills will repair, replace, or supply equivalent goods, or pay the cost of these remedies. The warranty does not cover damage from transit, abuse, accident, improper installation, or use not in accordance with instructions. Unauthorized additions or attachments also waive the warranty. Consumers in Australia have additional rights under the Australian Consumer Law.

Hills Portable 170 Specifications

General IconGeneral
BrandHills
ModelPortable 170
CategoryOutdoor Furnishing
LanguageEnglish