English
5
SPECIFICATIONS
Voltage (by areas)*
1
(120 V, 127 V, 220 V, 230 V, 240 V)
Power Input*
1
2000 W (127 V), 2200 W
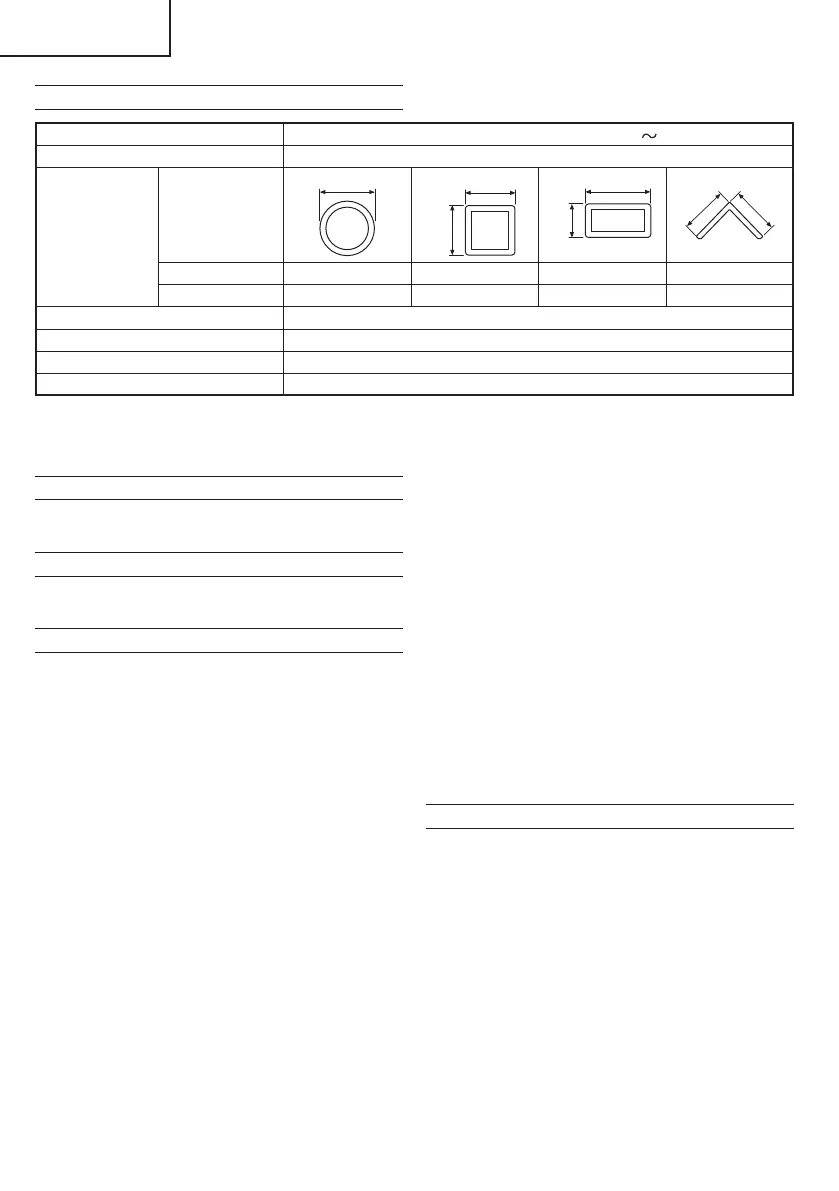
Max. cutting
dimensions*
2
Height × width
Shape of material
to be cut
A
A
A
B
A
A × B
A
A
Cutting angle 0° 130 mm 120 mm 95 mm × 200 mm 137 mm
Cutting angle 45° 115 mm 104 mm 115 mm × 104 mm 100 mm
Cut-off wheel ø355 × ø25.4 × 4 mm (Reinforced resinoid cut-off wheel)
No-load speed 3800 / min
Max. working peripheral speed 4800 m / min
Weight (Only main body) 17.0 kg
*1 Be sure to check the nameplate on product as it is subject to change by areas.
*2 The maximum cutting dimensions are the permissible cutting dimensions when the cut-off wheel is not remarkably worn by
cutting material.
STANDARD ACCESSORIES
(1) Cut-off wheel ................................................................1
(2) Hex. bar wrench ...........................................................1
APPLICATION
Cutting of various metallic materials such as pipes, round
bars and shaped steel.
PRIOR TO OPERATION
1. Power source
Ensure that the power source to be utilized conforms
to the power requirements specifi ed on the product
nameplate.
2. Power switch
Ensure that the power switch is in the OFF position. If the
plug is connected to a receptacle while the power switch
is in the ON position, the power tool will start operating
immediately, which could cause a serious accident.
3. Extension cord
When the work area is removed from the power source,
use an extension cord of suffi cient thickness and rated
capacity. The extension cord should be kept as short as
practicable.
4. Install the machine on a level fl at place, and keep it in
a stable condition. Prior to shipping, the equipment is
subjected to a rigid factory inspection to prevent electric
shocks during operation.
5. Since movable portions are secured by tension of a chain
while in transit, remove the chain from the chain hook by
slightly depressing the switch handle.
6. Ascertain that all cut-off wheels are in perfect condition,
and do not display scars and cracks.
7. Although they have been fully clamped at the factory
prior to delivery, reclamp the clamping nuts securely for
safety.
8. Possible accidents such as a cracked cut-off wheel
is prevented by this protective cover (wheel cover).
Although it has been fully clamped at the factory prior
to delivery, securely reclamp the mounting screws for
safety.
9. When replacing the cut-off wheel, ensure that the
replacement cutting wheel has a designed circumferential
speed in excess of 4800 m/min.
10. Ensure that the bar spanner used for tightening or
removing the cut-off wheel is not attached to the machine.
11. Check that the work piece is properly supported. Ensure
that the material is securely fastened with the vise. If it is
not, a serious accident could be caused if the material
comes loose or the cut-off wheel breaks during operation.
12. Ensure that the abrasive wheel is correctly fi tted and
tightened before use and run the machine at no-load for
30 second in safe position, stop immediately if there is
a considerable vibration or if other defects are detected.
If this condition occurs, check the machine to determine
the cause.
13. Rotate the cut-off wheel to inspect any facial defl ection.
A heavy defl ection will cause the cut-off wheel to shift.
14. Ensure that ventilation openings are kept clear when
working in dusty conditions. If it should become
necessary to clear dust, fi rst disconnect the machine
from the mains supply.
CUTTING PROCEDURES
CAUTION
It is dangerous to remove or install the workpiece while
the cut-off wheel turning.
1. Operating the switch
Switch operations diff er in accordance with the region.
Power will be turned on when the switch is pulled, and
turned off when released. (Fig.2)
<Lock-on Switch Operations>
For models equipped with a switch lock, press the switch
lock when the switch is being pulled to enable operations
to be continued ever after the switch is released. (Fig.2)
2. Cutting
(1) Rotate the cut-off wheel, gently press down the handle,
and bring the cut-off wheel close to the cutting material.
(2) When the cut-off wheel contacts the cutting material,
gently press down the handle further and start cutting.
(3) When cutting (or designated slotting) is completed, raise
the handle and restore it to its original position.
000BookCC14STDSA.indb5000BookCC14STDSA.indb5 2015/01/1415:39:202015/01/1415:39:20


 To Next Page
 Loading...
