EasyManua.ls Logo

Hitachi RAS-D10EX3 - User Manual

Hitachi RAS-D10EX3
26 pages
Print Icon
To Next Page IconTo Next Page
Loading...
–1–
SPLIT TYPE AIR CONDITIONER
MODEL
RAS-D10EX3/RAC-D10EX3
INDOOR UNIT/OUTDOOR UNIT
INDOOR UNIT
Instruction manual
To obtain the best performance and ensure years of
trouble free use, please read this instruction manual
completely.
Manuale di istruzioni
Per garantire la migliore prestazione e la più lunga
durataleggere attentamente e al completo le seguanti
istruzioni
√‰ËÁ›Â˜ ¯Ú‹Û˘
OUTDOOR UNIT
RAC-D10EX3
RAC-D14EX3
RAS-D10EX3
RAS-D14EX3
°È· ÙËÓ Î·Ï‡ÙÂÚË ·fi‰ÔÛË ÙÔ˘ ÎÏÈÌ·ÙÈÛÙÈÎÔ‡
ηÈÁÈ· ÙËÓ Ì·ÎÚÔÚfiÕÂÛÌË ¯Ú‹ÛË ÙÔ˘ ¯ˆÚ›˜
ÚԂϋ̷ٷ, ‰È·‚¿ÛÙ ÚÔÛÂÎÙÈο ·˘Ù¤˜ ÙȘ
Ô‰ËÁ›Â˜¯Ú‹Û˘.
HSILGNE
Page 1~26 Pag. 53~78
™ÂÏ›‰· 79~103
Manualde instrucciones
Para obtener el mejor funcionamiento y asegurar años
de uso libre de problemas, lea cuidadosamente este
manual de instrucciones.
27~52Página
RAS-D14EX3/RAC-D14EX3
Question and Answer IconNeed help?

Do you have a question about the Hitachi RAS-D10EX3 and is the answer not in the manual?

Summary

Safety Precautions

Installation Safety Guidelines

Safety guidelines and warnings to follow before installing the air conditioning unit.

Shifting and Maintenance Safety

Safety measures to observe when moving or servicing the air conditioner.

Operation Safety Precautions

Operational Warnings and Cautions

Critical safety advice for operating the air conditioner, covering warnings and cautions.

Air Conditioner Component Identification

Indoor Unit Parts and Functions

Identifies and explains the components and features of the indoor air conditioning unit.

Outdoor Unit Parts and Functions

Identifies and explains the components and features of the outdoor air conditioning unit.

Indoor Unit Indicators and Controls

Operation Indicator Lights

Explains the meaning and behavior of the unit's indicator lights during operation.

Temporary Switch Operation

Details how to use the temporary switch for operation when the remote is not working.

Indoor Unit Panel Handling

Closing the Front Panel

Instructions for safely closing the front panel of the indoor unit.

Remote Controller Guide

Remote Controller Overview and Buttons

Description of the remote's signal window, display, and basic buttons like START/STOP.

Mode and Fan Speed Selection

How to select operation modes (HEAT, COOL, etc.) and fan speeds.

Timer and Sleep Function Settings

Instructions for setting sleep timers and general timer controls.

Remote Controller Usage Precautions

Important warnings regarding the placement and handling of the remote controller.

Advanced Air Conditioner Functions

Auto Restart and Automatic Operation

Explanation of auto restart feature and automatic mode selection based on temperature.

Heating Operation Mode

Setting and Using Heat Mode

Steps to select and operate the heating mode using the remote controller.

Understanding Defrosting

Explanation of the defrosting operation and its indicators.

Dehumidifying Operation Mode

Setting and Using Dehumidify Mode

Steps to select and operate the dehumidifying mode using the remote controller.

Dehumidifying Function Details

Details on how the dehumidifying function works and its limitations.

Cooling Operation Mode

Setting and Using Cool Mode

Steps to select and operate the cooling mode using the remote controller.

Fan Operation Mode

Using Fan Only Mode

How to use the unit as a simple air circulator.

Extended Airflow Adjustment

How to adjust airflow direction and reach for extended distances.

Air Purifying Operation

Activating Air Purification

How to use the air purifying function to improve air quality.

Airflow Direction Adjustment

Vertical and Horizontal Deflector Control

How to adjust the air deflectors for optimal upward, downward, left, and right air direction.

Setting the Sleep Timer

Configuring Sleep Timer Settings

Step-by-step guide to setting the sleep timer for automatic shut-off.

Cancelling Sleep Timer Reservations

Procedure to cancel any set sleep timer reservations.

Timer Setting Procedures

Setting Current Time and Timer Modes

Guide to setting current time and configuring OFF, ON, and ON/OFF timers.

Cancelling General Timer Reservations

Procedure to cancel any active general timer reservations.

Specific Timer Time Configuration

Setting Turn-Off and Turn-On Times

Steps to set specific times for unit turn-off and turn-on operations.

Setting Combined ON;OFF Timer

Procedure to set both turn-on and turn-off times simultaneously.

Cancelling Specific Timer Reservations

Procedure to cancel any set specific timer reservations.

Remote Controller Battery and Switch Maintenance

Replacing Remote Batteries

Step-by-step guide on how to replace batteries in the remote controller.

Temporary Switch and Circuit Breaker

How to use the temporary switch and manage the circuit breaker.

Optimal Operation Practices

Temperature, Ventilation, and Timer Usage

Advice on temperature, ventilation, and timer use for comfort and efficiency.

Air Filter Cleaning and Special Needs

Importance of cleaning air filters and adjusting settings for babies and children.

User Information and Precautions

Room Heat Sources and Operation Limits

Caution regarding heat sources affecting cooling capability and operation limits.

Long Term Storage and Lightning Safety

Recommendations for storage and safety during lightning.

Electrical Interference Avoidance

Advice to keep the unit and remote away from electrical products to avoid interference.

Air Cleansing Filter Installation

Attaching Air Cleansing Filters

Step-by-step instructions for attaching the air cleansing filters.

Air Conditioner Maintenance Procedures

Cleaning the Air Filter

Procedure for cleaning the air filter to maintain performance and reduce noise.

Servicing Electrical Terminals

Instructions for cleaning electrical terminals, emphasizing safety precautions.

Washable Front Panel Care

Cleaning and Reattaching the Front Panel

Instructions for washing, cleaning, and reattaching the removable front panel.

Long Period Maintenance and Inspection

Preparing for Long Off Periods

Steps to prepare the unit for long periods of non-use.

Regular Inspection Checklist

Periodic checks for electrical safety and structural integrity.

After Sale Service and Warranty Information

Pre-Service Troubleshooting Checklist

Points to check for common issues like remote failure or unit not operating.

Understanding Normal Operation Phenomena

Explanation of normal operational sounds, odors, and minor brightness fluctuations.

Power, Panel, and General Checks

Checks for proper power supply connection and front panel installation.

Overview

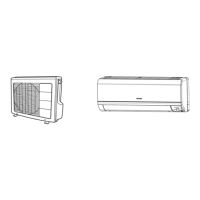
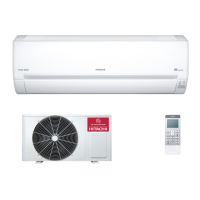
This document describes a Hitachi split-type air conditioner, including its indoor and outdoor units, remote controller, and various operational and maintenance features.

Indoor Unit

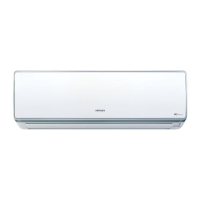
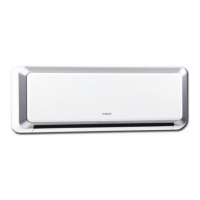
The indoor unit features an air cleansing filter and an air filter to prevent dust from entering. It has a movable front panel that automatically opens during operation and closes when stopped. Horizontal and vertical deflectors control the air outlet direction. Indicators on the unit show the operating condition, and a signal receiving port allows communication with the remote controller.

Outdoor Unit

The outdoor unit has an air outlet, a drain hose for dehumidified water, and piping and wiring connections. Air inlets are located on the rear and left sides. During "Stop" operation, the outdoor fan continues to turn for 10 to 60 seconds to cool electrical parts. In heating mode, condensate or defrost water may flow from the drain port.

Remote Controller

The remote controller operates the indoor unit from up to 7 meters away. It features a signal emitting window, a display showing room temperature, time, timer status, function, and circulation intensity. Buttons include:

  • START/STOP: To begin or end operation.
  • AIR PURIFIER: Activates the air purifying function, generating negatively-charged ions to capture dust.
  • FAN SPEED selector: Adjusts fan speed from AUTO, HI, MED, LOW, to SILENT.
  • SLEEP: Sets the sleep timer.
  • TEMPERATURE buttons: Raises or lowers the temperature setting.
  • TIME: Sets and checks the time and date.
  • RESET: Used after battery replacement or irregular operation.
  • FUNCTION selector: Cycles through AUTO, HEAT, DEHUMIDIFY, COOL, and FAN modes.
  • AUTO SWING: Controls horizontal air deflector swing.
  • EXTENDED AIRFLOW: Pushes air further for extended airflow.
  • TIMER control (OFF-TIMER, ON-TIMER, RESERVE, CANCEL): Manages scheduled operations.

Precautions for Remote Controller Use: Avoid direct sunlight or proximity to heaters. Handle with care to prevent damage from drops or water. After battery replacement, the unit may take about 10 seconds to respond. The outdoor unit has a 3-minute restart delay for protection. Pressing the FUNCTION selector during operation may cause a 3-minute stop for protection.

Various Functions

Auto Restart Control: In case of power failure, the unit automatically restarts with previous settings once power is restored. This feature is not available if a Timer or Sleep Timer mode is set.

Automatic Operation: The unit automatically selects HEAT or COOL based on initial room temperature and adjusts as needed. The monitoring range is ±3°C relative to the preset temperature. If the automatically selected mode is unsatisfactory, it can be manually changed.

Heating Operation: Use when outdoor temperature is below 21°C (not above 21°C to protect the device) and above -15°C for reliability. The fan speed can be set to AUTO, HI, MED, LOW, or SILENT. Defrosting occurs about once an hour for 5-10 minutes when frost forms on the outdoor unit's heat exchanger, with the operation lamp blinking.

Dehumidifying Operation: Effective when room temperature is over 16°C. The fan speed is set to LOW or SILENT. The recommended temperature range for dehumidifying is 20-26°C. If the room temperature is higher than the setting, the unit dehumidifies to the preset level. If lower, it dehumidifies at a slightly lower temperature than current, stopping when the room temperature falls below the setting.

Cooling Operation: Use when outdoor temperature is between -10°C and 42°C. High indoor humidity (over 80%) may cause dew on the air outlet grille. The fan speed can be set to AUTO, HI, MED, LOW, or SILENT. Cooling starts only if the temperature setting is below the current room temperature.

Fan Operation: Functions as an air circulator. Useful for drying the indoor unit at the end of summer. Fan speed automatically adjusts in AUTO mode during cooling/heating.

Extended Airflow: Adjusts airflow direction and speed to reach further distances. If AUTO SWING is active, EXTENDED AIRFLOW cancels it, and vice versa. During stop operation, this button activates a dry function to prevent mold and odor in the heat exchanger.

Adjusting Air Deflectors:

  • Upward/Downward: The horizontal deflector automatically adjusts. Pressing the AUTO SWING button makes it swing continuously; pressing again stops it. Avoid continuous swinging in cooling mode to prevent dew formation.
  • Left/Right: Manually adjust the vertical air deflector by holding it and moving it to the desired position.

Sleep Timer: Sets the unit to turn off after a designated number of hours. The remote controller displays the turn-off time.

ON/OFF Timer: Allows scheduling the unit to turn on and/or off at specific times. The current time must be set for this function.

Maintenance Features

Exchanging Remote Controller Batteries: Remove the cover, take out old batteries, and insert new ones, ensuring correct polarity. Do not mix old and new batteries or different types. Remove batteries if not using the remote controller for 2-3 months.

Temporary Switch: If the remote controller fails, this switch allows starting/stopping operation with the most recently set mode (or automatic mode if power was cycled).

Circuit Breaker: Turn off the circuit breaker when not using the air conditioner for extended periods.

Cleaning and Maintenance: Must be performed by qualified service personnel. Always stop operation and switch off power before cleaning.

Attaching Air Cleansing Filters:

  1. Open the front panel by pulling it up at both sides.
  2. Remove the filter by pushing up claws and pulling it out.
  3. Attach air cleansing filters to the filter frame by gently compressing sides and releasing after insertion. Do not bend the filter.
  4. Attach the filters with "FRONT" facing front, then push the front panel at three arrow points to close. Note: Air cleansing filters may slightly reduce cooling capacity and speed; use "HIGH" fan speed if needed. Do not operate without filters.

Cleaning the Air Filter:

  1. Open the front panel and remove the filter, gently lifting the air cleansing filter from the frame.
  2. Vacuum dust from both filters. For heavy dust, rinse the air filter under running tap water and gently brush. Air dry in shade.
  3. Re-insert the air cleansing filter, then the air filter with "FRONT" facing front, and close the front panel. Caution: Do not wash with hot water (above 40°C) or expose to direct sun. Do not use detergent on the air cleansing filter.

Servicing Electrical Dust Collector's Electrical Terminals:

  1. Stop operations and remove power.
  2. Remove the front panel.
  3. Use a dry toothbrush to remove dirt from the electrical terminals.
  4. Re-install the front panel and restore power. Caution: Do not touch terminals during operation. Prevent water contact.

Washable Front Panel:

  1. Remove the front panel by holding both sides, pushing the right arm inward, and pulling it forward while slightly closing the panel. Wash with clean water and a soft sponge, using neutral detergent if needed.
  2. Wipe the front panel and remote controller with a soft dry cloth. Ensure no water remains on indicators or signal receiver.
  3. To reattach, align projections of the arms with flanges in the unit and insert into holes. Caution: Do not splash water on the unit. Do not use hot water, benzine, gasoline, acid, thinner, or a brush.

Regular Inspection

Qualified service personnel should check the following points every six months or annually:

  • Earth line connection.
  • Stability and rust of the outdoor unit mounting frame.
  • Firmness of the power plug in the socket.

After Sale Service and Warranty

Troubleshooting:

  • Remote controller not transmitting: Check batteries and polarity.
  • Unit not operating: Check fuse, voltage, circuit breaker, and operation mode setting.
  • Poor cooling/heating: Check air filter, outdoor unit sunlight exposure/obstruction, open doors/windows, heat sources, temperature setting, and air inlet/outlet blockages. Check if fan speed is "LOW" or "SILENT."

Notes:

  • Slight refrigerant flowing noise or rubbing noise from the fan casing are normal.
  • Odors may be emitted due to accumulated smoke, foodstuffs, or cosmetics; clean filters and evaporator regularly.
  • Contact your sales agent for service, providing model, production number, installation date, and fault description.
  • Ensure power supply is at rated voltage.
  • Supply cord damage requires replacement by authorized service centers.
  • Slight brightness fluctuation in room light on startup is normal.
  • Ensure front panels are properly installed if movable panels are not moving.

Hitachi RAS-D10EX3 Specifications

General IconGeneral
Cooling Capacity2.8 kW
Heating Capacity3.2 kW
Power Supply220-240V, 50Hz
RefrigerantR410A
Weight (Outdoor Unit)28 kg
Coefficient of Performance (COP)3.61
TypeSplit System
Noise Level (Outdoor)50 dB(A)

Related product manuals