Do you have a question about the HiVi DIY3.1-A and is the answer not in the manual?
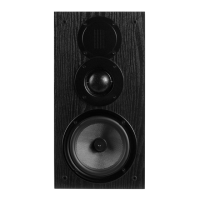
| Configuration | 3-way |
|---|---|
| Impedance | 8 ohms |
| Type | Bookshelf |
| Woofer Size | 6.5 inches |
| Tweeter | 1 inch dome |
| Frequency Response | 20kHz |
Detailed list of electronic and acoustic components included in the DIY speaker kit.
List of pre-cut wooden panels for speaker enclosure assembly.
Includes cushioning materials for drivers and the terminal box.
Lists screws, fasteners, wires, tape, and branding elements for assembly.
Guide to gluing and joining the main enclosure panels and internal division.
Instructions for using clamps and allowing the glued enclosure to dry properly.
Steps for smoothing panels and applying wood veneer for a finished look.
How to attach retainers and threaded inserts to the enclosure panels.
Placement of the crossover board and acoustic stuffing inside the enclosure.
Instructions for applying glue and fitting the bass reflex tube.
Wiring the crossover input to the terminal box lugs, ensuring correct polarity.
Connecting and mounting the tweeter, midrange, and woofer drivers.
Gluing fabric to the grill frame, attaching threads, and optionally adding the logo.
Attaching rubber feet and the branding label to the completed speaker.
Final step indicating the speaker is ready for use.