9 10
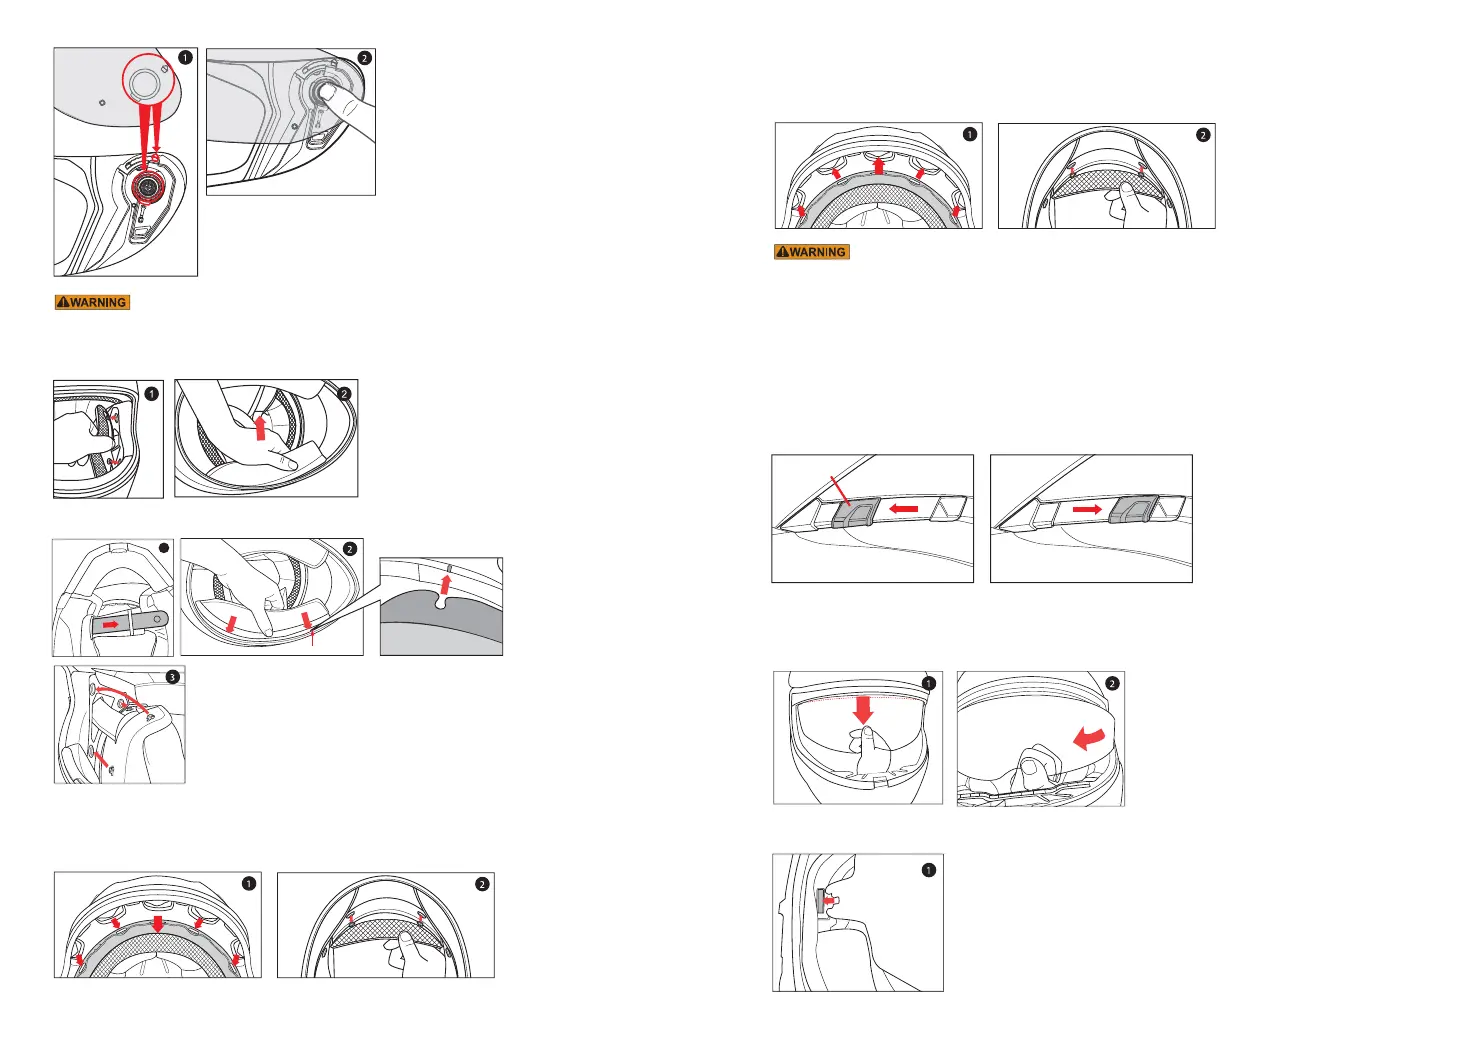
Shield Installation
Cheek Pad Removal
Cheek Pad Installation
1. Align and insert the top of the
shield guide into the plate-gear
guide.
2. With the guides properly
aligned, press the lower
section of the shield into
the plate-gear mechanism.
The locking tab should
pop into position, locking
the shield into place.
Always check to make sure helmet pads are installed before using the helmet. A helmet with missing or improperly installed
pads may increase your risk of serious injury or death in an accident.
There are 3 snaps holding the cheek pad in place.
1. Gently pry the check pad away from the interior, releasing
the snaps.
2. Grasp the cheek pad near its center and gently pull it free
from the chin strap.
1. Feed the chin strap through the opening in the cheek pad.
2. Align and fully slide the cheek pad plastic plate between shell and EPS.
3. Clip the cheek pad’s 3 small male snaps to the 3 female snaps fixed on the shell interior.
Crown Pad Removal
Position of tap holder
1. Grasp the crown pad fabric as close as possible to its plastic base and pull/pry away from the helmet. Notice how
the crown pad plastic section aligns with the shell plastic sleeve. This will help orient you with the reinstallation.
2. Repeat same at rear.
※Slide tab 'A' from the cheek
pad into the holder 'B'.
(Repeat same on opposite
side)
Crown Pad Installation
1. Install the front section first by aligning the plastic shell base and the crown pad plastic sleeve, ensuring that the center
and side holes are properly aligned. Press the crown pad plastic sleeve (center portion) into the center of the channel
which is built into the plasticshell base, working your way outward to each side.
2. Align and snap the two rear snaps into place.
Try not to operate the sunlight film while riding as this may impair your vision and may lead to an accident.
DO NOT pull on the sunlight film when it is already down. The sunlight film may be ejected and this will increase
the risk of serious injury or death in the event of an accident.
Do not attempt to adjust the sunlight film itself with your hands. Always use the sunlight film lever.
DO NOT use sunlight film at night time. The sunlight film is only for day time use. The sunlight film does not provide
eye protection. When you use the sunlight film be sure that the clear visor is also in closed position
Above illustration shows raised
sunlight film position.
Above illustration shows lowered
sunlight film position.
Sunlight film Operation
Sunlight film Removal
1. While sunlight film is in lower position, gently pull it until you see the top of the sunlight film.
2. Gently pull one side of the sunlight film as arrow indicates (repeat same for other side).
Sunlight film Installation
1. Insert sunlight film tab 'A' into 'B' position.(Repeat same on opposite side)
※When installing the sunlight film, be sure to have it slided behind
the tap ‘B’ holder.
A
B
1
Lever