EasyManua.ls Logo

Hobie Adventure Island - User Manual

Hobie Adventure Island
8 pages
Print Icon
To Next Page IconTo Next Page
Loading...
1. Using an Allen key wrench, unscrew the bolt that is passing
through that handle and pull the handle off of the control arm shaft.
2. Push the control arm shaft in so that it falls in the hull. Reach inside the hull and grab the control
arm to take both of the lines off of it. This part is to be removed from the hull as it won’t be needed
anymore. Also, untie the bungee cord and loop of line from the small spectra lines.
3. Plug the hole that is created with the push in cap that is
included with this kit.
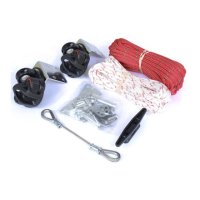
As you start sailing your Hobie Mirage Adventure Island in more challenging conditions, you may
require more force to keep the rudder locked in the down position. This rudder lock upgrade kit will
allow you to apply more holding power for the rudder. To install this new system you will be removing
the up/down handle that you are currently using. Follow the instructions below for the kit installation.
2007 Adventure Island Rudder “T” Handle Kit
4. To install the new tubes and lines, you
will need to partially disassembly the rud-
der housing. Start by loosening the screws
and unwrapping the lines completely from
the two screws on the underside of the rud-
der and the one screw on top of the rudder
near the main bolt.
5. Pull on the lines that exit the hull so that they completely pull
out of the rudder housing.
Question and Answer IconNeed help?

Do you have a question about the Hobie Adventure Island and is the answer not in the manual?

Summary

Rudder Housing Disassembly and New Line Routing

Install New Rudder Lines and Tubes

Install new tubes with lines into the hull holes, tapping gently to seat them.

Separate Rudder Housing Halves

Unthread the central bolt to separate the rudder housing components.

Cleat and Pulley Installation

Install Cleat on Kayak

Use cleat holes as a guide to drill two 11/64” holes and bolt the cleat in place.

Attach Padeye Fitting

Place the padeye fitting over the cleat and through-bolt it to the kayak.

Attach Pulleys to Kayak

Through-bolt the two pulleys inside the kayak using existing or kit hardware.

Final Line Connections and Operation

Connect Lines to Handles

Feed the line ends through the "T" handles and tie a knot close to the ends.

Cinch Lines to Rudder Loops

Form a cinch around the rudder lines using the knots tied at the rear hatch.

Test Rudder Operation

Pull right handle to lower, left handle to raise rudder; cleat for down position.

Hobie Adventure Island Specifications

General IconGeneral
Hull ConstructionRotomolded Polyethylene
Width (with amas in)9' 6" / 2.9 m
Hull Weight75 lbs / 34 kg
Capacity400 lbs
Mast Length15' 2" / 4.62 m
Rudder SystemKick-Up
SeatVantage CT
StorageTwo 8" Twist and Seal Hatches
Mirage DriveMirageDrive 180
Fully Rigged Weight120 lbs

Related product manuals