This document describes the HOFFEN Bagless Vacuum Cleaner, model ACD610R, designed for domestic use. It provides instructions for assembly, operation, maintenance, and troubleshooting, ensuring users can maximize its performance and longevity.
Function Description
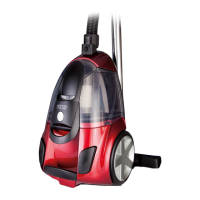
The HOFFEN ACD610R is a high-suction bagless vacuum cleaner that utilizes a combination of different filters and a cyclone effect to effectively clean various surfaces in your home. Its primary function is to aspirate dust and debris, contributing to a simpler and healthier living environment. The appliance is equipped with a transparent dust container, allowing users to easily monitor when it needs to be emptied. It also features an automatic thermal shutoff system to prevent overheating, enhancing safety during operation.
Important Technical Specifications
- Supply Voltage: 230V~50Hz
- Power: 700W
- Filter System: HEPA
- Suction Power: 120 Watts
The HEPA (High-Efficiency Particulate Air) filter is a key component of its filtration system. This washable filter is designed to capture small particles from the exhausted air, making the air cleaner. The HEPA material used in this model is approximately 98% efficient in removing airborne particles. The appliance also includes a motor protection filter and an exhaust filter, both contributing to its comprehensive filtration capabilities.
Usage Features
The vacuum cleaner is designed for ease of use and versatility across different cleaning tasks.
Assembly:
- Flexible Hose: Insert the flexible hose (P) into the entry (O) at the front of the main housing until a click sound is heard.
- Telescope Metallic Tube: Attach the handle (G) to the telescope metallic tube (J).
- Adjustable Tube Length: Adjust the telescope tube (J) by sliding the button (K) forward and pulling out the lower part to the desired length. Release button (K) to lock the length.
- Accessories: Select the appropriate accessory (L, W, or X) based on the surface type and connect it to the end of the telescope tube (J).
Operation:
- Power Cord: Unwind the supply cord (S) until the yellow mark is visible, indicating the ideal cable length. Do not unroll beyond the red mark, which indicates the maximum length, to avoid damage. Connect the plug to a wall socket.
- Switch On/Off: Turn on the appliance using the on/off button (E).
- Suction Power Regulation: Adjust the suction power using the regulator valve (H) on the handle (G). It is recommended to keep the valve open when vacuuming curtains to prevent excessive suction and close it for hard floors. Push the valve forward to open and backward to close.
- Transport: Lift the appliance by the carriage handle (C).
- Switch Off: Press the on/off button (E) and remove the plug from the wall socket.
- Disassembly After Use: Disconnect the flexible hose (P) by pressing the flexible hose button (Q) and pulling it out.
- Cord Rewind: Automatically rewind the supply cord (S) by pressing button (B).
Multifunction Brush (L):
The multifunction brush features a button (M) to free or retract its bristles, adapting to different floor types.
- Hard Floors: Use the brush with bristles extended to prevent scratching and ensure smooth gliding.
- Carpets and Mats: Use the brush with bristles retracted for a smoother glide.
Emptying the Dust Container (N):
The transparent dust container allows easy monitoring of its fill level (up to the "MAX" mark).
- Preparation: Turn off the appliance (E) and remove the plug from the wall socket.
- Removal: Press the dust container release button (F) and pull the container out by its handle (D).
- Emptying: Place the container over a garbage bin and press the button below the air inlet to release the contents.
- Reassembly: Close the container and place it back into the appliance, ensuring it is properly secured.
Accessory Holder (V):
An accessory holder is provided to store the crevice nozzle (W) and dust brush (X). This holder fits onto the telescope tube (J).
Maintenance Features
Regular maintenance is crucial for the appliance's performance and longevity.
General Cleaning:
- Always disconnect the appliance from the wall socket before any cleaning, assembly, or disassembly.
- Do not use abrasive cleaning agents, scrub pads, alcohol, solvents, or metallic utensils.
- Never immerse the appliance in water or any other liquid.
- Exterior: Clean with a soft, damp cloth and dry with a clean, dry cloth. Ensure no water enters the appliance.
- Wheels (A): Clean any accumulated hair or dirt on the wheels.
Filter Maintenance:
It is recommended to clean the HEPA filter (U) every time the dust container (N) is emptied.
- HEPA Filter (U): The HEPA filter is wrapped with a mesh filter. Remove the mesh filter and wash both filters under running water. Do not use detergents or soap, as they can damage the filter.
- Motor's Filter (T) and Exhaust Filter: These filters can also be washed under running water without detergent or soap.
- Drying: If washed, filters must be completely dry before being placed back into the appliance. Never use them wet or moist.
Filter Replacement:
Filters should be replaced if they become too dirty, stiff, or lose their filtering capacity.
- Motor's Protection Filter (T): Located at the back of the dust container (N). Remove the dust container, pull out the grid by the superior groove, and remove the old filter. Insert a new filter, ensuring it is well fitted, and close the grid.
- Exhaust Filter: Located at the back of the appliance, under the rear grid (R). Press the interlock release grooves to remove the grid, take out the old filter, insert a new one, and replace the grid.
- HEPA Filter (U): Remove the dust container (N), pull out the motor filter grid, and remove the HEPA filter from inside the dust container by turning it anti-clockwise (following the "UNLOCK" arrow). Insert a new filter by turning it clockwise (following the "LOCK" arrow), then replace the motor filter grid and dust container.
Accessory Kit:
An accessory kit is available for purchase under the Electric Co / HOFFEN brand, which includes 1 HEPA filter (U), 1 motor's filter (T), and 1 exhaust filter.
Storage:
- Preparation: Turn off the appliance (E) and remove the plug from the wall socket.
- Cord Rewind: Press button (B) to automatically rewind the supply cord (S), holding the plug to prevent abrupt movement.
- Brush and Tube: Retract the bristles of the multifunction brush (L) and close the telescope tube (J) to prevent damage.
- Vertical Storage: Insert the parking connector (I) into the parking slot on the main body's lower part for vertical storage.
Troubleshooting:
A table is provided in the manual to help identify and resolve common operational issues, such as the appliance not switching on, sudden stops, or weak suction power. For technical issues that cannot be resolved, users are advised to contact customer support or return the appliance to the store of purchase. Repairs should only be performed by qualified professionals.
Safety Instructions:
The manual emphasizes several safety precautions, including checking voltage compatibility, supervising children (appliance is not a toy and should be kept away from children under 8), avoiding contact with liquids, not obstructing air passages, and not vacuuming hazardous materials like incandescent objects or liquids. It also warns against attempting self-repairs and stresses the importance of using only manufacturer-recommended accessories. The appliance is equipped with a thermal shutoff system that activates in case of overheating, requiring the user to clean the appliance and allow it to cool down before restarting.